Waves Soundgrid Tips and Tricks: Part 2

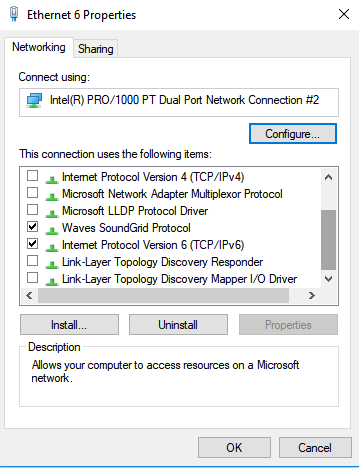
Welcome back to week 2 of our Waves Networking series. Last week we spent a bit of time going over a few extra details regarding setting up your network with the right gear and getting your host OS to play well with the waves soundgrid network (in the form of driver settings). If you missed it, check it out at this link! This week I’m going to be going through three tools that I use to monitor my setup and which help to troubleshoot issues before or during issues that happen within this fragile ecosystem. I’m not going to be talking about troubleshooting this week but stick around until next week. I wanted to spend some time talking about what I’m keeping an eye on so I can spend more time discussing troubleshooting next week and less time defining terms. Let’s dig in!

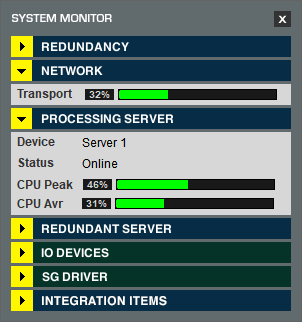
It all starts with the system monitor. In Multirack you can open it as a separate window found in the audio menu. Unfortunately in LV1 there isn’t a a system monitor. There are a few things you can monitor SoundGrid Studio, but you’ll have to rely on the windows task manager for some of this info. From here you can monitor the status of everything in your soundgrid network. There are a few key things to keep an eye on: the first is the transport percentage, the second is the processing server peak and average meters. What you’re looking for here is stability. We don’t want these numbers to be jumping up and down all over the place. They will move and adjust but shouldn’t be jumping too erratically. Side note, I’ve noticed having some reverb plugins in use can cause the cpu peak to jump a bit, as long as you don’t have audio dropouts you should be just fine.

The second tool I use to monitor my setup is the verbose log. In Multirack, go to preferences and on the main tab, there is a checkbox. I believe it’s found in a similar spot in the LV1 software as well as soundgrid studio. I learned about this feature from a waves tech who just wanted me to enable it and send the logs in when the issue I was experiencing happens. Out of curiosity I opened it up (I’d recommend reading it with WordPad as it will organize it better, you cannot open it this way until you turn off the log, use NotePad to monitor while it’s still logging if you want) and started trying to learn what I’m seeing. The software logs any event (i.e. cpu re-organizing on the server, buffer issues, audio dropouts, etc) and attaches a timestamp and mac address with each item. This log won’t always be empty as it logs anything that happens not just bad things. Be sure to utilize the “find” (CTRL + F) function to do a word search. You can search for the term “drop” to see if there have been audio dropouts or search for “buffer” to see if there have been any buffer related incidents and so on. Having a spreadsheet handly of the mac addresses on the network and what they are can be helpful as well as you can then search for those as well. There are a few events that happen that I haven’t found a reason for or a waves tech to explain them to me but most are easy to see and understand. Lots of the log is just the server re-arranging plugins, filesaves, etc. I would encourage you to turn it on and start learning yourself. Even if you don’t have a server, turn the log on so you can start monitoring and learning what’s going on in your soundgrid network.

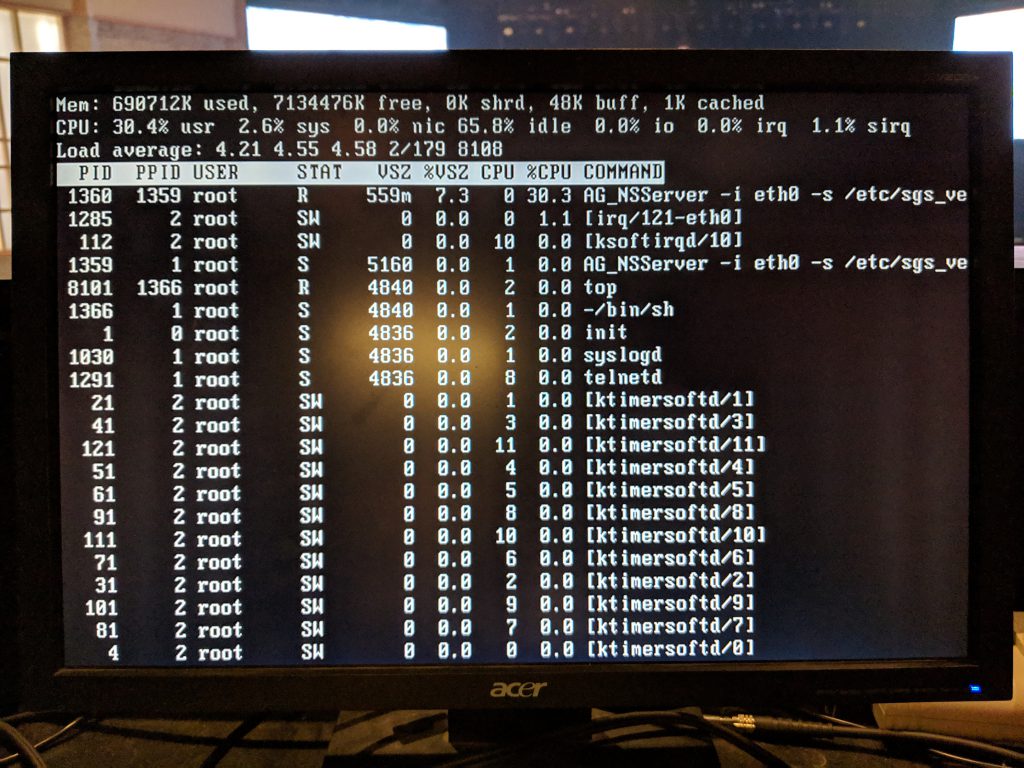
The last tool I use to monitor my network is the “task manager” from the waves server. While there isn’t a GUI persay to the waves server linux software, it is a form of linux. When the boot process completes in the server, you can hit enter and get to the console. From there you can type “top” (which is a task manager baked into most linux OSs) and the console will open up. From here you can see memory usage, cpu usage, and just about anything else you’d want to see. The processes waves is running are the “NG_NSServer” tasks. Usually they are at the top of the list so you shouldn’t have trouble finding them. I’ve noticed that the cpu average meter in the software is a bit off occasionally so if you are really stretching your DSP, using this task manager for cpu monitoring gives you real-time usage info. If you are a knowledgeable linux user you can find some other available commands to expose temperature info and a few other handy items as well. While linux is incredibly difficult to crash, I like having a monitor plugged in and running “top” as it refreshes every second. I can see that it is still running and functioning normally.

That’s it for this week. I hope I’ve inspired a few of you to turn on some of these tools and start monitoring your network. Even spending the littlest amount of time using these tools this week will make next week, the troubleshooting week, a bit easier to follow. You’ll definitely need to utilize all these tools in order to properly identify issues in the future so you may as well get used to using them. If you have any questions about anything I’ve mentioned please feel free to comment below, shoot me a message on facebook, or email me at daniel@studiostagelive.com. If you’d like to receive updates when new content is posted on this site, sign up at this link, and you’ll get an email whenever new content is posted so you can stay up to date. I’d also be curious if any of you have any questions regarding the soundgrid network that I may be able to answer. Leave me a comment here or on facebook and I’ll try to make sure those questions are answered either within a post or a reply to your comment. See you next week!

Waves Soundgrid Tips and Tricks: Part 1

Welcome back to Studio.Stage.Live, where we strive to share and learn from each other regarding any stage of audio production. The series I’m starting today has been inspired by my own struggles recently with my waves rig. As with any outboard processing rig, you always risk issues with connectivity and glitching. Over the last few months we had (finally found the solution, thankfully) been fighting audio dropouts. Through many calls to waves tech support it was clear that even after submitting error logs that they weren’t going to be much help. It’s hard to blame them however because they aren’t on the ground, they don’t support any audio console, and there are so many variables in play it’s just difficult to diagnose. They were however always prompt with responses and never pushed me off a phone call. If you can get your computer hooked up to the internet they are able to remote into the computer and check settings and such and make suggestions for troubleshooting steps, which in many cases may not have directly solved my issues but lead to me discovering the solution. So the impetus to this series is me sharing as many of the setup details and tricks I’ve learned over nearly 5 years of using waves gear in a live environment (multirack or LV1). I don’t currently own an LV1 setup but have several friends who have confirmed that these tricks do apply. It isn’t an exhaustive list but most of this is all stuff I haven’t found in any of the Waves documentation or I’ve seen ignored with dire consequences. All of the problems I’ll be addressing in the coming weeks I’ve personally experienced or assisted someone else to solve.

This week I’m going to cover a few things that you need to do when you setup your network. These few techniques are all things you’ll learn when you call into Waves customer support that they don’t tell you in the setup manuals. The first is the use of Waves certified gear. In this day and age, most switches these days have features that save power or reduce consumption during use. These types of features are pretty detrimental to audio networking. For that reason, Waves has a list, found at this link, of network switches that are best suited for use with their soundgrid network. Most of these are unmanaged switches (there are a few managed ones on there) but they are all gigabit switches. This is the lowest common denominator when it comes to soundgrid networks. Everything must be gigabit. It’s getting harder and harder to not have a gigabit network but there are still a few exceptions when it comes to usb network ports and such. That means that you must have cat5e cables in the least and they add the requirement of having STP cables not UTP. This means the cable must be shielded. Having a shielded cable, for all intents and purposes, eliminates external electronic interference on longer runs or in congested areas. They certify all the way up to cat7 (which is only STP) and when I asked about cat8 they just said that they cannot certify it because they haven’t done testing with it. You can find more information about what they certify in terms of wiring, at this link. It’s important to follow the guidelines for two reasons. One, if you don’t, you’ll likely have network related issues. Two, if you admit you aren’t using their suggested setup, your help from them will basically stop until you comply with their standards. There are enough variables here in regards to switches, cabling, interference, etc that I don’t blame them for this rigid policy. There are switches and cabling at any end of the price range so just order the right stuff and start out right.

This is the part you won’t find in the waves setup guide, proper network adapter setup within windows. I’m not sure how these settings can be set within OSX as we run windows for all of our production machines but if anyone knows how, drop me a comment below and I’ll get this post updated. Because the network ports in computers can be used for so many different protocols it’s incredibly important that you go into your driver settings and shut off every protocol except what you need for multirack to interact with the soundgrid network. Open your settings page (start menu, click on the settings gear), choose the “Network and Internet” page, then click “change adapter options.” This brings you to the traditional network settings page we’re all used to. Right-click on the adapter you are using for soundgrid and click on properties. It should look like the picture I’ve included. Uncheck every item except for “IPV6” and “Waves Soundgrid Protocol.” None of the other options (yes even IPV4) are needed for the soundgrid network. Doing this won’t solve overarching issues but will help to eliminate the small ones. From time to time windows will execute commands in the background related to those unused protocols which can flood the soundgrid network with unnecessary packets which “can” cause issues. It’s best just to turn them off which will only allow IPV6 traffic and traffic related to the Waves applications. It’s worth noting that the waves network, in most situations, should be run on its’ own dedicated network and not be used in conjunction with a larger regular building network.

Lastly, before you close that window, click on the “Configure” button in the properties tab of the adapter in use with soundgrid. This brings up another pages of options for configuring the driver. There will be tabs across the top, choose “Power Management.” Be sure that “Allow the computer to turn off this device to save power” is unchecked. This is one of those power saving things that windows does to be more “green” which can totally hose the waves network. A couple years ago I had a pretty big networking issue that I tracked down to this very setting and even Waves didn’t suggest this one. It was a IT professional friend who knew about this and it’s aggressiveness after a recent windows update.

Hopefully those few setup tips show you something you didn’t already know. Some of them seem a little trivial but believe it or not, I’ve either personally had a problem solved by implementing these steps or I’ve helped someone else solve their issues by doing what I’ve described above. If you have any questions or concerns about our topic this week leave me a message on facebook, comment below, or shoot me a quick email at daniel@studiostagelive.com. Next week we’ll be covering how to properly identify your problem so you can troubleshoot more effectively. If you’d like to receive an email when new posts are up on this blog, follow this link, and sign up for my email! See you next week!

Waves Multirack: Bus Processing

Well it’s the last week of our Waves Multirack series. This week we will be looking at the processing I use with my group busses. On my console, nothing is directly routed to the master. This is done for many reasons but organization and the possibility of group processing is the main reason. For the band inputs everything comes in normally, than is routed to my group busses (i.e. drums, instruments, tracks, vox, and fx), and from there routed to the broadcast master and master bus/aux sub. I don’t do any outboard processing to the FX returns but I do attenuate them in the broadcast mix which is why they are split from their respective groups. However, I do a small amount of group processing on the other four groups which is what I’ll be covering today. Once again, this is what is needed for my situation and is at best a suggestion of a starting place for any other room/PA. Group processing should be very well thought out and carefully considered as decisions made in this arena can have major impacts on your mix as a whole.

My drum bus is pretty empty within waves. I usually just have an NLS Bus plugin on it to complete the NLS chain appropriately within waves. Putting the NLS on the bus simulates the audio actually going through the physical bus of the chosen console and you get some nice summation of all the harmonics you’ve introduced. This does require that you assign each input channel to a VCA and that the bus itself is also assigned to the appropriate vca. Additionally, if I ever feel the need for some group compression to help glue the drum set together I’ll either pull up my SSL Bus compressor built into my console or I’ll pull up the API 2500 or  VComp within waves to pursue that further. More often than not the SSL compressor has the desired results and I can stop there. From time to time I’ll drop in a C6 for F6 and start with some of the mastering presets as a guide and tweak until I find something I like as well.

My instrument and tracks busses are treated the same way. Just an NLS plugin on there to complete the NLS chain and perhaps a compressor as well. I find bus compression on these two groups to often work against my goals for mixing. It works well on drums because I want the group of drums to sound like each other in terms of intensity and attack but with guitars and tracks, I want things to stand out when I mix them that way. I don’t want to be driving my guitar solo into a compressor. Instead I want the guitar to open up and take over. The same goes with my tracks group. If I’m pushing a driving synth into a compressor I’m basically turning everything else down instead of letting the synth grow in power. Instead with these inputs I’m more apt to adjust individual compression settings rather than the bus. But I do have a trick that I use with these two groups: dynamic, frequency based, externally triggered compression. I side chain the vocal group into an F6 that compresses the vocal range out of the instruments and tracks when someone is singing. This helps to create space for the vocals to dominate that space as much as I want. I do this dynamically so that during those solos or big breakdowns, I’m not doing anything to the group but when someone is singing I’m gently clearing the vocal range of other traffic. We aren’t talking big cuts here, between 3 and 5 db will do the trick. I’ve found that when I do this, this allows me to really nestle the vocals down with the band instead of having to push them so far on top. Because the vocals are the loudest by far in just about any mix, this allows me to not need to push them quite as hard to get the clarity that I need for my mix. If you’ve never tried it, just give it a whirl. You can do this with any compressor that can be externally triggered and frequency selected. Remember, we basically want to just attenuate the vocal range out of the instruments and tracks inputs. Here is a link to a chart I reference when I’m setting things up that gives interactive information on the right when you move your mouse around the chart. I would recommend setting your multi-band compressor of choice up, turning it on, and then moving the frequency around a bit and seeing where it’s most effective for you. The content of your mix can really drive where you need to compress to make room for the vocals so take the time to set this correctly and check on it from time to time. 

Lastly, in regards to the vocal bus, there isn’t much else different here except that I have inserted a Q10 to replicate the findings of an X-FDBK run. If you haven’t heard of X-FDBK I’d check it out. You just drop in on the channel or bus that you want to remove feedback from, turn it on, and let it do it’s thing. Now, I usually do this a few times so I can know how far I can push the processor before it goes hog wild and just turn it all down. In my setup I took my lead vocals mic, dropped it in the middle of my room, pointed it back at the PA, and did a feedback run. After getting reliable and consistent results I turned off the plugin and replicated the cuts with a dsp light EQ plugin capable of doing tight slices, in my case, the Q10. This is because X-FDBK uses a lot of active processing because if you want it to, it can remain active. I leave it in line but just disable it so the resources are released. However, before you go live with this on a weekend or during an event you are going to want to A/B it on and off and make sure it’s not making cuts that are heavily noticeable. In my case I created the setting and turned it on and off during a playback recording and found it hard to really notice a difference. What I did notice however is a drastic improvement in feedback protection which has really come in handy. Mileage may vary and from time to time I’ll make another measurement and adjust as necessary to make sure this is never more than it needs to be. Lastly I have the NLS Bus inline to do its thing. You can play with which model you want to use with each bus but it makes more sense to me to stick with one model for all that you process to help glue them together a bit. However, this is really more of an opinion than a sense of right and one. Try both ways and see which works best for you. 

Well that’s it. My last set of suggestions. What ways do you guys/gals improve your mix from a bus standpoint? I am always open to hear new ideas. In fact, a lot of the more unique things that I do, across the whole band, are ideas that I’ve combined and improved from suggestions over the many years I’ve been mixing. Let me know in the comments below or email me at daniel@studiostagelive.com what unique things you do that really help. Lastly, there has been a few asking if they can get my preset files for my whole input list or even my multirack showfile. I will be sending those out to my subscribers here in about a week or so when I get the stuff compiled. If you are not a subscriber please go to this link and sign up. Not only will you get those files but you’ll get an email each week when new content is available on this blog. See you all next time!