Waves SoundGrid: SuperRack Review

When we bought our SSL console about 6-7 years ago we jumped headlong into the Waves ecosystem through the use of Multirack. Over the last year that I’ve been using Waves Multirack and I’d hit a performance peak with it. I was getting more and more glitches through continued use requiring me to keep restarting the software in order to remain stable. I started to report glitches but never got very far with technical support. Then I started to hear rumblings of a Multirack replacement on it’s way. About 6 months after that initial report last fall in late in November, I believe, Waves dropped SuperRack. After several years of using Multirack, I was a bit sad, but also excited at the prospect of new software that hopefully addresses some of the significant issues that I had reported. As soon as I heard the news that it was released I checked my budget and purchased it through the upgrade path for Multirack owners. We keep our update plan going as we use our waves rig on a weekly basis (while it isn’t “critical,” our waves ecosystem greatly reduces the time needed to get the mix dialed in so we consider it a critical system) so the V11 update came free of charge for us so all of our plugins would be compatible with SuperRack.

I had a big Christmas show coming up that I really wanted to use SuperRack with but wanted to get some experience under my belt before I go after it with a big show. So I turned on some playback through my console so I could get this installed, setup, and tested. So over the next few days, I’m not going to lie, I had a rough experience with SuperRack (and using V11 plugins). When I first opened up the software everything seemed great. I had read that you can import Multirack sessions in SuperRack to make the transition a bit easier. Well, that didn’t exactly happen as planned. Not only did I find some significant issues with this import over the next few hours I also ended up repairing the install for my entire waves software suite as there were so many glitches in the plugins. After the repair was complete I decided that it was probably time anyway to clean up my waves showfile so I decided to just rebuild my setup in SuperRack instead of importing. This worked really well. As soon as I completed that, things just started to work. After two weeks of successful stable use I committed to stick with it for the Christmas season and beyond. A few minor versions in things are just getting better.

But I’ve learned a few things for those of you that are about to start using it here are a few tips for the migration process. The new waves central has a repair option, just use it. Secondly, don’t rely on the export/import process. Next, export your presets to files from MultiRack and just import them from your files on the SuperRack side of things instead of migrating them. Lastly, start in SuperRack from scratch. It’s good from time to time anyway to trim away the low hanging fruit, clean out the extras, and rebuild it. Not only does this help you get your feet wet with the nitty gritty in SuperRack but it also forces you to decide whether or not you really need everything you used to have in Multirack.

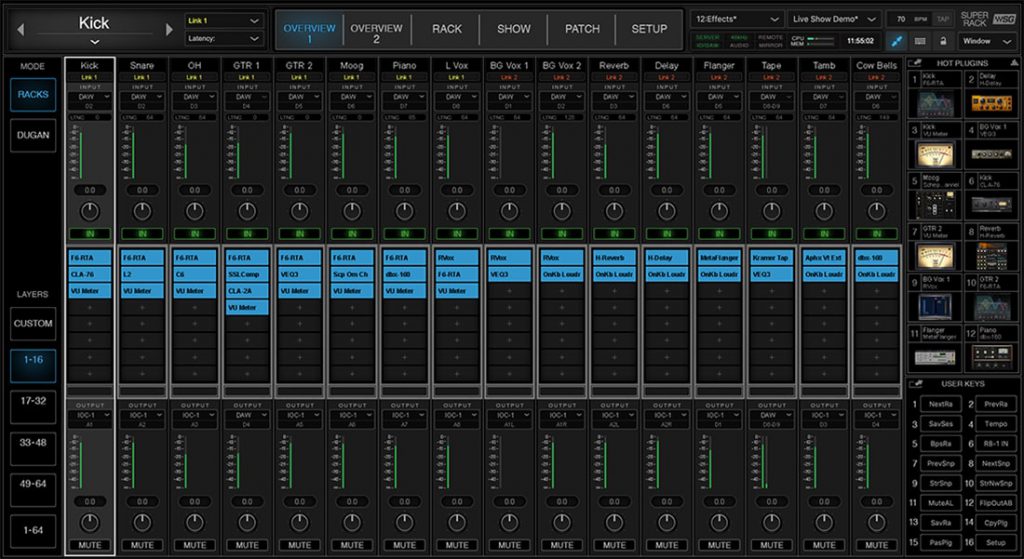
So now we get to the fun stuff, what do I think of it. Well instead of rambling on and on I thought I’d make a simple pros and cons list. Enjoy. 

Cons

  1. As of right now, external control is a bit lacking (i.e keyboard shortcuts) but they have given more ways to control internally (added 4 additional hot plugins, added 16 user defined buttons)
  2. There are a few GUI issues either with plugins or the program (still early in development)
  3. Boot time, still takes forever to boot (likely no way around this)
  4. Not super efficient to use without a touch screen (I’ve noticed that using a mouse and keyboard with SuperRack isn’t as easy it was with multirack)

Pros

  1. Much better workflow (software designed around the use of touchscreens)
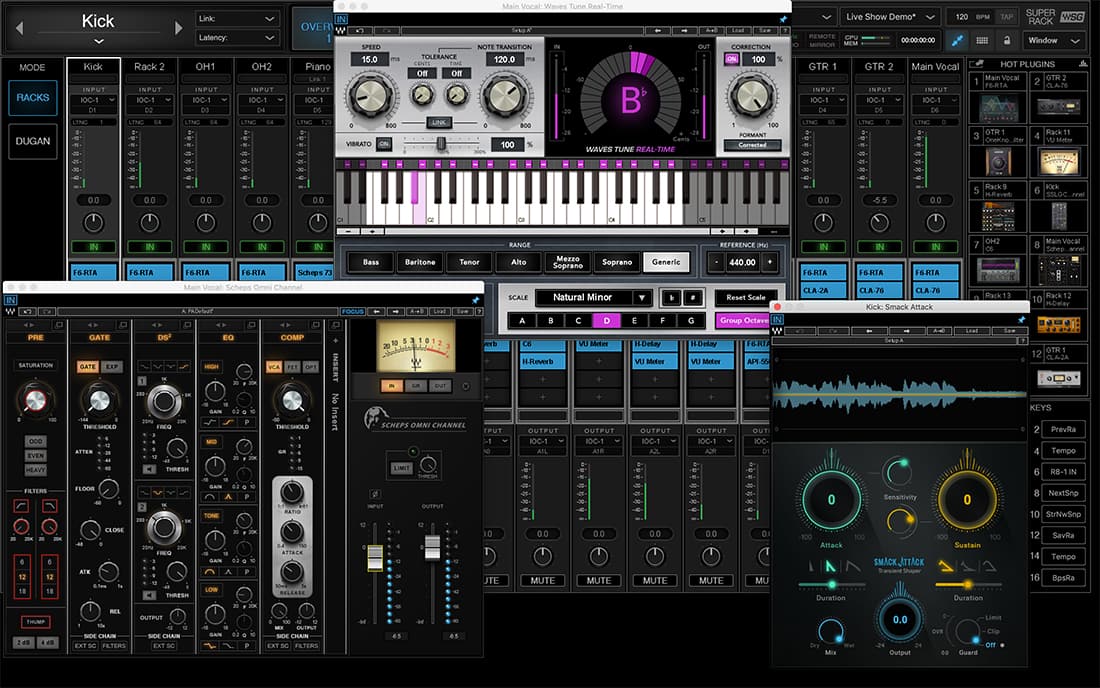
  2. Everything can automate (you can even automate the plugins that are shown outside of the rack view and where they are arranged)
  3. Server is more efficient than before causing greater capacity (about ~15% for me)
  4. Support for multiple screens and extracting plugins to separate windows (you can have up to 4 external screens in use with SuperRack)
  5. More stable than the last versions of multirack in my experience
  6. Soundgrid direct patching (no more need to install soundgrid on the multirack machine, patching works a lot like Soundgrid Studio does)

So what does all this mean for you? Well I have two ways to think about this. The first is you should buy this software if you meet one of these three conditions: you are a heavy Multirack user (the updates, fixes, and new features are worth it), you already own V11 and you buy lots of plugins (you are already in the ecosystem, dump Multirack and buy SuperRack), or if you are going to continue to use Multirack long term (I can bet you that they won’t be doing much development for Multirack) you should really look into purchasing SuperRack. However, because of its’ cost you should rethink buying SuperRack right now if you: just bought multirack a few months ago before they released SuperRack (however in this situation I’d be calling customer service about fixing that issue), perhaps you don’t have the Waves Update plan and haven’t bought any v11 plugins yet (SuperRack will not work with v10), if you don’t have a touchscreen or can’t afford to pick one up (here is a link to one that I love that is a really reasonable price). It’s not that it won’t work with a mouse but it works a lot better when used in conjunction with a touchscreen. For me it feels cumbersome with a mouse, even a nice ball mouse like I have (I use this one with that machine for general navigation and miscellaneous activities). 

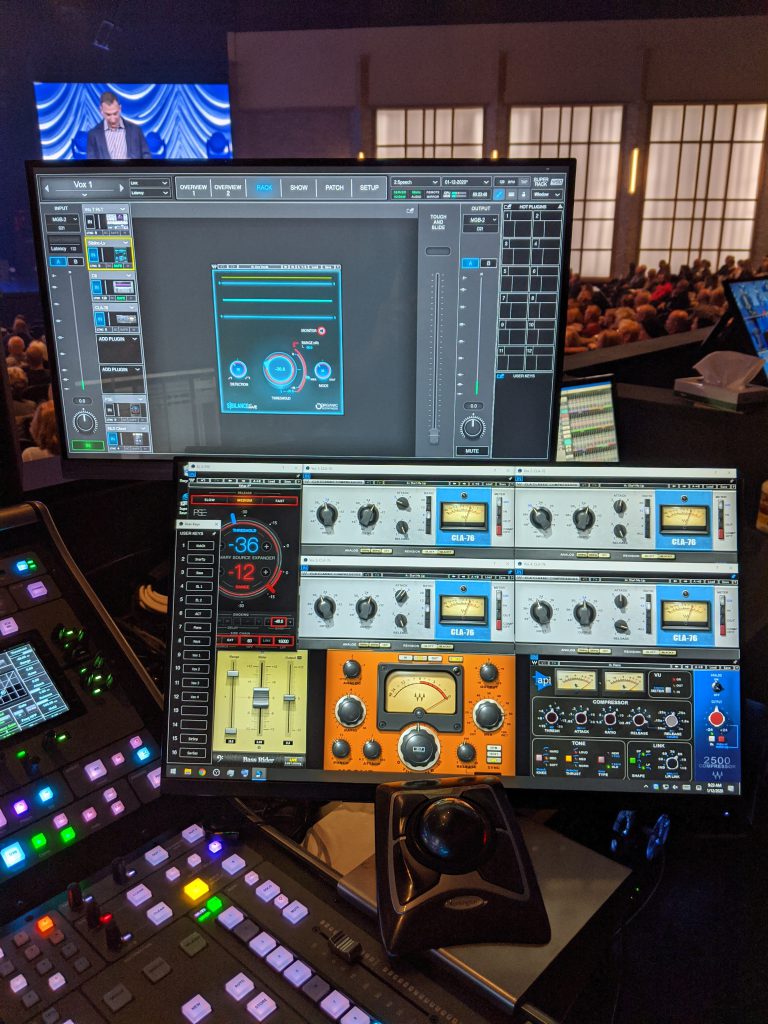
Just a quick note about touchscreens and the display you choose to use with SuperRack in general. They advertise SuperRack with at least a pair (sometimes you see four monitors) of dell touchscreen monitors. I actually have one that I purchased to use with Multirack. However, I wanted a second screen to use with SuperRack to take advantage of the extra space to view individual plugins and had one of the Planar ones (link found above) and got that hooked up and I actually like the ergonomics of it more than the more expensive Dell screen. The Planar screen is on top in the picture. It is a bit smaller size but with a glossy screen the screen is naturally more sensitive than the Dell with its’ matte finish. This makes all the difference when you are trying to work quickly and don’t want to have to push really hard on the screens. Expanding from that, I’ve tested a few different monitors with SuperRack and all of them were able to use touch features flawlessly. But I’d recommend a few things when it comes to monitors. The biggest things is just to make sure they have a native resolution of 1920 x 1080. This is the resolution that SuperRack was designed around and it doesn’t seem to scale well outside of that box. Also, be sure to consider the finish on your screen. If you have a darker room than you can pick up a glossy screen without issue but if you’re thinking of being outside, pick up the matte finish ones instead. Lastly, be sure to get a monitor capable of multi-touch so you can pinch and pull things like EQ and the like (both of the monitors I’ve linked and use are fully multi-touch compatible). 

Well I think that’s about it for this review. I hope to do this a bit more often as I get a chance to get some new equipment and software. If you ever have anything that you want me to take a look at, drop me a quick message either through the site or send an email to daniel@studiostagelive.com and I’ll get to it as soon as possible. Also, if you’d like some hands on experience with SuperRack and getting the personal demo from Waves has either run out or whatever, drop me a line and we can setup something up so you can get a look at my setup. I’m not currently paid or sponsored by Waves but just think that this can be a great tool for any situation. Lastly, if you enjoyed this post, go to this link and subscribe to this site and you’ll receive an email anytime new content has been posted. I’d love to hear your thoughts, let me know in the comments below, see you next week for a new episode of “From the Booth” which is a recording from our Christmas show this year which has some new footage from my SuperRack setup! See you next week!

Waves Soundgrid: Top 5 – Honorable Mentions

I was on the fence about whether or not I should even have this post as part of my series but when it came down to it, I felt like I should just put it out there and let you guys know what plugins lost out in my battle for the top 5 places in my waves library. I have rarely found waves plugins that aren’t useful when applied correctly but as you’ve seen in the last 5 weeks, there are 5 that I use a lot and for a variety of reasons. They either make my life easier, more efficient, or just provide options that others don’t. But this week I wanted to go through a few plugins that are worth mentioning. I picked out 5 (sort of 6) plugins that float to the top in terms of usage and such when you look at my waves templates. 

The first that came to mind is the HComp compressor. This plugin is packed with features that make this plugin incredibly useful. Probably the thing that got me using it (and keeps me using it on electric guitars) is the mix knob. With just one knob you can setup parallel compression. I know, I know, it’s a bit different but having the ability to wet/dry mix compression live without the need to suck additional audio paths is awesome. For guitars, I find myself dropping it down to about 70% to start and go from there based on the type and dynamics of the source involved. I’ll find myself backing off even more with acoustics and if I there is a particularly dynamic electric I’ll raise that up a bit. EIther way, using the plugin like this, combined with proper attack and release settings really helps what you want from your source pop through and be present but then sit back in the mix. Secondly, the punch knob. Man, this is a wildcard that I love. It’s quite hard to describe but in my experience, the best way to set it is to start at 0 and turn it up until you like it, than just leave it. Yes it does add punch, but that isn’t all. So get the demo, load it up, and try this out, ASAP!

If there is a reverb that if you don’t own you should just go out and buy from Waves, HReverb is it. I know, I know, the Abbey Road stuff sounds but you don’t have access to the number of variables to alter as you do with the HReverb. The tails in HReverb are just the smoothest you can imagine. Let me put it to ya this way, my daily driver is an SSL L500 that has some pretty legendary verbs onboard but I still use HReverb regularly to create a wash verb (like 4-5 seconds of washy verb) that my boss developed on HReverb and I couldn’t get the onboard stuff to imitate it that well. Right in the verb there is a built-in EQ, decay control, slap echo control, dynamics section (I usually run a de-esser here or one right before it in the plugin chain), and even a modulator built right in if you wanted to add a chorus effect. That is all on top of the usual reverb settings. Now, this is a DSP hog so use at your own risk but if you’re after a buttery smooth long verbs, HReverb is where you can find what you’re looking for.  

I’m sorry but in my search to find and decide honorable mentions there was a tie with my de-esser of choice. Having a de-esser on most vocals is nearly a requirement. There are a few of the folks who sing where I work where I can get away with not having one but I usually have one in there anyway to catch any strays. For the longest time I was dead set on using RDe-Esser but ever since Sibilance came out I’ve started flopping around a bit. They work quite well with Sibilance better at detecting and RDe-Esser a bit better at controlling how you handle the response. If I had to give an edge for me in my room on my board, I’d go with Sibilance because the live version of it is basically a zero latency plugin whereas the other does introduce a small amount of latency. More often than not I’ll use Sibilance on females and RDe-Esser on males. It’s just easier for me to get each dialed in if I split it up like that. The latency added isn’t enough of a concern for me to stop using RDe-Esser. It’s important to know that the non-live version of Sibilance does contain a look ahead setup for studio use which is incredibly handy in the studio.

As you read in week 2, if I had to pick I’d pick the Vitamin Sonic Enhancer because of it’s extra features to adjust, but Scheps Parallel Particles in my opinion sounds just as good and is definitely easier to configure. Because I don’t always need all the features of the Vitamin, I have found myself using Parallel Particles in those few places where I just need a simple, harmonics generator. A great example for me is the kick drum. Where I used to use Vitamin, I inserted Parallel Particles and turn off everything except the bottom knob where I set the frequency (I like to boost 50hz) and turn it up to taste. Just like in Vitamin you need to keep an eye on the internal plugin dynamics. What I like about Scheps is the input light telling you what you need to do to set the input volume. If it’s red or yellow, turn it down until it stays green most of the time. I usually end up removing the link between input and output gains as well so it doesn’t turn into a huge gain stage. So if you’re looking for a simple no nonsense harmonics plugin, Scheps Parallel Particles is what you’re looking for.

The last plugin I wanted to mention as a plugin to really consider as you expand your toolbox is Torque. As a technician this plugin really appeals to me because I can’t tell you how many times I’ve fought with drummers regarding tuning what notes to pick when you’re doing so. Over the years I’ve learned that the lower you can get the snare note to be the less you have to do to control it. But drummers hate drum heads that are tuned so low that their stick feedback (read how much the stick bounces back to them) isn’t what it used to be. So now, I can tune the drum with enough spring-back to keep drummers mostly happy and then in “torque” it down a bit more so that the snare can really find a home in the mix. Secondarily, I’ve recently started, after a suggestion from a co-worker, tuning the bottom snare mic up a note or two so that you get a great crack tone from each hit and the snares. Typically I’m tuning the top mic down a few notes and the bottom mic up at least one note. The great thing is that it’s easy to adjust and make it fit your sound. In any case, we finally have access to a tuner that works well for percussion instruments and only messes with the attack while leaving the transients alone. 

Well that’s it for the honorable mentions. Hopefully I’ve covered at least one or two of the plugins that you use. If I missed a great plugin that you think we should all use more, feel free to leave a comment below or on Facebook and let us know about it. If there are any questions I can answer for you please email me at daniel@studiostagelive.com and I’ll respond as soon as I’m able. As always, if you’ve enjoyed reading this series feel free to subscribe at this link and you’ll get an email whenever new content is posted here at Studio.Stage.Live.com. See you guys and gals on the flipside!

Waves Soundgrid: Top 5 – Part 5

The time is finally here for my favorite waves plugin. I know over the last few weeks that I’ve chosen some pretty popular plugins so there probably hasn’t been any surprises but that might change this week. I’ve already used the CLA-76 on week 1, the Vitamin Sonic Enhancer for week 2, the C6 Multiband Compressor as week 3, and last week talked about Scheps Omni Channel last week slotting in at #2, which doesn’t leave a lot of heavy hitters left to be the top dog. Well, I disagree. This plugin has a tremendous effect on my mix that I didn’t anticipate even in the slightest. It also is the reason why all of my band inputs go through waves soundgrid (I’m betting that last hint narrowed it down for you a bit). My favorite and most used plugin is the Waves NLS (non-linear summer). Yep, you read that right. Generally I have it on everything I mix.

So why the NLS? Well it’s a long story but I’ll try to sum it up. I’m what I call a middle school audio guy. I was taught and trained by basically all old school audio guys from the 70s, 80s, and 90s (basically I call old school anyone who was mixing before there was digital consoles) but have embraced the technology of the new guys. I think both methods have merits and basically cherry pick the best of both. Because of that, as I’ve embraced technology having experienced the hard parts of analog audio (i.e. – ground hums, buzzing, etc) I’ve always been a bit hesitant to re-introduce 50 or 60 cycle harmonic hums or subtle harmonics because I’d always felt that the advantage to the digital realm is it usually free of those issues. Combine that with the SSL L500+ that is my daily driver which has some great pre-amps I figured I was set for a smooth sounding pre-amps and natural yet transparent summing. But I kept seeing the NLS in use from some great guys and decided I’d give it a try when I saw it on sale for $29. At worst we’d throw it at the studio which is fed digitally just to get a little warmth but boy was I wrong. I set up a quick test in MultiRack (now SuperRack) where I could A/B the entire set of plugins on and off. I also decided that if I was going to test, I’d test all of it. I put the NLS at the end of each rack in waves(to emulate the sum in the fader rather than at the beginning to emulate the mic pre on the original console). Because I run the buss groups into waves as well I through the NLS Buss plugin on those as well and assigned each channel to the appropriate buss. After the time I turned it on and off I could hear a difference. The warmth that came from just turning it on, riding up the drive knob to the same number on each channel (be careful not to drive it too much, the plug can clip) and picking the model that fit each input (I started with Neve everywhere and adjusted from there). It’s difficult to quantify but when I don’t use it, I can’t get the same feelings about how the mix sounds as I do when I have it on. My mixes sound good but a little sterile. The NLS brings cohesiveness and a warmth that you can tangibly hear when you use it as it was intended. 

The plugin includes models from these three legendary technicians consoles: 

The “magical” solid state console belonging to Mark ´Spike´ Stent (Björk, Muse, Maroon 5, Madonna).
The classic console owned by Mike Hedges (The Cure, Siouxsie and the Banshees, Dido, Faithless, Manic Street Preachers, U2), heard on such timeless recordings as Pink Floyd’s The Dark Side of the Moon.
The vintage British console customized for Yoad Nevo (Bryan Adams, Pet Shop Boys, Sugababes, Goldfrapp, Air)

(source: Waves.com)

It is easy to say and hear how different digital consoles sound over analog consoles. All the actual circuitry, the hums, the buttons and knobs, it all added up to something that affected the sound ever so slightly. In that sense, at the top end of analog boards from yesteryear all had their own “sound” that colored the mix in a usually a pleasant way. That’s what this plugin does for your digital consoles or DAWs. It isn’t the only plugin like it and in fact the CLA MixHub does this same thing but differently. You aren’t getting three models however, you are getting CLA’s console with all its’ sends, fades, knobs, etc. I’m not into the workflow solution that he offered so I’ll be sticking with NLS. I also love pulling up the plug and clicking through the three options and seeing which model sounds the best for what I’m trying to accomplish. Personally I use the NEVO side the most and usually end up with spike on acoustic inputs because of the rasp introduces. As with any tool it’s more about how you use than just having it. The NLS is pretty hands off but you still need to configure it properly (set the drive knob to be sure you aren’t overloading it, set buss, etc) for it to work right. Waves made a great video talking about and actually playing samples from NLS which can be found at this link.

This plugin is also a great way to bring up the sound of a lower end console that has the ability to integrate with waves. In essence that’s what waves can do for you and your mix. If you can’t afford to purchase a top end console that has that sound you’re looking for you can get almost there with plugins like NLS or CLA MixHub. The Behringer x32 doesn’t have the horsepower for something like a C6 but for under $1000 you can have access to all the tools the big name mixers have at their fingertips, including the NLS. So for about $4000 you can buy an x32 and everything you need for waves and emulate a $100,000+ console. But also remember, this plugin, as with all plugin, should be the icing on the cake. If the fundamentals of your mix aren’t there before you start tinkering in waves there isn’t a magic button or a plugin that will just fix all that. 

Well that’s it for the series. Hopefully you’ve learned something new or thought of something you could improve in your workflow or at least been exposed to some new tools that you could use in your mix. For me just having thought through what my top 5 plugins are was good to be thinking critically about why I choose particular plugins over others and make sure that all my decisions line up with each other so there is consistency in my workflow. If you’ve thought of any questions, hit me up below in the comment section, on one of the facebook posts, or email me at daniel@studiostagelive.com. If you’ve enjoyed reading this series feel free to subscribe at this link and you’ll get an email whenever a new post is released here at Studio.Stage.Live.com. Happy mixing!