How To: Mixing for Broadcast Part 3

For the last two weeks we’ve talked about crafting a broadcast mix for your church and the various ways to set it up, whether it’s with your current FOH console or whether it’s with a separate console for broadcast. We’ve discussed analog vs. digital splits and now we come to the fun stuff. Actually mixing content. Now that we’ve got our mix options set up, whether it’s a feed from FOH or a split to a separate console, we need to get a good mix crafted. Before we dig into the good stuff, it’s worth noting that you should always keep track of the speech mics in the field and whether or not they should be on. If a speaker leaves his/her mic on while in the audience you may not hear anything different in the house but in the broadcast it will make a huge impact. This is another great reason to utilize automation to help you easily conquer the little stuff.

So, broadcast mixing typically needs to be a little more precise than FOH. Because we don’t have a large room to hide mistakes in, we need to be very conscious of various instruments and singers and how they’re blending with everything else. Typically I tend to mix the band a little heavier than vocals when doing broadcast because even with reverb and a band, it is often very easy to hear mistakes made by vocalists when singing. They’ve got one of the hardest instruments to control and keep in tune and even the best singers in the world aren’t perfect so I actually keep them in front, but not overtly so. I’m also constantly on the lookout for band members who may be struggling. You’ll also want to try different reverbs out and see what works best. Typically reverbs that work in an auditorium don’t work as well in broadcast. Try to find something that fits your mix and doesn’t tail too long. Too much reverb can render a vocalist unintelligible and it’s much easier to overdo it in broadcast than FOH. Mixing for broadcast is very different from mixing a room. As discussed earlier, it’s mainly different because you’re not dealing with interactions from the room and PA nearly as much as FOH has to. It’s also not quite like producing an album. It’s a blend of studio work and live sound. Broadcast mixing has it’s own challenges.

One main area broadcast differs from FOH is in EQ. EQ for broadcast is much easier in many cases because you aren’t fighting the room. This is where plugins can make a huge impact. If you’re using Waves you can use plugins like the F6 to dynamically carve or add frequencies back into channels, you can use the C6 or C4 to dynamically compress or expand bands of frequencies. We previously spoke of the fact that most listeners will be listening on phones and tablets and this is another area that comes in to play. We need to make sure we EQ in such a way that things sound pleasant on all devices. Because of that limitation we have to make sure we don’t have too much low end on channels that don’t need it and we should keep from having too much in the low-mids because that will really muddy up a mix on smaller speakers. We also have to remember that we aren’t filling up a big room, just a small pair of speakers or maybe headphones, so everything needs to be EQ’d as tight as possible. That being said, a lot of corrective EQ you might instinctively reach for at FOH, is not needed in broadcast. Mostly just watch your lows and low-mids. Inserting a plugin with an RTA on it like the F6 or HEQ can really help to monitor this as well.

Panning is another important tool in shaping a good mix for broadcast. When we’re listening on headphones or a small device, similarly to listening to a PA in a room, our brains need help to pick out all the various inputs in a mix. Panning can be a huge help in this area. With drums, I like to pan them from the perspective of the drummer so that the sound of each individual drum matches the sound of that drum in my overheads. This helps keep the sonic image clean but also sounds really cool on a mix when panned from left to right. It also helps with visuals if you have camera on the drummer and he plays from one side of the kit to the other. I’ll also pan instruments based on stage location and what they’re doing and I change it up from time to time as well. Singers are also usually slightly panned with any leaders being dead center. Be careful not to pan singers too drastically as it can cause certain singers to stand out too much. I also typically keep either the keyboard or acoustic guitar center depending on which instrument is the anchor for a particular song.

One other important part of the broadcast mix is audience mics. If you can have them at all, I would recommend it. It’s best to have them hanging in line with your PA and pointed at your main audience area but even choir mics hanging halfway back is better than nothing. Being able to get claps, cheers, laughs and singing from the congregation connects the broadcast audience with the audience in the room. The best place for an audience mic is either the lip of the stage or hanging over the lip of the stage pointed at the audience. Most broadcast guys go with the a shotgun mic like the Sennheiser 416 and will place anywhere from 2-4 depending on the room. I’ve seen as many as 8 handling a large crowd. If you don’t have the budget for new mics utilizing a condenser or even dynamic mic you already own will be better than nothing (just anything cheap and omnidirectional like this pair on Amazon). Try to get it as close to in-line with the PA as possible so you don’t have weird delay issues. Nothing sounds better than a well placed crowd mic picking up the congregation singing as the worship team falls back. Crowd mics can also be used to feed in ears for musicians so they can serve more than one purpose.

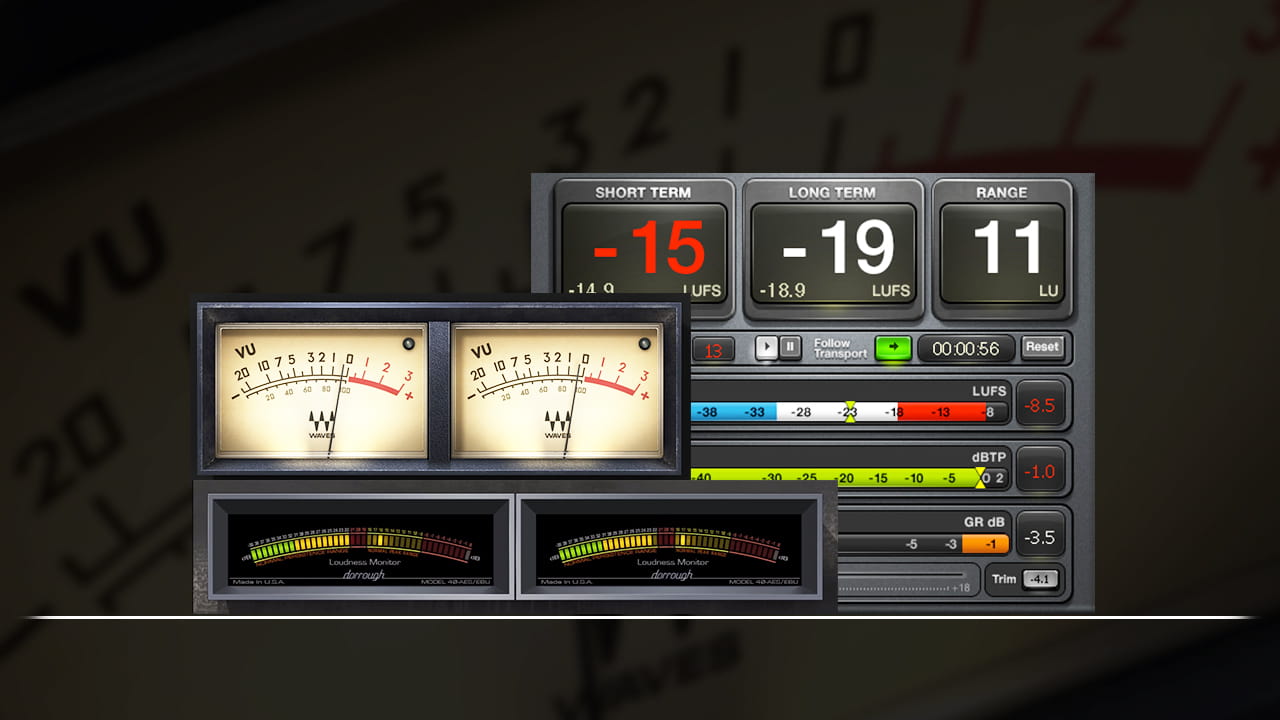
Unlike mixing a live PA where dynamics are incredibly important, in the broadcast world we must try to do a better job of keeping the loudness more uniform. If people have to turn the volume way up for the sermon or can’t even hear the sermon, then we’ve only done half our job. If you’re using your FOH console to mix you can accomplish this by using a post fade aux and turning all your musical channels down more and your speech channels up more, or doing the same with subgroups. For live events on broadcast on TV, your overall loudness is supposed to be within +-2db of -24LKFS (this is a measurement standard use to standardize perceived volumes across all devices) for the length of the program. While we aren’t necessarily required to do this for streaming online, I like to try to follow it as a good rule of thumb giving myself a range of +-3db LKFS. Getting consistent loudness on a separate broadcast console is a little easier and we have some better ways to do it as well. One of those ways is by using the WLM Meter plugin in waves to monitor (and if needed limit) the loudness of your mix. There are also several outboard options like this one that just allow you to monitor. The basic principle is to check three things: 1) level match speech vs music, 2) be sure to check for headroom across your entire signal chain, 3)If nothing else, take a recording of your mix and analyze it to see how you line up with the LKFS standard. No one is going to be angry that your mix is too quiet or too loud but getting things setup correctly can really contribute to the overall quality of the art you create.

At the end of the day, the best way to craft a mix is to just work at it. Like playing an instrument it takes time and practice. The more you do it the better you’ll become. Hopefully this series was a good primer and a first step towards better crafted mixes. If you have any questions or thoughts, please drop a comment below or on Facebook. As always, if you’ve enjoyed reading this blog, feel free to sign up at this link to subscribe and be notified when new content is available. We hope to see you next week!

P.S. – If you didn’t already notice have a new author, Justin Fugett! To help you get to know who is behind the scenes here I’ve launched a new page on the site with bios for each author. Be sure to check it out at this link!

How To: Mixing for Broadcast Part 2

Welcome back to week two of our mixing for the web series.  Last week we discussed a few options for broadcast mixing while using a console you already own to craft a good mix for an online audience.  This week we’ll concentrate more on how to craft a mix when you’ve got the ability to use a second console to mix specifically to an online audience.  Using a second console to mix broadcast is by the far the method that has the highest potential for quality because you are never balancing what the audience in the room hears with what the audience from the broadcast hears.

One of the most critical decisions to make when buying a broadcast console is how the sound will get into it.  You will have to “split” the audio from one source to two or more outputs. This has traditionally been done via analog splitters that are purpose made for this task.  With the advent of digital consoles we also have the option of doing this digitally inside the console. There are of course pros and cons to both options. Analog splits are probably the most “pure” option but they do come with some restrictions.  The first being, they are very expensive. Even the simplest splitters are essentially Y cables, but depending on your needs, you may need a transformer isolated split. The main advantage to an analog splitter is that everyone can have separate head-amp control of inputs without affecting each other.  Another nice feature of analog splits is that if the main input console goes down, it only affects that console and not everyone using it as a digital split as is the case with console based digital splits. The main disadvantage can be that some buildings aren’t wired in a way to make a splitter useful or it may be an issue where the splitter is isn’t conducive to where the inputs for the mixer are.  Most splitters are fairly large, and some installations just don’t have room for them. Cost is the biggest prohibiting factor for analog audio splits.

If you’ve got a digital console then you’ve also got a potential wealth of options to do a digital split.  This may be a simpler and easier solution but does have the downside that unless you have a Midas Pro console and a stage box with dual pre-amps, one person has to control gain for both users.  Most consoles today offer a “gain sharing” function (or manage the sharing behind the scenes). This is where one person has control of the gain and the other user trims digitally up or down. This allows both users to adjust their levels without affecting the other but it’s still affecting gain so if you’re recording multi tracks or have headroom issues you’ll need to gain down your inputs and trim up to compensate for your onboard needs. That aside, digital splits are incredibly cost effective and useful.  Digital splits can come in many flavors and depending on your console, you may even be able to mix them and use more than one. While most consoles have their own proprietary format that may or may not be able to split to other consoles of that make or model, there are several digital “transport” methods. We won’t go too much into detail regarding those options but know that the main options are MADI, AES50, and Dante Networking to accomplish a relatively inexpensive digital split. Don’t worry, we are already working on a series to talk about each of these options and how they are used in our industry. Stay tuned!

Once you’ve got yourself setup it’s time to be able to listen to your content.  If that’s a submit of some kind from your FOH console, I recommend a really good pair of wired headphones.  Apple earbuds probably won’t cut it here. I would recommend something like the Sony MDR-7506s or maybe some Shure SRH 440s or 840s.  AKG makes some really good stuff as well.  I tend to like Shures and Sony for their flatness.  I’ve gotten used to what they sound like so I have an idea of what various types of content should sound like in various places when listening to those headphones.  If you’re mixing on a separate board and have your own audio room then I’d recommend getting some good quality near field monitors. Computers speakers, even really nice gaming ones, aren’t going to be ideal here.  You’ll want something that is purpose made for mixing and making music. I’d even recommend a subwoofer if you can afford it (try to get at least 8” drivers on your speakers if you don’t plan on buying a subwoofer).  Quality matters here. I’d recommend the KRK Rockit 8s or the Sony HS8s as a good starting point. There are a lot of options and it’s hard to go wrong as long as you understand what you are getting so do your research.  The key is to get professional speakers not hifi home audio equipment.

One thing that I would also recommend is getting something like a Mackie BigKnob so you can easily control volume and flip between mixes (if needed) and even flip between multiple sets of speakers.  Next, most control rooms will have “small” speakers from a couple different brands that mimic sound coming out of TV speakers.  These can be very expensive, what I would recommend is to buy a pair of cheap computer speakers that may have been around the block a bit. The reason studios and control rooms use small speakers is because most people listen to content on their TV speakers, not thousands of dollars of speakers so we like to check and make sure our mixes sound good on smaller less resolute speakers.  What I’ve done at my church is buy a small low rated pair of computer speakers to better mimic what our mixes would sound like on a laptop or a phone. We didn’t have money for Auratones and this was a great way to give us a clue if our mixes sound good on smaller devices that they will most typically be watched on.  Again, people won’t be listening on nice near field monitors, they’ll be watching on their phones, tablets, laptops, and maybe their TVs.  “It sounded nice in the control room” isn’t a good excuse if no one can hear well on their phones and that’s all the service is watched on.

Regardless of how you split your audio it’s always smart to have good communication between FOH and broadcast.  We’ve spent the last two weeks discussing various methods of setting up your mix. Next week, for our last post in the series, we’ll look at the best practices for actually mixing the service.  We’ll focus on loudness, metering, tonality, and EQ differences from just mixing at FOH. Thanks for reading, if you like what you’ve been seeing here on the Studio.Stage.Live please feel free to subscribe to the blog at this link so you can get an email when new content is posted. If you have any questions feel free to reach out on Facebook or in the comments below. See you next week, Happy mixing!

P.S. – If you didn’t already notice, we have a new author, Justin Fugett! To help you get to know who is behind the scenes here I’ve launched a new page on the site with bios for each author. Be sure to check it out at this link!

How To: Mixing for Broadcast Part 1

Welcome to a new “How To” series talking about mixing for broadcast. With all the options to live stream these days more and more churches are in the market to live stream their services.    While there are a lot of opinions on this and while others can weigh into the should we category, I’m going to dive into the how should we category.  This series is aiming to be an audio based primer for what to do if you’ve decided to take the plunge and throw your service up for the world to see. Whether you’re diving in with multiple cameras, a switcher, live graphics, and a whole crew or you’re starting small and just streaming from a single camera, live streaming means commitment. Even if you don’t end up needing a ton of extra volunteers you do need to make sure that they all adequately trained and able to mix for broadcast. Depending on how you move forward this may mean learning a new console or learning to more efficiently use the one you already have.  Don’t be afraid to ask another church who is already doing this for some help or advice, maybe one of their techs can come out and help train your team. It’s also important to consider how your audio is getting to the stream (i.e. – Is it just the FOH mix? Aux off the console? Some form of split and a separate broadcast console?). It’s also wise to make sure there is enough physical I/O to accommodate connecting to a streaming encoder of some kind. Regardless of your intentions or capabilities, I hope this series gets you started down the right path. All of the options we will discuss below offer differing amounts of control and the level of skill required to mix for broadcast well.

The first and easiest is to just send your FOH mix straight to broadcast.  This is definitely the easiest but it is also the least flexible mix to operate because it just follows your mix for your main output.  Most of the time it would be advisable to use groups or an aux allowing you to craft a broadcast mix off your FOH console but if you don’t have groups available to you, and you don’t have a spare aux just duplicating your master mix gives you a way to send your mix out.  Mixing a large space, even a small sanctuary is very different from the experience of hearing that same service on a phone, laptop, TV, or headphones (this is the pitfall of this option). The differences tend to be in EQ choices, broader fader moves, and maybe more or less verbs/FX as the space calls for it.  When someone is mixing for TV they’re often in a much smaller space and only have to deal with making the input signals sound as good as possible without having to worry how the content coming out of loudspeakers will affect the overall mix and sound quality. If you have the ability to send your main buss to a mono or stereo matrix (preferably stereo), this gives you an easy way to attenuate the overall level up or down as needed.  A lot of really talented FOH guys use this method with great results, but it takes a skilled hand to pull it off. A subset of this idea that can be done if you have a flexible digital console is to send your main mix to a matrix but also send your effects returns to that matrix to add to it and fill it out (allowing you to attenuate up or down as needed to compensate for the difference between your room and the broadcast). This requires some extra routing and some challenges like creating a matrix for your mains and sending your effects returns to it separately as well.  You could even have special effects returns for the broadcast feed. Again, while an easy “set it and forget it” method, it does require you to be very conscious of your mix and how it will sound in a broadcast environment. Lastly, the biggest question you have to ask yourself is if someone isn’t in the room, can they hear what is going on? I can’t rely on vocal mic bleed to mic the drums, you actually need to at least mic everything a little bit.

The next option uses groups or subgroups to build a broadcast mix.  Like the first, this can be done with most analog or digital consoles. If you’re already mixing with subgroups this is a great way to craft a good sounding broadcast mix.  If you’ve already broken your mix up into subgroups you can easily route those groups to a matrix for broadcasting. Then it’s just a matter of adjusting those groups to taste (often times lowering heavily dynamic sources).  This is also nice because any level changes you make in the main mix follow in your broadcast mix. This version also allows you to keep the overall level of anything in a group where it needs to sit so if you have let’s say groups for drums, keys, guitars, tracks, singers and effects, you can mix the relative level for all these groups but as you track certain instruments or singers at FOH they get louder or quieter in your broadcast mix as well.  You can use the groups to mix in the correct overall level of each subset of inputs you’ve put into that group. I’ve heard great broadcast mixes that were just stems (i.e. subgroups, etc) off the FOH console. The only downside to this is you don’t get the individual control of channels, for instance, if your drums fit well overall into the mix but there’s just too much hi hat, because let’s face it, there’s ALWAYS too much hi hat… You would have to adjust the hi hat for the FOH mix for the change to track in the broadcast mix.  Joking aside, this is a great way to handle a broadcast mix from FOH without tying up an aux buss and it gives you way more control than just taking a feed from the main buss. You would then balance your band groups against your video and speech groups to help normalize the mix as a whole.

The third option is great, if you, for whatever reason, aren’t using groups.  This is also easy to do on analog or digital consoles and is probably the easiest to setup aside from using the main buss.  Using a post-fade aux is a great way to get a good mix. It gives you all the benefits of the main buss or subgroups options, but gives a little more granular control.  To accomplish this all you have to do is set up one or two busses as post fade on your console. If it’s analog you’ll need to be mindful of the fact that most consoles pre-post fade buttons control 2-4 auxes at a time.  Another issue with analog consoles is that if you decide to use two auxes to mix in stereo you’ll need to treat the send levels as your pan for those sends. In the digital realm it’s a little easier. Most consoles allow you to create a stereo aux or combine two mono auxes. From there you can automatically set all the sends to pre or post fade and adjust panning as needed.  After you’ve done that it’s just a matter of adding input channels to the aux. I typically start with everything at around unity and adjust from there. Since all the channels are post-fade, any mixing you do in the room follows suite in your broadcast. If a singer sings a solo, you can turn them up in both places at once. Another one of the reasons I really like this method is that it allows you to help even out your output level to the stream.  In most church services the worship portion of the service is typically much louder than the sermon and the input level follows suit. With a post fade aux you can push the send level of your pastor’s lav mic or podium mic to more closely match the loudness of your worship service. This will be a huge benefit to those watching your stream. When using an aux to stream your broadcast you can also work a little better at controlling the feed. Yet another great feature is the ability to individually tweak the mix.  Unlike using groups or the main buss you can easily go to an individual channel and adjust it. If your hi hat channel is too loud, you can just turn the send down to that aux without affecting the FOH mix. If you have a digital console you can even use a mobile device, PC, or remote controller to make adjustments as well. This can be a massive benefit because you get a lot of the same benefits of having a dedicated broadcast console but at a much-reduced price as a tablet (or an old computer you already have around) and a pair of headphones are much cheaper than a second board for broadcast. Mixing a post fade aux for your broadcast is probably the most flexible option for using your existing FOH desk to stream with.

Whether it’s analog or digital you can have a lot of control and tweaking without having to make any financial investments if you don’t want to. Regardless of which of these methods you choose, it’s incredibly important to have a properly tuned and balanced PA which will help your mix translate better in a studio environment. Next week we’ll take a look at setting up a whole separate board for broadcast, some of the challenges, some of the advantages, and the best practices for doing so. If you’re interested, subscribe to this blog at this link so you can get an email whenever new content is posted. As always, comment below or respond on Facebook with questions! See you next week!

P.S. – If you didn’t already notice, we have a new author, Justin Fugett! To help you get to know who is behind the scenes here I’ve launched a new page on the site with bios for each author. Be sure to check it out at this link!