Welcome back the inaugural Waves series here at Studio.Stage.Live.com. Hopefully last week you picked up a few tips and tricks to help your vocals if you have the ability to use waves. If you don’t have a waves rig to play around with hopefully you are getting an idea of what is possible with just a little outboard processing. Each plugin I use has a distinct purpose and many of those purposes all work together and make an incredibly positive change when combined. Like last week where we started this series talking about my philosophy of waves and my vocal chain, I want to remind you again that these settings at best make a decent starting point for you and your room. So many factors weigh in to good mixing like room tuning, gain staging, style choices, etc that there is no preset for everyone. The best thing you can do is load these plugins and play around. Learn how this stuff works and then adjust them to fit your situation and style. This week we will be discussing the bass guitar and how I process this to achieve a balanced and dynamic sound that helps to form the basis of my mix with the kick and snare (which we will talk about next week). You’ll remember that I also run a bass drive channel that I briefly talked about in part 3 of my From the Booth: Episode 3 short series.
My bass guitar plugin chain is relatively short. Because of the bass drive channel that provides a lot of the brightness and presence of the bass guitar that gives me a bunch of character I can focus my main bass channel on being big and round. It becomes very easy to lay a firm foundation for my “pyramid of sound” if I’m not trying to accomplish two things with one channel. 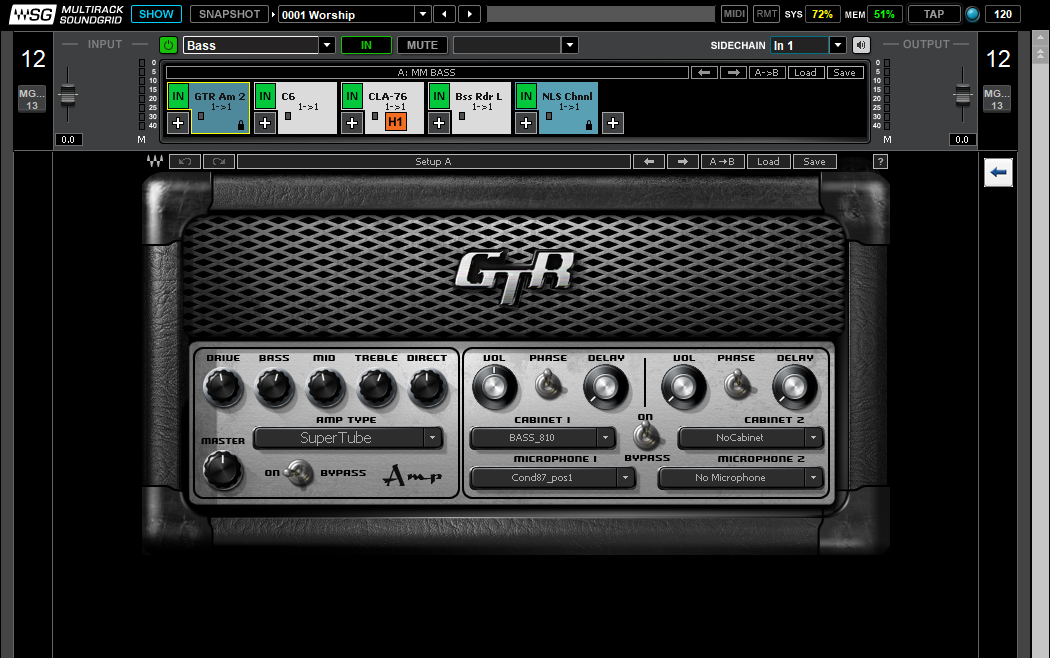 My chain starts with an amp modeler. On stage, the bass guitar is usually wired through a tuner (like this one) so the player can tune and mute their guitar as necessary then straight into our Neve DI. We have used other DIs in the past but have landed on this one as it seems to convey the clearest bass sound without distortion or weird filtering. Also, not having a bass amp on stage allows us to have incredible control over the low end of the mix but we still want to have the “good” harmonics as a part of the change so we pull up the GTR Amp 3 plugin set. Most weeks we will just have one amp in there but on the big weekends or for concerts I’ll pull up the second channel in there and simulate having to bass amps. Believe it or not, even on a mono channel you can really hear a difference (we do like to save some stuff for the big weekends as the difference is still not huge). This plugin is also where I will correct any weird pickup issues or balance issues that I hear as the bass enters the system. Those first five knobs (drive, bass, mid, treble, direct) can really shape your sound and turn an average guitar into a great bass guitar. The settings in my preset are those I chose for our bass player who plays the most so it’s a great place to start and help steer a good average for this instrument which brings great consistency to our mixes.
 Next is the C6. I have it setup like a general compressor with the crossovers set to differentiate where the sounds are going. The orange band covers what goes to our sub send, the green band is the meat of the bass guitar, the purple band covers the upper harmonics and presence of the guitar and the yellow band is bypassed as it is unneeded for this application. We also don’t use the blue sweep usually but sometimes bring it down to manage something inside the purple band. The best part of this setup is the light blue sweeping compressor. I use it to directly compress the resonant frequency or a frequency that is just jumping up out of the bass guitar. By doing this you can really win over some folks because you will end up with a much more uniform signal across the spectrum. Setting this plugin than becomes as easy as grabbing the global threshold and dialing that in, than moving the sweep around and finding the frequency that pops out when notes like open E are played that really dig into a room.
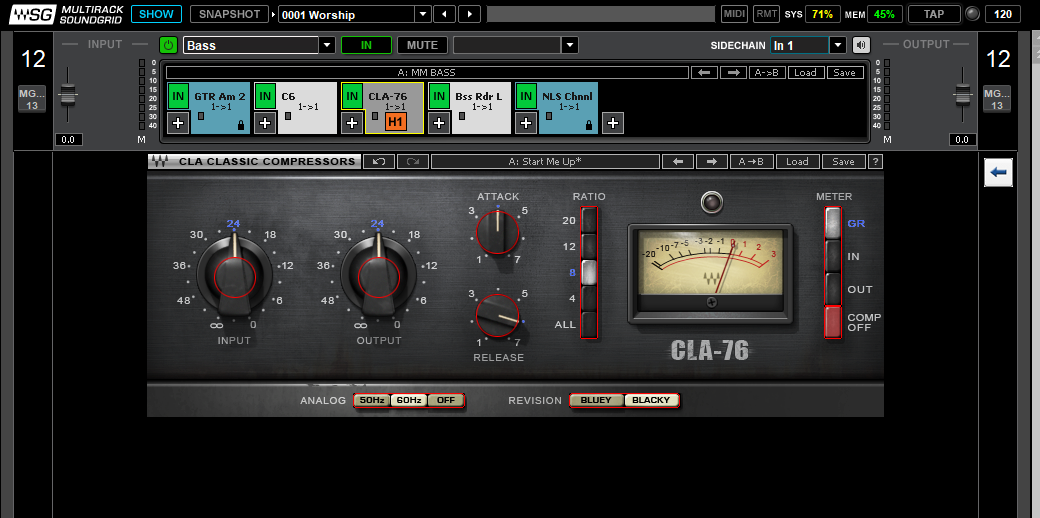
One of my favorite compressors to use in general within waves is next, the CLA-76. I like how the blacky reacts and sounds a little better than the blue side and start with the preset for the bluey, “Start me up.” If I have trouble I’ll just dial up the Bass preset and go from there. Input and output levels are based on how you manage it in the console but I’ll use the attack about halfway and the release pretty quick. I want to squash it a bit but make sure the attack isn’t attenuated that much. Faster release times also allow for a more dynamic sound which is why I love this compressor so much. It always sounds transparent because it reacts and releases fast enough that it’s difficult to hear the compressor working if you have it setup correctly. My ratio usually ends up and an 8 or 12 but can waffle around depending on the player.
 This next plugin is likely my ace in the hole so to speak. It’s the Bass Rider Live plugin. While it’s easy to use this like a compressor the key is to remember to give it a range to work with and make sure some of it is above zero. I know this is a fear for a lot of folks that a computer could be turning something up but I think I’ve found a compromise. In the early days of using this plugin I would run this thing at +3 to -3. The fader returned to unity when nothing was happening and this was pretty great. But when I realized I’d like to have this plugin help highlight the mid and upper range and attenuate the bottom (creating a more even sound why still being dynamic) I switched to my current settings which are +1.5 to -4.5 with the fader still resting at 0 db by default (just grab the tiny black arrow and move it where you want the plugin to start when the signal is strong enough). I start with the gentle rider preset which keeps this pretty slow reacting so it moves like a human would react instead of snap reactions. This causes the plugin to react once a note or so making a small adjustment for each note played. Waves as well claims that the algorithms used in the plugin were specifically designed to be different than a compressor so it moves more like a person moving a fader. Before I had this plugin I would find myself riding the bass more and more instead of being able to ride more melodic sources like the guitars or keys so it has really allowed me to have greater control and dynamics within my mix that I hadn’t had previously.
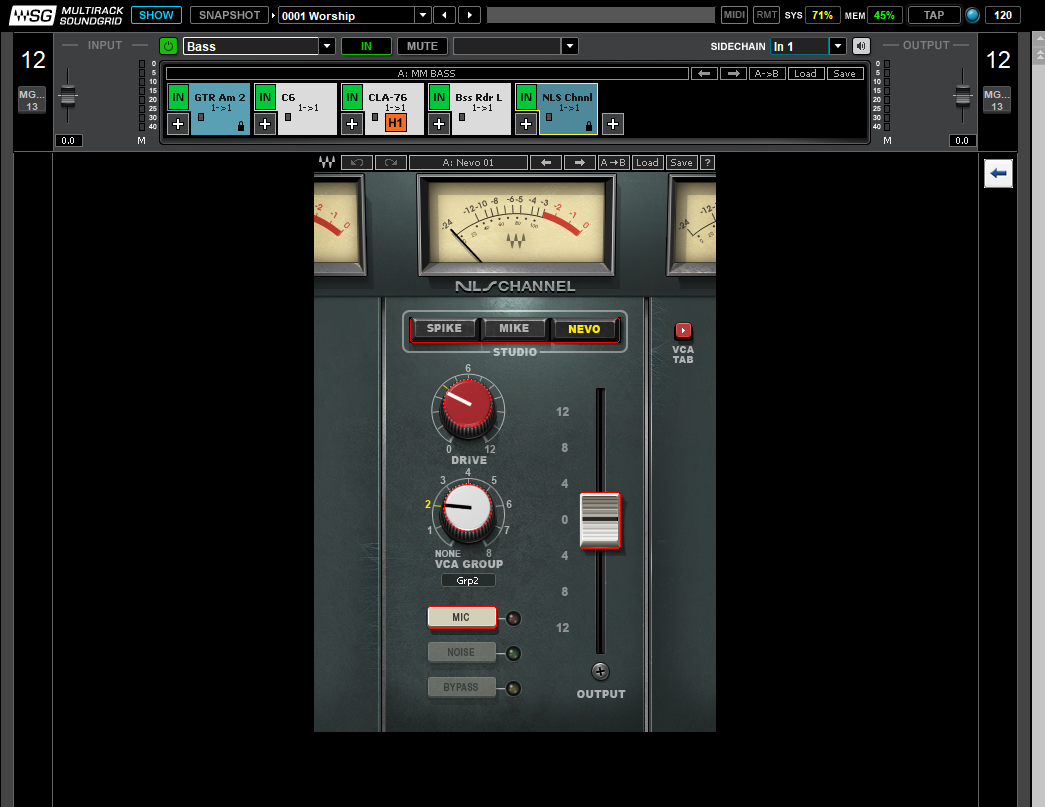 Lastly, as always, is the NLS plugin. It is set to it’s standard settings with the default model being the Nevo setting. However, much like you’d select a mic capsule for vocals, I use this plugin in a way to select the right model for instruments. If I’m having trouble with an instrument like the bass guitar, I’ll pull up this plugin and make sure the model I’m on suits the scenario the best. All 3 are good choices for everything so it’s really up to you as the audio guy, to pick the right one for your mix, whether it’s live or in the studio, that is a great universal principle to abide by while you mix, especially when using plugins as extensively as we are discussing.
That’s it for this week. Next week I will be going through my signal chains for the kick and snare to continue to build the mix. As always if you have any questions please feel free to email me at daniel@studiostagelive.com or comment below and I’ll get back to you as soon as possible. If you like what you are reading and want to make sure to get notified when new content is published, please subscribe at this link, and you will receive an email on mondays or whenever new content is published. See you all on the flipside!