Well, it’s finally that time. I have alluded to this series over and over again and finally found the extra time needed to dig into my waves setup. Each week we will dig into the my default plugin chain for a given set of inputs. Please don’t hesitate to leave a comment or email me if you have any questions.
I think it’s important to start this series off with a bit of a disclaimer. Mixing audio is incredibly subjective. Everything I do is what works best for my room. At best the presets I use would be a good place to start anywhere else. Just like EQ or compression, FX processing is different for every room. What I do won’t necessarily work anywhere else. The keys I look for when reading articles like this is looking for new uses for the tools I already have or things that the author is doing that I need to try. Perhaps someone was working to solve a similar problem and is using a plugin or an EQ to approach the issue from a different angle. I hope that you can read through what I do, see how I solve different problems, and walk away with a new idea how to solve similar problems in your space. As always, I’m happy to answer any questions you have in the comments below or at my email, daniel@studiostagelive.com.
Just to give an overview of how audio is processed on a macro scale at CCC where I work, we mix on an SSL L500. There are several optical and coaxial madi I/O ports that we use to get in and out of our waves soundgrid with. Right now, we have 64 96k channels inserted across the entire band input list. Every channel, ableton input, group bus, etc is inserted to a channel in waves. This includes our master groups. We do not currently use waves for our main verbs for two reasons: verbs are dsp hogs but more importantly, the verbs built into the L500 are amazing as all SSL verbs always seem to be. This leaves waves to be basically a dynamic processor which works great. All 64 channels, whether they are stereo or mono, have the NLS plugin inserted which does some pretty amazing stuff (I’ll get into this more when I discuss this particular plugin later). Lastly, waves is inserted, in most cases, directly before the fader.
Well this week is all about the vocals so let’s great right down to it. At CCC the vocal inputs are the most important part of our mix, they are always as intelligible as possible. After around 3 years I’ve finally landed on a vocal chain that I really love for the live environment that I haven’t really messed with a lot (I’ve played around in studio with this and short of needing to add an EQ it works pretty well there as well). Because waves presets can move between work environments, when I sit down at our audio workstation, I’ll often start with this chain and see what happens. I’ve included pictures of my presets for our worship leader and while these get dialed in each week for each vocalist, this is just where I usually start the process. 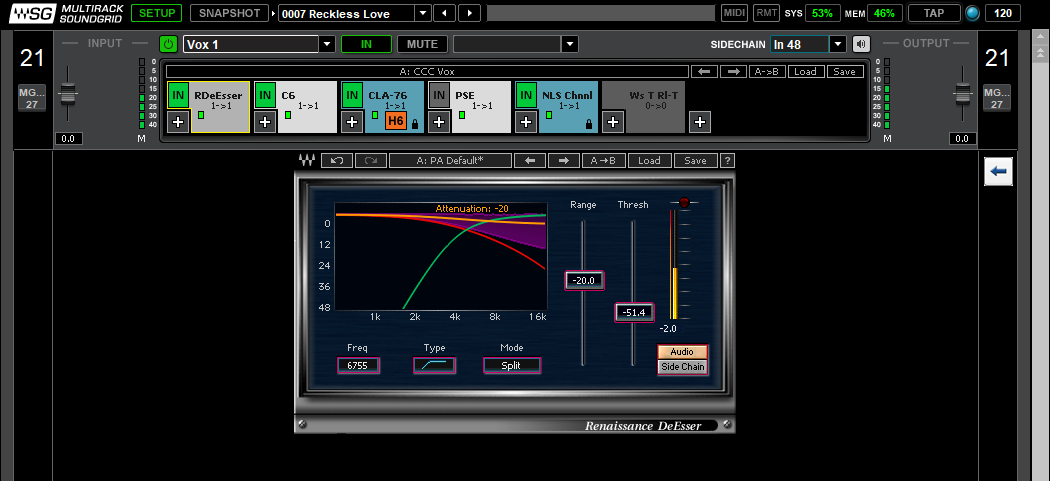 The very first plugin I use is a de-esser, Renaissance DeEsser. This is a very easy plugin to use and one of the most transparent de-essers I’ve used. You have the option for a band pass de-esser or a low-pass de-esser. As with all de-essers, you need to be careful not to turn this down to low because you will sacrifice presence and in some cases intelligibility. A good test is to watch your compressors for this channel and make sure they aren’t working in tandem, if they are this might mean you need to turn the frequency of the de-esser up a bit so it only triggers when needed and not during regular speech. My worship leader can have a harsh ess so sometimes I lower the frequency down a bit but it’s usually never below 5k and usually lands between 6-7k (this is where Smaart comes in handy because I can bypass this plugin, see the ess on the meters and really be able to dial this in a lot faster). I then just adjust the threshold to taste being careful not to overdo it and create a lisp. That reason is also why I often stick with the de-esser working low-pass mode rather than band pass. It just sounds better in our environment.
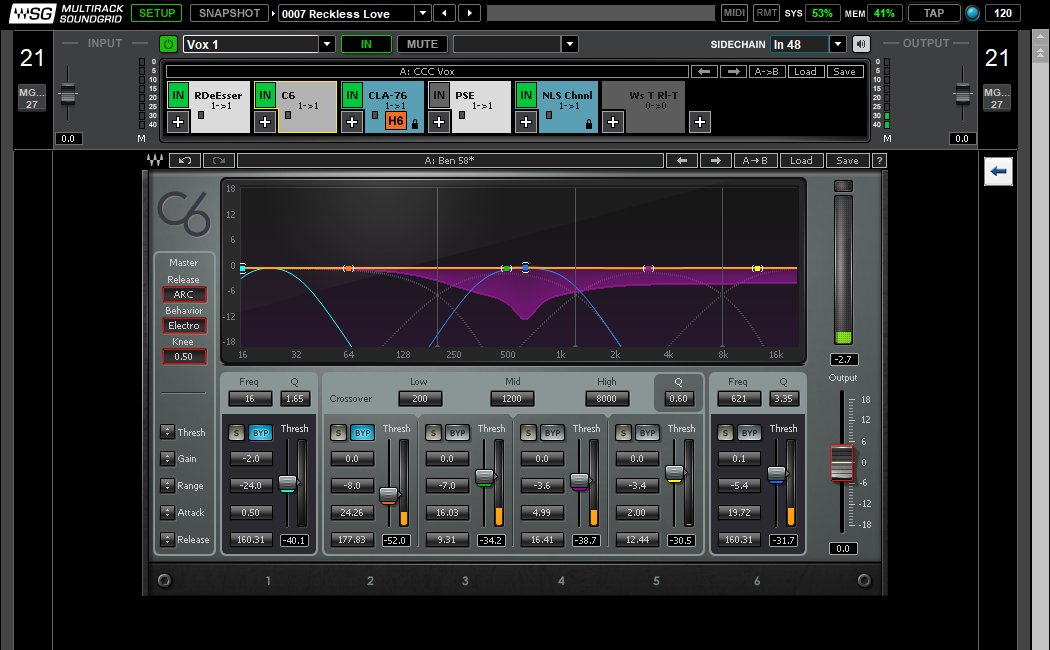 Next I have the perennial Waves C6. I have traded the F6 in here a few times but have always come back to the C6. Others have said this and I agree, the C6 seems to respond a bit faster for whatever reason. I also like the UI when it comes to vocals as well. I use EQ with vocals to fix global issues and use the C6 to correct dynamic issues that occur when a vocalist really sings out. Then, when he really sings out, I use the C6 to really shape his amplified voice to make the sure clarity and crispness remains. I try to keep his EQ light and only end up pulling some low mids. I’ve found that with the seV7 capsule I need very little EQ and this allows his voice to sound incredibly natural despite how much processing is actually happening. In the past I had some more dramatic cuts at the EQ level brightening it up and such but had a few issues when he is talking so I swapped to using the C6 instead which allowed for a more normal EQ curve and dynamic compressor that simply doesn’t trigger when he is just talking. I don’t use the orange band because I low pass all my vocals up to about 200 anyway so there isn’t any point in processing that range and I just didn’t need the other sweeping band. Generally I’m setting thresholds so the compressor is doing something measurable when singing out and not doing a whole lot when he is just singing normally. I love setting this with the adjustment to the far left where I can grab all the thresholds together so I can keep the curve that I set with the individual thresholds. A lot of times with female vocalists I’ll bypass that high yellow band to keep the presence in their voice that they naturally have when singing.
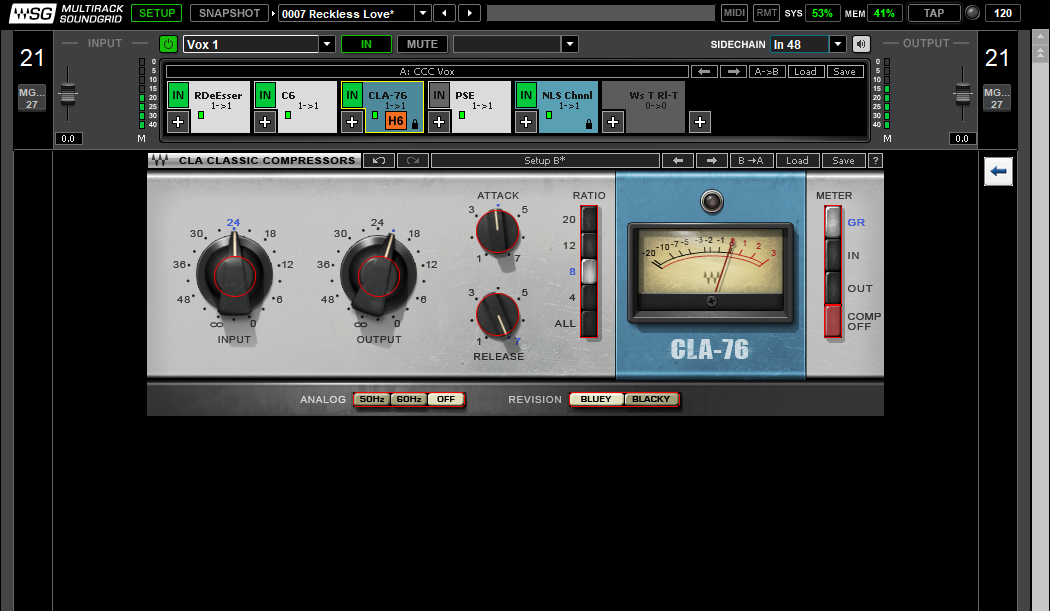 Third in the chain I insert a CLA-76 compressor. This really helps me lock in the whole voice together. Notice how I went from the C6 to the CLA-76. I don’t want to compress the voice as a whole before I dynamically compress different parts of it. The CLA-76 itself is based on a modified 1176 and is one of the fastest compressors out there. It also is a little different to setup as the threshold is not adjustable, you are setting input and output gains and setting the ratio and attack/release times. I turn the input gain up until I see the desired amount of compression happening, set attack/release based on role (for the worship leader I slow the down the attack and set the shortest release time, for BGV I speed up the attack and slow the release down a bit) so that even in my compression settings, the worship leader will have priority. I often have it on a ratio of 8 or 12 depending on circumstances and turn up the output gain to at least match input levels if not a bit higher. That output nob is basically post-compression gain. Also, it’s important to note that with the attack and release knobs, faster is to the right, slower is to the left. I’ve used the vocal rider here in the past but when I tried out the CLA-76, I’ve basically never gone back. If I need it I’ll put a vocal rider after this plugin but that is a pretty rare circumstance anymore. The biggest thing to remember when layering compressors is that ratios are additive. If you have 3 or 4 compressors on a voice you might end up with 15+:1 compression happening could all but eliminate dynamic range. Just something to keep in mind as you choose your plugin chains.
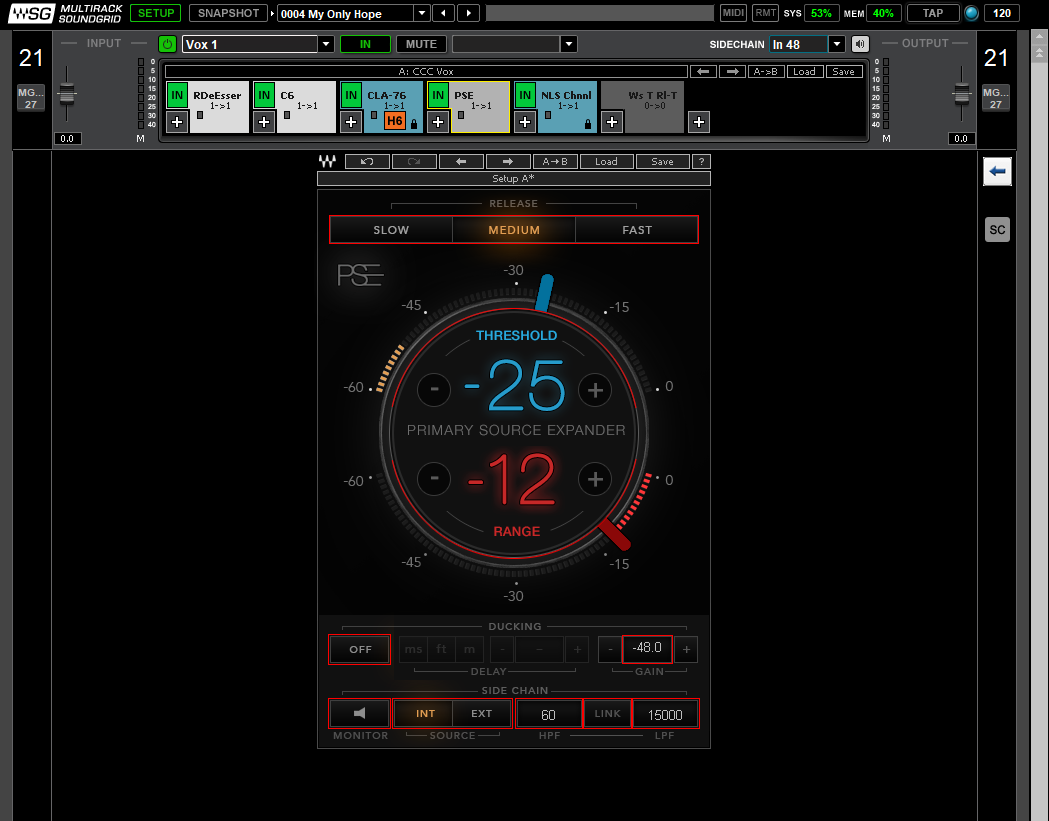 Before the NLS plugin sits the Primary Source Expander. This isn’t just an expanding gate, it works better than many other gates with expanders work and I really believe Waves when they say they developed this plugin as “the” gate to use with melodic sources such as vocals. They claim to have developed with voices in mind and it seems to have really paid off. I think the ballistics in the meters don’t truly show what’s happening, you really need to set this with your ears live. Occasionally you’ll have to make a change mid-show as well. Because this is post compression the threshold can be set pretty high with an aggressive range. I’ll set the threshold during soundcheck and often never have to touch it and will experiment with different speed settings but usually land on medium 95% of the time as well. If I change it I’ll slow it down for BGVs or have to speed it up for a song for the lead voice. When I first started using it I was only at a -6 range or so with my lead vocal and a few less for BGVs but as I’ve learned to use it and start automating Waves so I can turn this plugin off when not singing, I’ve gotten real comfortable down around -12. Because the plugin is so smooth you get all the benefits of a strong gate to lessen drum bleed but have it open up every single time. PSE at this point is basically on by default for all of our events for vocals in general. Having it in line has really tightened up the band sounds and been one of the factors in allowing me to actually get to have cymbal mics up in the mix a bit to hear them better. In addition, having it after compression easy takes care of the higher noise floor from any compressors you’ve added up to this point.
 Then comes the NLS plugin. As I said earlier, this stands for non-linear summer. This plugin simulates the harmonics added by the electronics of the faders on every channel of three famous consoles. The first, Spike (as it’s called in the plugin), is modelled from the SSL console used for bands like Muse and Maroon 5. The second, Mike (a console owned by Mike Hedges), was used for some big name singles like Pink Floyd’s “The Dark Side of the Moon.” The third, Nevo (a modified british vintage console owned by Yoad Nevo) which was used for Sugababe, Air, and many more. They all have their own unique characteristics. We start them all on the Nevo setting with each on their own channel model because this seems like the brightest model of the three which is the best starting point for us of the three available. I have set a global drive level to the same numeric value so the plugins are all having about the same impact and sometimes turn it up on a few inputs to really push the harmonics. Because I have my bus groups in waves I can use the dca settings as well so those are setup as well. This adds the modeled harmonics of the DCA pots on the consoles as well which is a really unique feature. While the differences in the models are minor, if you take the time to try all three A/B/C style, one will pop out as sounding the best. So most weeks, I’ll go through the guitars and vocals and make sure that Nevo model sounds the best still and make changes as necessary. Having this plugin in the chain has really given me the ability to mix at the same warmth of sound our PA provides between 95-100 dBa down at levels in the low 90s where we usually try and mix.
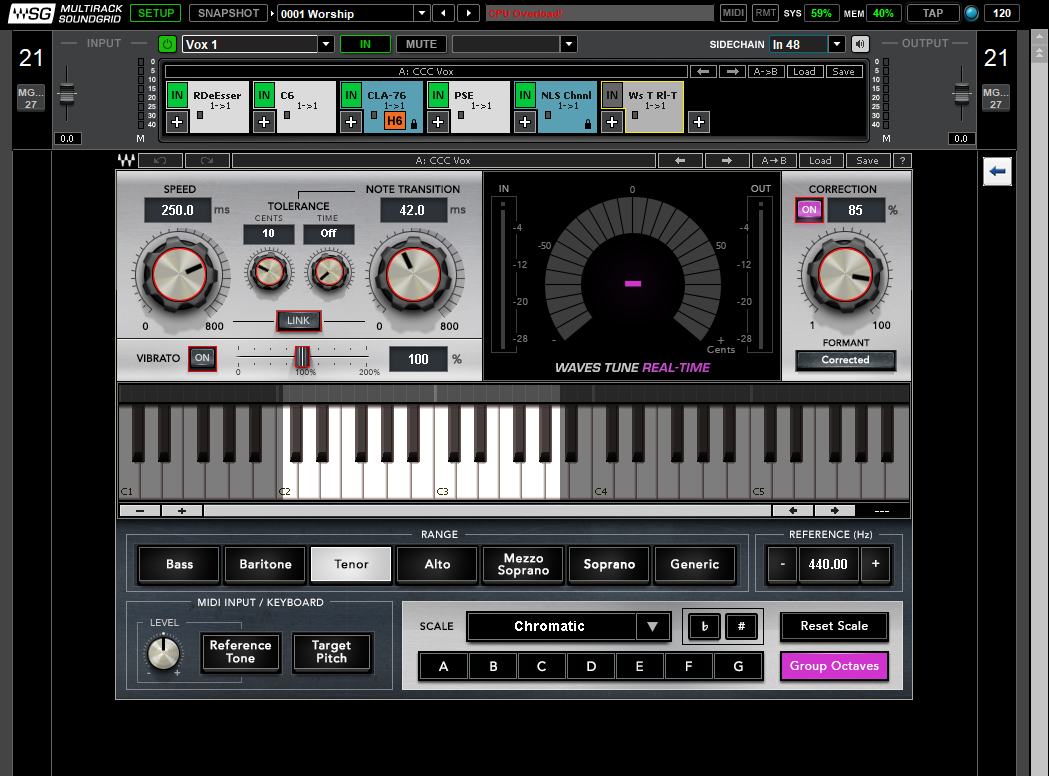 Last in the chain is the Waves Tune Real-Time. This is an auto-tune plugin I use to really lock in good vocals to each other. I don’t use this all the time because it can make vocals who struggle with pitch worse but if you have a group of really good singers, you can enable this and really lock them in pitch-wise. We use it very gently in a live setting. For example, one of our vocalists hits the note but sometimes has trouble holding that pitch which I can fix with this plugin. We also have it react relatively slowly with a correction of only 85% so this plugin is not going nuts. Sometimes I’ll set a key if the chromatic setting isn’t finding itself but most of the time it works great. I’m not using this as an effect so the key here is keeping it incredibly transparent and slow moving.
***UPDATE*** After some experimenting with having this at the end, I now have this at the beginning of the chain.
Well that is week one. I hope you got some new ideas or confirmed what you are already doing. Next week we will going through the default chains for guitars. While they default chains are a bit different for each they are also quite similar. As always if you have any questions, feel free to leave a comment below or email me at daniel@studiostagelive.com and I’ll respond as quick as I can. See you next week!
Hey,
just a thought as im doing some pre-setting up of my multirack file. for vocals why put the Waves tune at the end? My initial thinking is that it may make more sense to put Wavestune earlier in the chain perhaps after the dynamic eq but before any compression and the NLS. I would think the eq and wavestune gets the vocal sounding as good a source as possible first then you process it into what sounds good with the band. and perhaps compression makes it more difficult for waves tune to operate because the harmonics don’t stand out as much. Just something id like to hear your thoughts about.
At the time I was experimenting with having it at the end to see if it would work better. Long story short it didnt, it’s now at the front, first thing. Tuners generally do work better but I had postulated that if it was post Primary Source Expander than it would only hear the notes that the vocalist is singing and might work better. It didn’t seem to do any better and generally speaking you want the tuners first anyway. I play around with stuff a lot. You can’t learn if you don’t try.
Would you be interested in my multirack template file?
Yes, I would love to have your multirack template file. Thank you.
send me an email and I’ll send it back. daniel@studiostagelive.com