Blueprints: Mix Position Essentials

This last week of this Blueprints series is going to focus on what our FOH/Studio booths look like. Sometimes we get so focused on system tuning, mic placement, battery checks, FX processing, etc, that we forget to make sure our workspace has everything we need setup and ready to go so we can be as prepared as we need our artists to be. This list isn’t meant to be an end-all be-all but rather a checklist, a brainstorming, or even just a suggestion of ways you can arrange your space to set yourself up for a win during the event/recording. The biggest thing I want you to remember is that this is only a list of recommendations based on my experience. We all use different tools and need to see different things, the key however is to get setup so that you have the ability to see clearly the information that you need the most in order to effectively mix.

The first thing may seem obvious but get your console setup with plenty of space. Try not to pin it in the corner or a room or right up against another member of the tech room.  Doing this ensures that you have plenty of room for your FOH/Studio computer and controls and gives you plenty of room to move around during your event/recording. No one likes to feel cramped anyway right? Check to make sure that it is also at a height that is comfortable for you to mix so your wrists don’t get strained and so that you can clearly see what meters are reading and what may be on the screen of your console.  I’d highly recommend an adjustable height desk (similar to this one), just make sure that it can hold the weight you plan to put on it!

While we are on that topic I wanted to bring up the FOH/Studio computer topic. In the studio you’ll probably always have a computer but at FOH having a computer there isn’t default yet. For me it’s essential, primarily because we multi-track all worship but also because I can put all my system control software on there, load up planningcenter during services, and just have access to Teamviewer which we use for just about everything. If you don’t know what Teamviewer is check out this post I wrote awhile back where I discussed how we use it! If you don’t have a computer maybe consider at least getting an old laptop you can use if only to play your walk-in and walk-out music from or be able to load up planningcenter live or pull up RTA to help find those troublesome frequencies better.

Speaking of which if you don’t have an RTA like Smaart7 or a program like Trend or at least a handheld db meter, please consider getting one of these three options. Having at least a meter accessible helps to keep you accountable to your mix. It is extremely easy to just mix, make it sound awesome, and not know how loud it is, but unless you are on tour this is never a good idea (even in the studio you need to be aware of the volume you are mixing at to help prevent ear fatigue). Now you might have that job where it doesnt matter but that’s likely not the case as sometimes even on tours there are restrictions and local laws to abide by. Having a more advanced meter like Trend can show you those averages over time and help  you better understand where your mix is sitting but something like Smaart does all that but also provides a reliable RTA that is extremely useful finding those feedback frequencies and noticing acoustic trends or a build-ups. Regardless of the solution you choose, please make sure it’s calibrated! Follow up with us at engineers@studiostagelive.com and we will help you with that!

These next tools I would consider optional but definitely a bonus. The first of those tools is Shure Wireless Workbench/Sennheiser Wireless Systems Manager/etc. A tool like this is great to help monitor your wireless mics. In so many systems today the wireless receivers aren’t kept at FOH anymore because of reception issues or just a want to make things as clean as possible. To that end it’s always neat to utilize those network jacks on the back of your wireless receivers and monitor them remotely.  Many times these systems also have a way to scan the area for RF interference and pick the best channels for your area. With both Shure and Sennheiser these tools are free to use with their hardware to download and install them today!

Next is the console external monitor.  While definitely  not required, if your console supports using an external monitor, plug it in and at least check it out. With digital consoles, it’s amazing that they are able to pack so many things in a small form factor but it is often at the expense of being able to see everying at the same time. So having that external monitor will allow you to see more information from your console and informing decisions you are making in regards to your mix.

This next tool isn’t always available to everyone but could be with some effort. That is the A2. Yep, having a second tech available.  Whether that is a monitor tech or someone who just helps check batteries or dole out microphones, having help is always great. In any situation, having just that one extra hand is more than twice as helpful. I love to use that guy/girl that wants to get involved but isn’t as knowledgeable. They can see and learn a lot standing right next to you or running the monitor console. In the studio world this person could be the tech that runs in the booth to make that mic placement change or who sits and watches the recording software to make sure it’s running while freeing you up to do what you do best, mix. At Christ Community we have a monitor engineer who is backstage with the band taking care of everything they need and also keeping an eye on batteries and headsets so that whoever is FOH can focus on that task completely. We are very fortunate to have an awesome team of monitor guys (one of which who also mixes FOH) who help every week taking care of the things that are easy to forget about from FOH. If you aren’t recruiting volunteers or thinking about bringing someone in to help with the little things, start now!

This last tool is sometimes controversial. For some engineers, headphones are tool of choice and for others it’s near field monitors. For a few, they have both options available. Here is where I land. I prefer, with prejudice, near field monitors and this is why….whenever you cover up an ear, you lose touch with what’s going on in the room you are mixing within (obviously this discussion doesn’t apply to those of us in the studio, but you recording engineers can still weigh in). I’ve used both, by themselves, in the past but it wasn’t until I had a good set of near fields to use that I learned how valuable they actually are to aid in locking in a good mix. There are many times in which I have felt that having headphones available would be helpful but if I put on that set of headphones I am no longer hearing what’s going on in my room and making decisions for the room but rather for my ears.  I find that near fields can be very helpful, when setup correctly (delayed to the PA so there aren’t timing or phase issues) in hearing intricacies and bringing issues right to your ears during rehearsals. The key for me is to always be listening the same way as the audience will be listening.  Simply googling this issue will expose quite a few conversations on the topic!

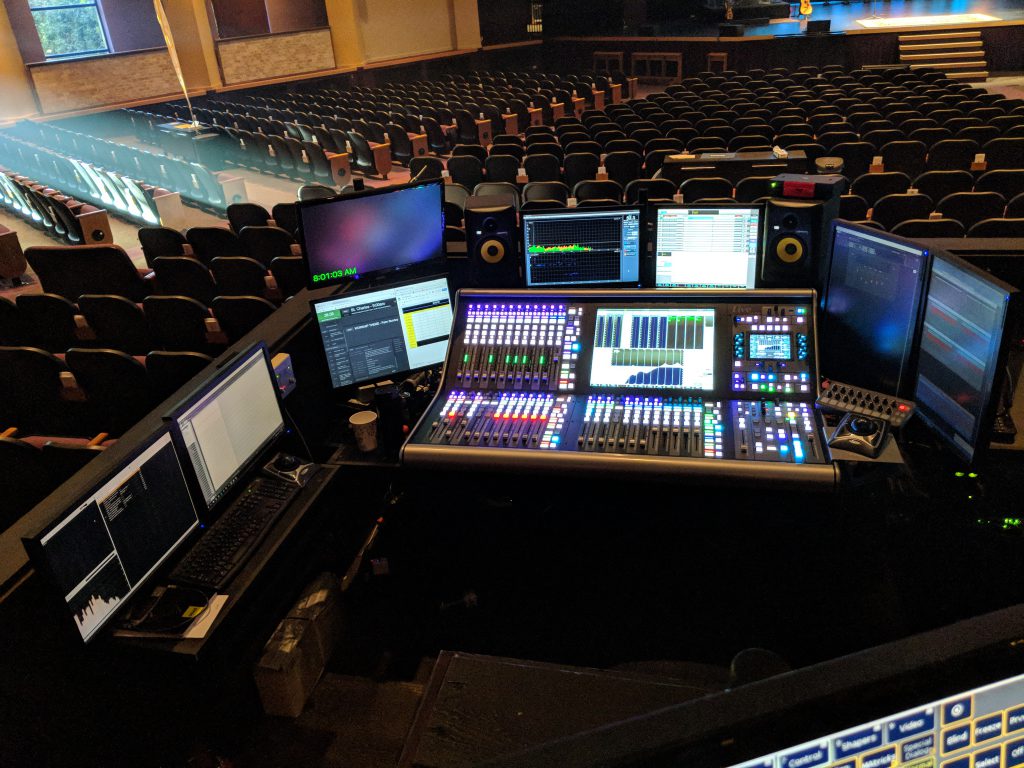
Lastly I just wanted to show you a picture of my office that I get to mix from on a weekly basis.

The list of tools we have just gone through, I am very blessed to have each of these items. I even have a few extras. I have audio and multi-track playback computer monitors to my left and a stage display monitor (something I didn’t talk about but that I use a lot as it shows me video countdowns, and helps me keep track of where we are in a particular element). Below that monitor is just an extra monitor I use for planningcenter and have our patch list loaded up.  Just above the board on the left is Smaart and the SSL console’s external monitor right next to it.  Then the two vertical monitors on the right are our Waves plugin rig and Shure Wireless workbench.  We also have that pair of near field monitors woven in there. Looks like a space ship I know but to be honest, the only extra expense here was buying the monitor mounts as all the monitors were just extras we had sitting around from retired computers. All of which are mounted to an adjustable desk so I can sit or stand when I mix.  Having all of these tools readily accessible and extremely visible helps me track a long pretty cleanly and provide me with all the information I need to create an excellent mix not only quickly and efficiently, but also consistently from week to week.

If you have any questions just leave a note in the comments!

P.S. – Happy Easter! Stay tuned, next week, if all goes well I’ll have another episode of From the Booth showing the worship from our Easter services. Be sure to stop by. If you’d like, click that subscribe button at the top and sign up to receive an email with a link to each new post published here!


Blueprints: Production Computer Design

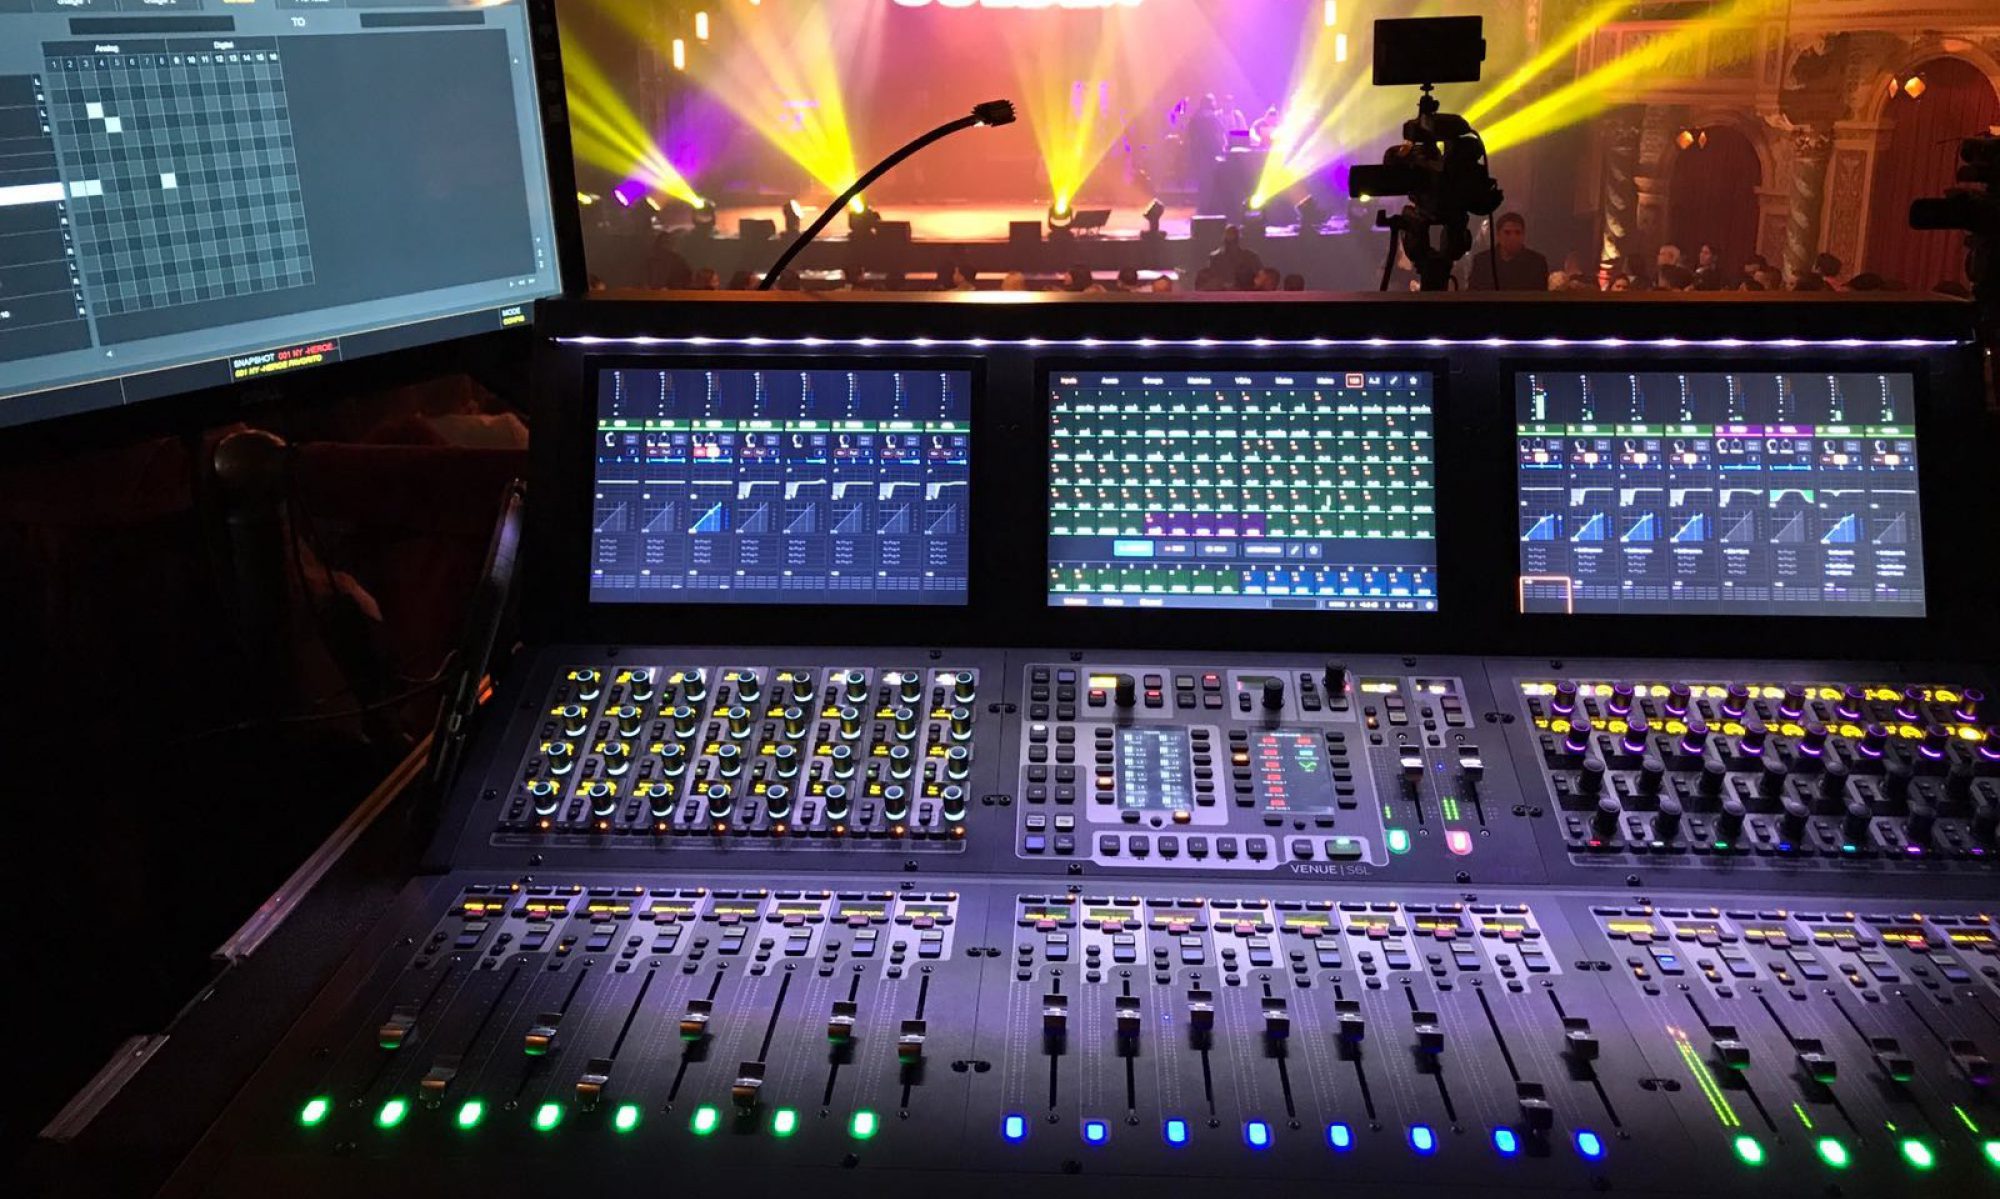
This week in our blueprints series we are going to talk about production computers and how I go about designing them so that they are both extremely reliable, have plenty of power, and budget friendly.

As we continue to progress into this new age of technology, church and studio technology will continue to progress with it (whether or not you decide to join that trend). Because of that the need for reliable, reasonably priced, computers for production use has risen. Many of us have gone the route of self-designed, self-built machines, but still several of us are still buying pre-made macs/pcs because of a fear of things breaking or money lost from design mistakes, or simply a lack of knowledge to get the job done. This is one area that we all could use some additional knowledge. To that end here is a quick tutorial/video about building computers from a great youtuber Linus TechTips. I don’t like re-inventing the wheel and repeating what’s already been said and he does a great job explaining the entire process and set the tone for our conversation here. Here is that link!

To that end, it has been one of my responsibilities recently to design a framework and hardware direction for our computers at my work. I had a few requirements if I was going to get into building and maintaining not just one computer but several mission-critical machines and several more that are just used in our facility for production support and it’s that idea that I think might apply to most studios/tours/churches etc. The first requirement I wanted to discuss was budget.  For those of us in the non-profit world this is a completely different ballgame than those in the for-profit world but both need the same computer, the computer that gives the most bang for the least amount of money. So the idea is to find the amount of money that allows for the purchase of quality components without spending so much that you haven’t saved any money from buying a pre-built machine from HP or DELL (notice I didn’t once mention Best Buy or Walmart or any big box store, it is my distinct experience that buying computers from any in-person store, barring any amazing sale of last years premo model, is rarely a great choice financially). This number will vary with your budget or expense allowance but a great guideline with any form of electronics is that you get what you pay for with a second guideline being that no matter how great your software is, if it isn’t running on a capable machine, it’s going to not work well. Right now at CCC and for a few of the side gigs I’ve designed for I try to build the basic production machine to be $1000 – $1200.  That sounds like a lot of money but if we think about that computer lasting 4-5 years that’s a reasonable price for a computer. If that machine has a specific purpose like multi-track recording or audio/video editing than we always plan for more. I know I know, you are saying that is more expensive than computers I can buy…this isn’t any cheaper! Well below you will see…

The second requirement was just that whatever computer I end up with needs to be reliably awesome.  Yes, I said reliably awesome.  I want to be able to sit down at whatever computer this is, be able to effectively do whatever I need to do and do whatever it is quickly and efficiently. Also, reliably awesome means that I can do that whenever I want. To put it another way, these computers need to run 24/7 and be distinctly overpowered for today’s ordinary tasks yet strong enough to last 4 or 5 years in order to keep up with the pace of software development and potential hardware upgrades. This means a few things, first is that the power supply purchased needs to be able to power whatever I put in that machine for next 10 years or so and be efficient enough that I’m not paying out the teeth to be running it for 24 hours a day for ten years. This usually means buying 80 Plus Gold certified power supplies (link explaining a few things to look for in computer power supplies). Doing this also usually gets you a better power supply made from better components as the certification process inspects everything from actual output to the quality of power coming from the supply itself. I often buy a power supply capable of 25%-50% more than I need as well so that I have room to expand internally by adding a new GPU, more RAM, more HDDs, etc without worrying about needing to buy a new PSU. Yes you can save a few dollars (it’s really not that much) and buy a weaker PSU but the odds are if you get a good PSU you won’t have to buy another one for as long as you are using the case you put it in….I’m speaking from experience here. Next I make sure to have plenty of RAM. This usually means 16gb of RAM. Yes that is a lot but two 8 GB sticks leaves room for RAM should you need it and gives the OS plenty of breathing room when it comes to running all the applications you’re going to run as well as having plenty of browser windows open and running. Lastly, when it comes to CPU and GPU choice, it’s all about matching them up to your budget but also together. Think of it like your home garden hose. If you have a small spicket, you aren’t going to fit a 4″ hose to it….you are going to fit a small hose. The same applies to your CPU and GPU. Start by figuring out how much of your budget is left for these two items, divide that in half, and that’s how much you have to spend on each.  9 times out of 10, it’ll all work out just fine. The only exception I’d say is if you plan on upgrading quickly than buy a better CPU. GPUs are easy to upgrade, CPUs are not. You get a new CPU and you are likely getting a new motherboard and you have to think about cooling, etc. Just trust me on this one. Believe it or not if you build a PC that is reliable, it will also be awesome. The components you’ll end up with will be better rated, have a history of working well and will help to extend the life of the computer you built to sometimes be twice or three times that of a lesser PC, saving you money. Please don’t cheap out…you’ll regret it.

The last thing I wanted to bring up was my philosophy of interchangeable parts. Yep, computers can be like cars and have interchangeable parts. You accomplish this by spending more time in the beginning picking gear that is universally available.  Don’t buy niche motherboards or used stock on Ebay. Yes these options will likely save you here and there but they will not offer the availability of stuff on Amazon Prime. You won’t be able to get them in two days after something goes bad. Next it’s about designing computers with identical parts.  For me this really comes into play with motherboard and CPU combinations. So far I’ve built around 10 production machines, there is only two kinds of CPU connectors but from the same manufacturer. That means if any of our critical machines goes down, I can take parts from any of our not as critical machines and put it into that critical machine so that regardless of when parts arrive, I can get through the event. That means also that my power supplies are all identical for the most part, they are all overpowered so I can take any power supply from any machine and put it in another one in no time flat. This is also the reason why I load up our computers with RAM so that I don’t have to worry about needing to take some out and put it in another machine, I can just do it. I haven’t had too many failures but when I have, they have been easy fixes and parts came quickly. For me, this is the best way to maintain a fleet of computers, build them all as close to identical as you can.

If you would like me to forward you a list of specs or parts that I use just email me at daniel@studiostagelive.com and I’ll follow up with you as soon as I can. Hopefully the discussion here helped you think differently when it comes to production computers and inspire you to start building your own machines!


Blueprints: Electric Guitar Amp Catch

This week we are starting a new series called Blueprints! The idea here is that we will be sharing things we have designed that have changed the way we do things for the better or saved us large amounts of money.  This first week we are discussing guitar amp catches!

There are many philosophies for how to deal with electric guitars in live spaces. For tours where db levels just have to remain safe none of what we will talk about will likely apply but for the rest of us, those who are mixing in clubs, recording studios, houses of worship, etc, controlling stage noise or mic bleed are daily battles. One of the ways we contain that at Christ Community where I work is to isolate the electric amp from the stage.  This allows us to do two things, the first is be able to tell the player to set his/her amp where he/she likes it volume wise (giving more freedom to the guitar players will surely get you some brownie points for when you need to make a change they will not likely enjoy). Secondly, it makes a huge difference for stage volume and reflections in the house thus tightening up the mix quite a bit.

So how exactly do you go about isolating a guitar amp? Well there are a few methods that will ultimately be determined by your budget. I would like to say right off the bat though that if you plan on doing this at all, please pick up some SGI boxes from Radial to extend that guitar cable from the pedal board to wherever the amp lands. Can’t you run just a long cable back there? Sure you can….should you run a long cable back there? I wouldn’t recommend it. Being that the guitar cable is unbalanced (i.e. two wires) this cable will be very susceptible to EMI issues as well as signal loss and longer distances. The SGI boxes actively convert the signal from a 2-pin unbalanced guitar signal to a line level balanced signal and back on the outgoing side.  Because the cable between the boxes is an XLR connection it’s easy to utilize existing infrastructure to route the signal however you want back to the amp where it needs to land.  Also, you can rest assured that the signal is getting to the amp as if it was plugged in directly to the pedal board without any tonal changes or interference. I’ve seen too many people have all kinds of grounding issues or hums and when I ask about how they extending the guitar signal they say just a long cable….but we didn’t come here to talk about that stuff….

Back on topic, the first and most budget friendly option is to just get the SGI Boxes and put the amp as far away from the audience as possible in your room, preferably facing 90 degrees to the PA (this makes sure that the audience doesn’t receive any direct sound from the amp itself). This, while not making a huge difference, will still improve your mic bleed issues and is as easy as plugging it all in and running a single cable between the boxes. If you plan on building a cabinet like I will describe below this is a great stepping stone to slowly transition players into the final setup.  Sometimes, when we change things on stage or in the studio, it’s better to ease artists into change regardless of all the benefits you perceive to just jumping the whole way in one leap.

The second option which you can take advantage of is to just put that amp in another room. Many of us have a closet or green room attached to our stage or studios and more often than not it would be easy to run those few xlrs needed (cable for SGI pair and a cable for the mic to bring that sound back into the PA) to setup in that completely separate room. Even if you can still hear the amp when the room is quiet, don’t worry, when you have the PA booming no one will hear those acoustic noises. I’ve even heard of putting an extra mic in the room with the amp off axis and generating some live reverb to mix in as needed. Just a few things to think about…first, don’t put more than one amp in a single room or closet. Your bleed issues will just move with the amps to the other room. If you need to have more than one amp in a room be sure to isolate them the best that you can by facing them in opposing directions, not setting them up right next to each other, setting up a few foam walls, etc.

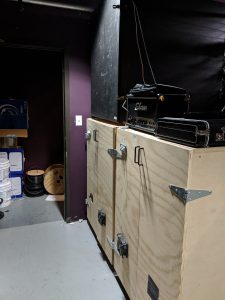
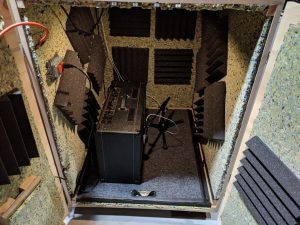
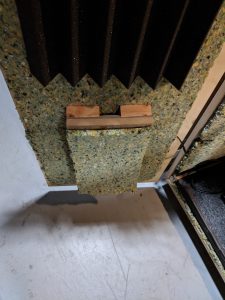
The third option is to simply just make an amp catch.  At CCC we have three cabinets we have made over the years.  One completely sealed cabinet that we use for anyone that has a cabinet seperate from the amp itself as no cooling is necessary and two for standard guitar amps.  Pictures below….

These are actually very easy to wire up.  We went to our local science surplus store and picked up an AC Powered cooling fan (or you can get one online, something like this), got some plywood or MDF from a local hardware store along with a few good hinges, a few light switches, and some wire if we didn’t already have it. We already had some pieces of what I like to call studio foam (here is an example) but we also picked up some carpet pad for general use and some spray on adhesive and some staples for our staple gun.  Total cost for parts was less than $100 per box and even less for the black on on top that is just a sealed box. Than we just made the biggest pair of boxes our space would accommodate which ended up being around 3′ x 4′ or so. The key here is to make it as big as you can. The smaller the box the more “confined” the amp is and the sound you capture will sound very tight, which from an amp cabinet isn’t always the best thing.  Our cabinets ended up being about twice as tall as the amps themselves which also made it very easy to get the amps in and out.  As you can tell we lined the whole thing with that carpet pad we talked about just as the first layer of “soundproofing” the box and giving the player even more room to run their amp at full volume. Than we just put in as many of the pieces of foam as we could to further that goal as much as possible. It’s important to plug in a commonly used amp from your band and make sure that it isn’t too dead, but that likely won’t be an issue. Remember, we are only keeping the sound in not turning the amp catch into an anachoic chamber. We also installed some easy to wire puck lights so we can have a light switch and make it easy to see whats going and and got a power outlet installed in the catch that is wired directly to our fans so that whenever there is power in the catch, the fans are running.  Just one fan was enough with a slit left in the catch in the upper back corner.  Doesn’t sound like much but it has worked great for us and no amps have overheated in over 3 years of weekly use. The switches for all of this are on the outside for easy access. Next, we carpeted and made the landing for the amp able to be pulled out if we ever needed even more access. We just parked all three of those amp catches right next to a conduit outlet we located so we could pull in an XLR snake to feed all those SGI boxes and mics that we will need for regular use. Lastly, for that fan we used, we made a baffle for it so the sound from the fan doesn’t bleed into the mic and the air from it doesn’t directly hit the mic either. We never tested this without the baffle just realized the first time we turned it all on that we might like one there.

Having a setup like this that is really well done has really helped our musicians to trust that we are looking out for their best interests. They also love being able to turn their amps up a bit to ensure they are taking advantage of all the tone those wonderful tubes can produce! That’s it for this week but in the coming weeks we will be discussing saving money by designing and building your own computers and lastly setting up your FOH/Studio setup for success. Be sure to subscribe if you haven’t already and comment below with any questions you may have!