Here we are on the last week of our Guerrilla Mixing series. In week one we went over what to do first in a time strapped situation. Namely just get the basics setup (VCAs, groups, etc), really focus on mic placement, and be sure to walk around and get a feel for the room. Last week, I talked about what to do if you find yourself with a bit extra time to get some EQ dialed in across the board as well as turning some compression on as needed. This week is all about the bells and whistles. More often than not I’ll be setting this up in the middle of the first few songs but occasionally things go really well and I’ll be able to squeeze all this in before the doors open.
If I happen to finish all that other stuff on time and have some time to get some more things done, the first thing I’ll dial up is some effects. Verbs first then delays. I love using verbs as a tool because they can hide a multitude of issues when used appropriately. It is quite amazing what a little bit of verb can do for a live mix in terms of gluing it together. If you can, try to separate instruments and drums from the vocals but if not it’s no big deal. I do this as I usually like to try and treat them differently (ideally I’d split them all up but remember, time is short, quality over quantity, what makes the biggest difference?). As a matter of personal preference I like to run the verbs on the vocals a bit richer than the rest of the inputs. After I get that setup I’ll go after getting a tap delay setup. As a mixing tool, the tap delay is likely one of my biggest and most versatile effect to add to a mix live as it can really be a neat thing to hear. Waves can be a big help here as well because you can really utilize the presets in something like the H-reverb or H-delay to get to a sweet sound really quickly. More often than not soundboards have presets for built-ins as well. No matter what the preset is, treat it like a starting point knowing you’ll be back to tweak it as you need.
From there it’s all about continuing to dial things in. Usually this part is actively happening during the show. The process slows down but as the show goes on I’ll be dialing in compression, adjusting EQs, looking at some group compression if I need it, and really trying to stay active as I mix. There is nothing that frustrates me more than watching someone just stop mixing. For me, audio engineering is not a “set it and forget it” experience. It’s an ongoing thing. As I hear something, I’ll fix it. Then start listening again for what’s different because of that change. Did fixing that one problem expose another? If I have access to some advanced metering with SPL readings or Smaart I’ll be looking at that as well. After a full day of running around and mixing at full volume for hours, your ears are also likely over exposed or almost there. This is where learning to read your instruments can come in handy as an assist your ears in mixing decisions. Lastly, If you haven’t walked around the room in awhile or at all and feel like you can, take a step outside the booth and make sure your mix is translating well around the room. You’ve changed a lot since you walked around in that first hour or so.
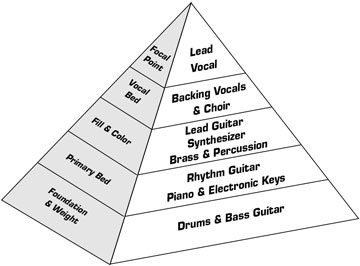
Lastly I wanted to remind you of one last tool that I use as I’m making mix decisions: the pyramid of sound (graphic courtesy of Curt Taipale, founder of ChurchSoundcheck.com). Good mixes are built on strong foundations. If the bottom of the pyramid is kick, bass, and any other low end source and works its way up to the top of the pyramid where you’ll find the transients in your mix, lead vocal, cymbals, etc. You don’t want a Washington Memorial here. Your mix will be too bright and feel thin or weak. You also don’t want a 1 floor state building either. Big mixes naturally have a good foundation of low end and controlled but present top end. Remember, this is just a tool and your ears should always be the judge but as you build a mix, don’t be afraid of low end. Don’t be afraid of controlling the cymbals and compressing that lead vocal a bit to keep it sitting pretty. I’ve included a picture which sums this up visually. I like this picture because on the front of the pyramid it tells you common inputs that sit in each area and on the left describes their most common purpose in a mix. Obviously as style changes the pyramid shifts a bit but this is a great thing to see to get started down this road. Along with that is the idea of mix relationships. Does the attack of the kick sound off when compared to the snare? Do the guitars blend well with the vocals? The individual components of the mix should sound good but to get them to blend well together you can use the framework of the pyramid of sound and apply it to groups of inputs as a system of checks and balances as you build your mix.
Well that wraps it up for this series. Hopefully you’ve learned a bit from my process and can start to implement the principles here the next time you are tight on time and have to come up with a mix quickly. If I had to share 3 ideas that sum up the series they would be this: set the big stuff up first and fine tune later, presets can be your friend, and check your work by walking around the room as much as you can. Have any questions about this series or this week? Just leave a comment below or on Facebook. Alternatively you can always email the team here (engineers@studiostagelive.com) and we will respond ASAP. Be sure to not miss out on the coming weeks by going to this link and subscribing to this blog so you can get an email when a new post goes live each week. See you next time!