
This is week two of our current tips and tricks series where I’ll be discussing gating drums and how to set them up the best way. Last week in the series, we discussed things that I do in order to get full piano/pad sounds on a stage with a full band as well. If you missed it check it out at this link. This week we are going to touch on using gates on drums, what not to do, and the little tricks to make the best of whatever you have. For the sake of discussion, lets already assume that you have your drums tuned and that you’ve chosen the best mic from what you have to suit each drum.
So, you’ve decided that you would like to use a gate on your drums. Not at all uncommon. There are some that are afraid of gates because you might miss out on a hit that you may need or simply don’t have the know-how to turn it on and set it up right and many more that use them religiously. The benefits to gating are quite apparent, most of which include the elimination of sounds entering your mix beyond what you are looking for from that input and secondarily controlling how much sustain that sound is allowed. For those reasons, gates are generally used on percussive inputs over less instantaneous and more sustained inputs like vocals or keys. Personally, the majority of my gating shows up on the drum sets with some very minor use on guitars to automatically rid me of that pesky tube noise coming from amps or hums from pickups. But before we get into this it’s important to go over the terms. There are 5 key terms to be aware of and unfortunately, each board uses different numerical schemes for these variables so you really just have to play around until you like what you are hearing and seeing happen within your console.
Range – the amount the input is lowered by if the audio input is beneath the threshold.
Threshold – this is the input level required to open the gate
Attack – attack is how fast the attenuation is released from the input after the audio levels pass the threshold
Hold – the time after the audio goes back under the threshold but before the attenuation starts again is referred to as the “hold”
Release – this is how fast the attenuation kicks in after the audio is beneath the threshold and after the hold time has been completed.
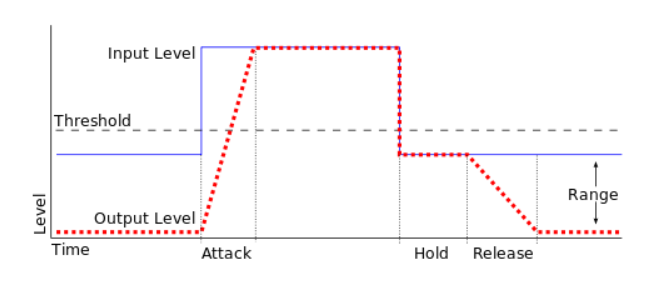 Here is a graph that shows what these mean if that would help you to understand things better. I know it helped me a lot when I was learning (if you click on it, you can look at a bigger version.
Through most of my career mixing I’ve just gated the regular way, by using the audio from the microphone as the thing that triggers the gate to open. This works pretty well. I have always been able to gate the bottom snare, kick in (if I have one), and the toms. This has allowed me to be able to control the non-useful ambient sounds of the drum kick that I don’t need. Sounds like snare in my kick and cymbals in the tom inputs. Usually on these gates I’d run a range of about -20db, thresholds set with some wiggle room to allow dynamic playing by the drummer, attacks that are about as fast the board with go without added any weird sounds, small amount of hold, and a release times between 150ms and 300ms. While these settings didn’t work for everything, they worked for most things. I unfortunately couldn’t really gate the snare top or the kick out mic (the one in the hole) because they lose their punchiness and attack while gated, this is because the gate couldn’t react fast enough while it’s being triggered by the acoustics of the drum. While you are still significantly better having gated bottom snare and tom mics, there is still some bleed that is especially noticeable in the drum verbs and the cymbals and hi hat still leak into mics all over the place because the other kick and snare mics are wide open. There are little things you can do to help (like using a dynamic EQ to created a frequency based gate) but you still can’t really gate the whole kit and really suck out that bleed unless you are editing in post production. However, there is one way….
That other way is by drum triggers. No no no, we aren’t talking about triggering recorded sounds to play with the drum is hit (though these can be used for that) but rather using a different type of mic that reacts faster in order to open up the drum gates. Drum triggers use a vibration pickup similar to that of some acoustic guitars that is much more sensitive than standard mics. This does of course require some extra inputs and a sound board that externally key a gate but most modern consoles have that ability to do this. For the kick drum you’ll need this trigger and for the rest of the drums, you’ll need this trigger. Just a heads up, you do actually need to get the kick drum trigger because of the difference in the rim on the kick being much deeper than in the snare and toms. After you get them installed on the drum hoops of your drums, I just plugged those into a DI and straight into the board. I’ve heard that you can make a cable instead of going through the DI but I haven’t tried that. So that is something to try if you don’t have any extra DI’s sitting around. We just used an 8-way radio DI because we had one sitting around because the 8th channel was broken. From there we patched each trigger to a channel so we could do whatever we needed to with the sound before we used it than set the external keys on basically the whole drum set excluding cymbals, ride, and hi-hat. I was really skeptical at first that we still wouldn’t be much better off but surprisingly, it was amazing! Because the triggers pick up vibrations not sound waves, they picked up the softer sounds much more effectively. We gated both kick mics to the kick trigger, both snare mics to the snare trigger, and each tom to itself. The very first week, without being prompted one of our more professional drummers came up asked what we did because the drums sounded so much tighter and clean. This also really cleaned up the verbs which had a profound effect on the slop in the drum sounds. Even on the ballads, I just make a quick adjustment to the thresholds to make sure they open for all the ghost notes. Just like that, I can gate just about everything all time. Personally I don’t gate any brass (cymbals, hi hat, ride) because I still want some drum set sounds so they don’t sound like samples and with setup, I still get plenty. Settings on the triggers are about the same just with a lower threshold because everything but the threshold can really shape the actual sound which we still want to happen. The only thing I use the triggers for is to speed up the gate opening, and for that they have been flawless so far. The biggest thing is that even on the softer songs I don’t have to adjust the gate near as much because of the sensitivity of these triggers and we can still get all those ghost notes without having to automate the gates on and off.
Now, I know that not everyone can afford to buy the triggers for their whole kit right away or have enough extra inputs to plug them all in, so if that’s the case, I’d focus on getting one or two triggers and putting them on your snare and the tom closest to your snare. These usually are the two that produce the most bleed so if you have to limit yourself, just try to get one or maybe two and get started with that. I promise you’ll be happy. As always, don’t just take my settings and run, be sure to test things in your room. What works for me may not work for you, so no matter what, put the trigger in, bring up some playback if you have some, and just start using your ears.
Next we will be looking at setting up guitars to be wireless the right way so that pedal boards and amps can all get the right signals. As always please feel free to tell your friends about the blog and subscribe at this link if you haven’t already! See you next time!