Gear Talk: Audio Distribution Part 2

Welcome back to our Gear Talk series about audio distribution.  Last week, we talked about the various types of splitters, patch panels, and snake connectors, but this week we’re taking a moment to stop and understand how digital audio consoles process their audio and how that affects connecting audio consoles to each other over digital formats.  Even if you only have two consoles to connect understanding the various factors involved is vital.

One of the things I often come across when working in broadcast land is the need to bridge multiple audio consoles (or just audio devices) through digital networks.  In broadcast applications with consoles that can support multiple formats and thousands of inputs and outputs it is something I have become fairly familiar with and I have grown to understand most of the popular digital audio formats in use today.  When connecting multiple digital audio devices (consoles) together one thing that you MUST ALWAYS be aware of is clocking (i.e. word clock). The word clock is basically an audio device’s heartbeat. It digitizes the data being brought in from it’s analog to digital converters all together at the same time.  When we connect or network digital consoles, we need to make sure they’re all clocking the audio bits together. If the consoles aren’t all clocked together, then those consoles will fall out of sync and artifacts or even dropouts in audio between the consoles will appear. When networking multiple consoles it is imperative to make sure that you have your clocking set up and working properly. The best way to do this is to have a clock master console or device.  This is a device that all other digital audio devices synchronize with. Most broadcast houses have a specialized “house clock” that handles both video and audio synchronization all at once so. In most cases, where only two or three consoles are being connected, you can simply designate one console to be the clock master. Designating a clock master is like syncing watches back in the days before smart watches. Most analog watches can keep great time, but if a group of people get together to do something very time sensitive, then they need to make sure all their watches all agree that 9am is 9am and that 9am starts at the same second for everyone at once.  Once you’ve understood that all your consoles must be clocked to a single source, you can now begin to understand digital audio distribution a lot quicker.

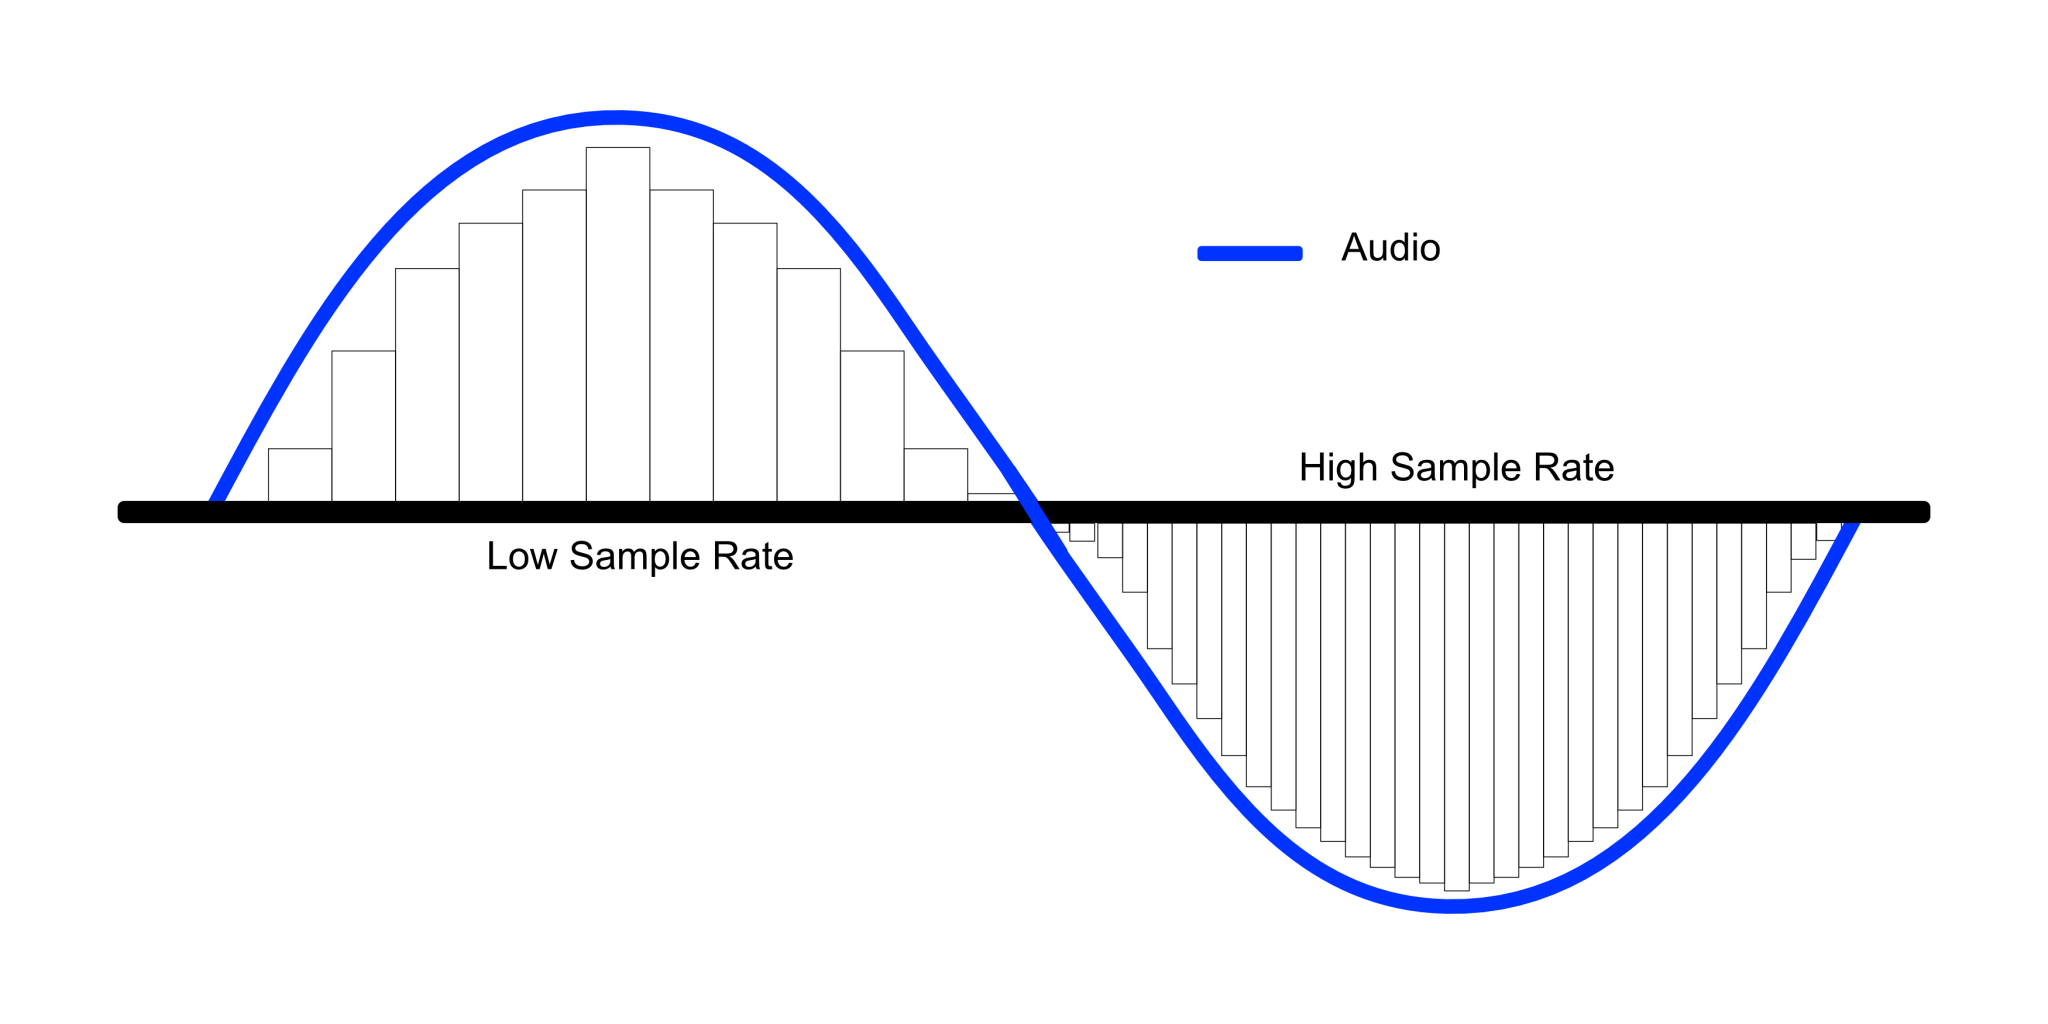
Another item to consider is the processing rate, or sample rate, of the audio consoles involved.  Most audio consoles in use today have a sample rate (the rate at which the analog audio is sampled (i.e. digitized) per second) of 48K but 96K is catching on and becoming much more popular and some consoles even have sample rates as high as 192K.  When thinking about audio processing there’s actually two factors to consider, one the sample rate which basically refers to how fast and how much your console processes the audio coming into it. The bit depth, which is often given in conjunction with the sample rate is how much audio your console can process at the given rate.  Think about sample rate as the speed limit on a highway and the bit depth the lanes on a highway. You need both a fast highway and a lot of lanes to move traffic smoothly. In this sense, sample rates and bit depths depend on each other. Most modern audio consoles today have bit depths of 16 or 24 bits with some manufacturers offering 32 bit I/O modules for more detailed sound.  This means most consoles have a great “highway” with plenty of “lanes” (bit depth) and lots of “speed” (sample rate) to move our audio along and process it efficiently and truthfully. While bit depth isn’t often a huge deal when networking consoles, the sample rate is very important as most digital networking formats have a hard time converting sample rates when transporting audio between consoles.  This is because a console running at 96K samples or processes the audio twice as much as a console running at 48K in a given moment of time The de facto standard to most digital networking formats is currently 48K because the broadcast world is still in 48k due to the huge complexity of their systems and interconnected technology. Live sound consoles vary much more based on manufacturer and user input.

Making sure all your audio consoles can communicate properly all comes down to sample rates and clocking.  Even consoles with the same sample rate may not be sampling the audio at exactly the same moment. Without making sure all the shared audio is being sampled together, the audio can be ruined.  It is important to understand the role of a master clock and why one is almost always needed when two digital consoles are connected together. Next week we’ll dive into some of the more common formats in use today as we continue our audio distribution primer. Be sure to drop a line below or on Facebook if you have any questions or drop an email to engineers@studiostagelive.com. If this article has sparked your interest in this topic be sure to follow this link and register to receive an email when new content is published. See you all on the flipside!

Gear Talk: Audio Distribution Part 1

These days more and more churches are growing their audio setups.  Some, want to do broadcasting to an online audience, others want to grow their worship team by adding a monitor consoles, while others may want to send all or parts of their mix to another space, still others may want to do all of the above.  This leads us into the wide world of audio distribution. In the upcoming series we will take a look at all the different forms of audio distribution from digital to analog and what their abilities and drawbacks are. For this first week, we’ll primarily stick to analog as it will build the foundation for the digital formats to follow.  As we have touched on in the How to Mix for Broadcast series, audio splits can be very useful and come in both analog and digital flavors.  This new series on audio distribution will cover both the analog and digital variants. We will also cover the various pros and cons of each type and of the special needs of some of the digital distribution methods.

Before we dive into the wide world of digital audio formats, it’s important to understand the analog variants many digital audio formats are modeled after.  The world of analog audio distribution is just as varied as digital distribution. Just like digital audio, there are a bunch of different formats that carry analog audio in different ways.  Analog audio distribution is done with splitters. While there are many kinds of splitters, the simplest is just a Y-cable. In fact, all big splitters are basically just multi-channel Y-cables.  Some have extra features and some splitters split more than just two ways, but all analog splitters, at their heart are just simple Y cables. Analog splits come in many formats and channel counts.  A simple 1:2 all the way up to 64:3 are common. Some of the more common formats of split are transformer isolated and groundliftable. Transformer isolated splits are the preferred method for large format splitters.  They work by splitting the audio 2-3 ways. One output is a direct Y cable split. The other output or two outputs are wound around a transformer in a 1 to 1 ratio to remove any DC voltage. This makes the transformer isolated outputs much less susceptible to any interference but has the effect of also isolating the outputs from phantom power.  This is mostly a protective measure to ensure that multiple consoles aren’t sending phantom power at once which could damage some older phantom powered microphones. The remedy for this when using a transformer isolated split is to make sure the console connected to the main output is able to phantom power any and all channels needed on the split.  Professionals have used splitters to allow any console using the splitter to their own gain settings instead of having to share and digitally trim (there were issues with doing this in the early days).

Another area of the analog realm that carries over into the digital arena is patch panels.  Analog patch panels are a really useful tool in live sound. You won’t typically find patch panels on tour setups but they’re still very ubiquitous in venues, even venues with digital consoles.  Patch panels are also still heavily in use in the broadcast world because of the flexibility they provide. Most audio patch panels in use today use the TT connector. It’s kind of a cross between a 1/4in cable and a mini cable and is a leftover of the old analog phone days.  TT actually stands for TinyTelephone and was primarily used by AT&T phone switchboards. However it is a fully balanced connection and is nice because its so small you can fit a lot more connectors into a block of TT patch panels than if you used XLR or even 1/4in connectors.  Like splitters, not all patch panels are created equal and different patch panels have different abilities. Patchbays can come in three variants. Normal, half normal, and non-normal. All of these have different characteristics that make them useful in certain situations. Normal patch bays are setup to work when nothing is plugged into the top or bottom.  They are wired so that whatever is plugged into the top port, flows to the bottom port. Plugging something into the top will break the connection and route the audio away from where it was originally flowing. Half normal patch bays work similarly except that when you plug something into the top port, it splits it and will continue to flow to the bottom unless you plug something else into the bottom port.  It is essentially a Y splitter. Non normal patch bays NEED you to connect the top and bottom ports to work. These are typically used in spaces that have much more physical I/O than console channels. The user can decide what goes where for each use. All of these options have their uses in certain cases and are a great option depending on your needs.

One more area of the analog world that I would like to touch on is snake connectors.  There are a lot of different analog snake connectors floating around these days but I’d like to touch on some of the more popular ones in use today.  One connector that sees a lot of use in studios more so than live environments is the DB25 connector. This looks loosley like the letter D and has 25 pins.  This allows for 8 channels of audio to pass through it. The DB25 connector is often seen on the back of patch panels, on a lot of recording gear, on the back of some Digital I/O modules where space is tight.  Be careful as there are a couple different pin-outs. The main two are TASCAM and YAMAHA pin-outs. It’s still 8 channels of audio but the two versions have differences on what pin is ground. Another connector is the CPC connector.  This is a circular connector that houses at least 8 but potentially 56 or more channels. CPC connectors are ubiquitous all over the place on tours, in theaters, and Houses of Worship (HOW) and are very useful. CPC snakes are a little scary because there is no one correct pin-out for them so you have to be a little careful when fixing one or changing one.  CPC snakes are cool because the CPC format can be made to fit just about any need and when paired with a patch panel, it can be extremely flexible. The last of the analog snake connector types is DT12. DT12 is a standard that carries 12 channels of audio in a round connector similar to the CPC format. What’s nice about DT12 is it conforms to one standard pin-out and has a VERY rugged connector.  DT12 is primarily used by OB (Outside Broadcast) trucks and other broadcast applications. It’s great for its size and weather proofing. While there are a ton of other snake connectors, these are the main players on the market today.

One last analog snake format that has become VERY popular in the past couple of years and can be very useful in spaces where there is a lot of cat5e but not a lot of traditional copper, is the analog audio over ethernet snake.  Analog over ethernet snakes utilize the 8 twisted pair cables inside a shielded cat5 cable to run 4 channels of audio with a shared ground over the shield. These can be extremely useful in situations where there is more cat5 than traditional copper.  A lot of companies make many versions of these. Some make boxes you can attach on either end of the cable, others make pigtail versions, a couple companies even make wall boxes. Most of them allow you to daisy chain snakes so you can multiply your four channels down the line.  Whirlwind, RatSound, Radial, and ProCo all make these.  Most of these manufacturers make DMX versions as well.  One thing to note is that a shielded cable is required for phantom power.

Come back next week when we dive into digital networking and all the different formats in use today.  We’ll also touch on best practices for digital networking and some ways to make sure you don’t get into trouble when connecting multiple consoles together. Feel free to ask any questions that came to mind below, on facebook, or by sending an email to engineers@studiostagelive.com. If you want to be notified when a new post is available, register at this link to receive an email when something has been published. Happy mixing!

Gear Talk: Micing Up a Speaker (Best of the Best)

Welcome back to week 4 of our series about micing up speakers for live sound. Sorry for the delay in this post, a side gig that has kept me quite busy and has delayed the writing queue a bit. Don’t worry, I’ll get back on track. Over the course of this series we have looked at several different options for micing up a speaker. From podiums mics, to lapels, and a variety of headsets my hope is that one week of this series has sparked some conversations about ways you can grow your toolbox and be ready for whatever is next. This last week I wanted to spend some time talking about my favorite headsets. Made by DPA they are what I consider to be the Cadillac of headset microphones. Most of the time, you can just turn them on and they sound great. It’s worth noting that I usually buy these with connectors to microdot. It seems counter-intuitive but I’ve found that the connectors break less when the mic goes to microdot and then gets adapted to your needs. I rarely argue for the most expensive options and these headsets are at the top of the price range for sure, however, in this case, I believe that it’s worth the time as these headsets are simply amazing.

My first exposure to DPA headsets was with their bread and butter headset the 4066. It’s the standard run of the mill DPA microphone. It’s reasonably adjustable but does have a tough time getting small enough for women. However, it sounds great. The mic, in my room at least, needs little processing EQ wise and brings an extremely natural sound while remaining vibrant and dynamic. By getting the omnidirectional microphone you get great coverage with minimal adjustment. For almost ten years, the senior pastor at my church has used this microphone without any help without issue. He puts it on, turns his pack on, and we are ready for soundcheck. Lots of headsets need to be fit to the user each time you put it on but with this 4066, with a semi rigid frame, it holds its shape very well and that makes it easier to use. DPA even recently released a new version of this headset called the DPA 4066 Core which basically increases the dynamic range. This is particularly helpful for quieter speakers or those that find themselves nearly yelling a lot of the time. Long story short, it is fair more sensitive at lower volumes and less prone to clipping at higher volumes.

The other offering from DPA is probably deserving of my award, if that matters at all, for the best sounding and most flexible microphone. The DPA 4166/4266 headset mic (single our dual ear options) can fit just about anyone’s head, have a micro adjustment right behind the ear including rotation to help it mold to the user, and a great system for cable management that just really helps the cabling disappear. The other unique feature of this headset is the way it sits on your ear. It looks a little intrusive with the extra little curly q involved but everyone I’ve asked about have said that it feel incredibly solid and after a few minutes you can’t really feel it anymore. If your pastor or speaker are worried about it, most of the DPA reps keeps these on hand for demos or you can usually rent them to try it on. This capsule carries the same improved dynamic range as the rest of the core microphones and of course as an omnidirectional capsule, it is just going to sound great if you can even get it close to being in the right place. Yes, I know they offer these and most headsets in cardioid mode, don’t be afraid of omnidirectional headset. With speakers, everything needs to sound natural all the time so having to be perfectly placed to achieve that makes everything more difficult. Really think about getting the omnidirectional headsets unless you’re outside or at a loud event.

Well that’s it for the series. I hope you’ve found some good ideas here and perhaps even thought about trying out or demoing some or all of these options. If you can amass a collection of items that includes a podium mic, a few different lapels, and a few options for headsets, you’ll be set no matter what you come across or need to support. If you have more questions about the mics I have, email me at daniel@studiostagelive.com or leave a message in the comments below or on Facebook. A great way to make sure you don’t miss what’s coming next is to sign up for my email list, found at this link, letting you know when new content is posted to the page. See you all on the flipside!