Thus far in this short series we have dicussed the keys to great piano and keys sounds, properly gating drums, and last week we talked about appropriately extending guitar cables to avoid interference. We continue this week talking about using backing tracks while considering both ease of use in setup and soundboard layout. Musicians in just about all genres of music have used and will likely continue to use backing tracks for many years to come. Now, with the advent of DAWs that run on any computer and vast libraries of samples many artists develop tracks to go along with their music. Where it gets interesting as audio technicians is how we integrate those tracks into our studio recordings and live mixes. Some mix the tracks down to a stereo two-track, others split them up and keep them as individual inputs. This week I want to discuss some of the different ways you can integrate the tracks into your workflows in both the studio and live environment and then offer up some suggestions on things you can do to help make your life easier.
Since tracks started in the studio, so will I. Using tracks for recording purposes has been going on for quite some time. Especially when you are starting to record a new song it isn’t at all uncommon to create a sampled band to lay down the vocals and start recording the other parts so musicians have something to play too. Than, when the song is all recorded you go back to the drawing board and develop some new sounds to help fill it in musically. Dealing with those extra tracks can be pretty simple. Personally, in the past I’ve provided a both and solution to provide as much flexibility as possible when recording. I’ll take all the tracks they have and mix them down to groups than eventually down to a stereo track. Than, I have a great mix of their tracks in a stereo format for them to hear, with the ability to adjust those mixes easily when it comes down to the nitty-gritty. I tend to make these mixes quickly paying attention to the big picture and worry about the finer details of each track after everything has been recorded. The key here is having something in decent shape before the recording starts to make getting monitors set faster so you can get straight to the good stuff. As always, be sure to include the artist in edits that you do to the tracks that they created if something needs to change. Communication is always the key. Many times tracks are created or laid down with a concept but rather an idea so in reality they might need to be tweaked a bit before being finalized.
For live, it gets a might dicier. In the studio you can have just about as many tracks as your computer can handle but in the live mixing world, you are limited to what your console can do. Some of us mix on analog desks, some of us on small digital consoles, and others on full size consoles with all different forms of inputs. One way or another you need to figure a good way to get the tracks into your mixes. For me it started with two inputs coming out of the headphone output of the laptop and in and through a DI, one (the left side) was tracks and one clicks (the right side). Those days were both good and bad but they illustrate well the issues at hand. How do you balance getting a good mix with simplicity. Because the click track is so important you are only left with one mono track to fit everything into. It was always a software based mix-down of what all was going to be played. But the FOH engineers never got to mix it, we had to rely on the musicians to get something good put together or ask them for all kinds of changes through rehearsal. But more often then not the musicians just threw it together last second and leave the tech guys to just figure it out, which is fine, because we always do.
Today however, things have changed quite a bit. There are quite a few pieces of software specifically designed to help with the playback of tracks in a live setting with various amounts of outputs and options to assist integration into the soundboard. The most common interface I’ve seen and used is the Motu USB interface (this is the updated version with a few different connectivity options). With up to 8 outputs you can get pretty flexible when it comes to choosing how the sounds get to the board. I typically created one stereo track for any keys or pad sounds, a click track, and the rest were open to whatever needed to be used. Soon after a track was dedicated to having band guide stuff but that is sometimes mixed in with the clicks. After I got used to mixing that many extra tracks, I started asking that we split up the mixed tracks to open or unused tracks for the song. Generally what I found is that you want the percussive tracks split up from melodic tracks; things like tambourines and drum tracks needed to be EQ’d and treated differently than others so having them separate can really help to get the tracks mixed in well. Since then, I have been able to step it up a bit. We finally bit the bullet and picked up a dante interface (focusrite D4R, picture below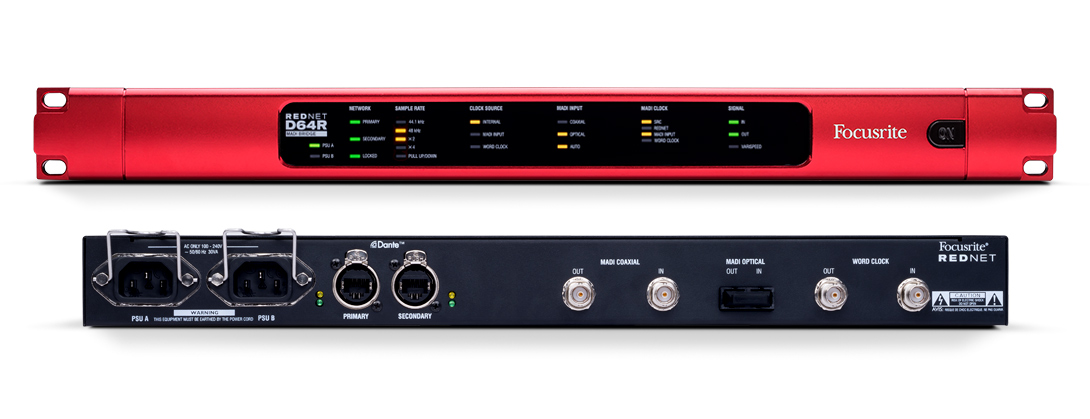 ) which can handle 32 bi-directional channels over coaxial madi which is our L500s primary mode of connection. Because we also take mainstage inputs with dante, I decided to limit our setup to 16 tracks (seemed like a big enough number to allow for lots of flexibility given our current track usage but not so big it’s unmanageable by our staff or volunteers). Beyond that, I decided to start pairing them down to stereo tracks so all of the Ableton inputs land on the same fader page so our techs don’t have anything crazy to deal with on the consoles.
  We have 12 faders on each page so that meant 4 stereo inputs and 8 mono inputs. The last two are automatically click and guide which is a nice feature to add as many of our band members don’t need the guide as loud as others. What we are left with however is what could be a mess of tracks to have to deal with (if you click on the picture you should be able to read the scribble strips, I’ll also explain later) but when organized correctly having individual control over a wider selection of the the tracks can turn into a very powerful tool to enhance your mix and the monitor mixes of the band as well as different musicians will want to hear different things differently!
However if you can’t split them all up as much as I can, what you can do is take in as many as you can, whether its 2, 16, or even 32 track inputs, there are a few things you can do to make sure everything goes as smoothly as possible. The first is to just be sure to collaborate and communicate. For me that meant setting up a way that the worship leader this weekend fills in a patch list of sorts to tell me what is being used on each track. We use a google document that is shared to all the appropriate folks that tells whoever is on FOH which tracks are being used and what is in each track. As I said before, we have 16 inputs from Ableton (our software of choice, there are many to use) that get fed to each of our boards so the monitor mixes can do things differently as needed. To help that not be so overwhelming, we have preset categories for each input already decided (see picture above). When I expanded the number of inputs I sat down with our campuses worship pastor and developed what these would be. The first four stereo tracks are for any keys or pad tracks (labelled pad, organ, synth, aux keys) than the remaining 6 mono tracks (labelled perc, electric, acoustic, misc 1, misc 2, and BGV) plus the last two which are always guide (voice announcing sections of the song that are coming up) and click. While these aren’t rigid naming schemes, they provide a consistent structure so that both the monitor engineer and the FOH engineer know where to start looking when something needs to be changed. 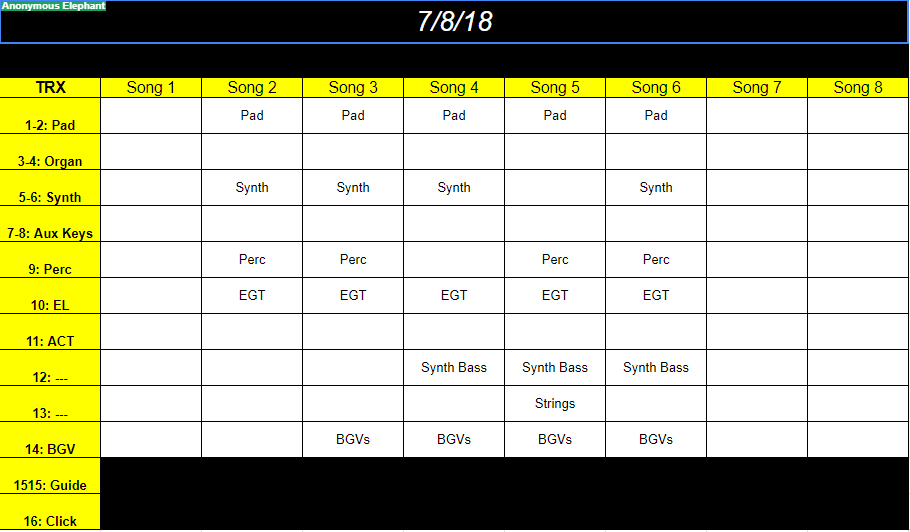 Because I sat down with the artist when I expanded the previous setup to this one, just about everything he does fits into these categories so we haven’t really ever needed to change the labels except for special occasions. Having two misc channels also helps to cover most things as well. Secondarily, having a track patch (see picture) list makes this all too simple to follow any complex setup that we need to do each week.
Secondly, to make it easy for everyone to stay within the bounds of the setup, we use a template for Ableton that’s all ready to have tracks dropped in and be programmed. I’ve even setup a folder sync between our leader’s laptop and the Ableton machine so he can just drop in the folder and a few minutes later just open it up on our production laptop and finish setup. We use Owncloud to do this for us but you can use google drive, dropbox, box, or whatever you like to help this happen. We used to use google drive but we needed more space than google drive could offer so we coordinated with our IT team to get something setup (I’m happy to help you set one up, just email me at daniel@studiostagelive.com). No matter what you do, try to figure out a fast and easy process for the artist so they have motivation to be a team player.
The biggest suggestion I have is to just remain flexible. Even in the most organized environment sometimes things just need to be different than planned. Maybe it just doesn’t sound right or something is missing but the key is to be flexible and willing to fix as many things as possible. Remember you are there to support your artist, not the other way around. As frustrating as it can be, sometimes you just need to buckle up and get at it so you help each artist find what they are looking for. Especially in the studio world, take after take can be frustrating but in the end you’ll find that it’s worth it. This is also a reason to get as many inputs from the tracks rig as possible. Whether it’s 4 or 40, the more you have available, the more flexible you can be. Even on channel limited consoles like the x32, everything you can spare is helpful. This often means extra prep-work, but the more you can flex with each artist, the more likely you are to get a call-back to mix a show or record again for them in the future. If it’s a job for you, that’s extra money in the bank you just stored up for that time when you won’t be able to help them because they will believe that you really can’t fix a problem because in the past you’ve gone out of your way to pull something off….ok, I’m getting off my soapbox now, sorry about that.
While this isn’t an exhaustive explanation I do hope that it’s covered at least some of the bases you needed to learn about. Our setup is a bit larger than most but I love being prepared for whatever could happen so that in the moment, there are always options. If you share that want but don’t know how to pull that off in your situation please don’t hesitate to reach out through the website contact form, subscribe to learn more each week, comment below, or email us at engineers@studiostagelive.com. See you next week for the last entry in this series where we will talk more about leveraging cloud services to improve not only your documentation but also your support of the bands that you mix for!