From the Booth: Episode 3 Part 3

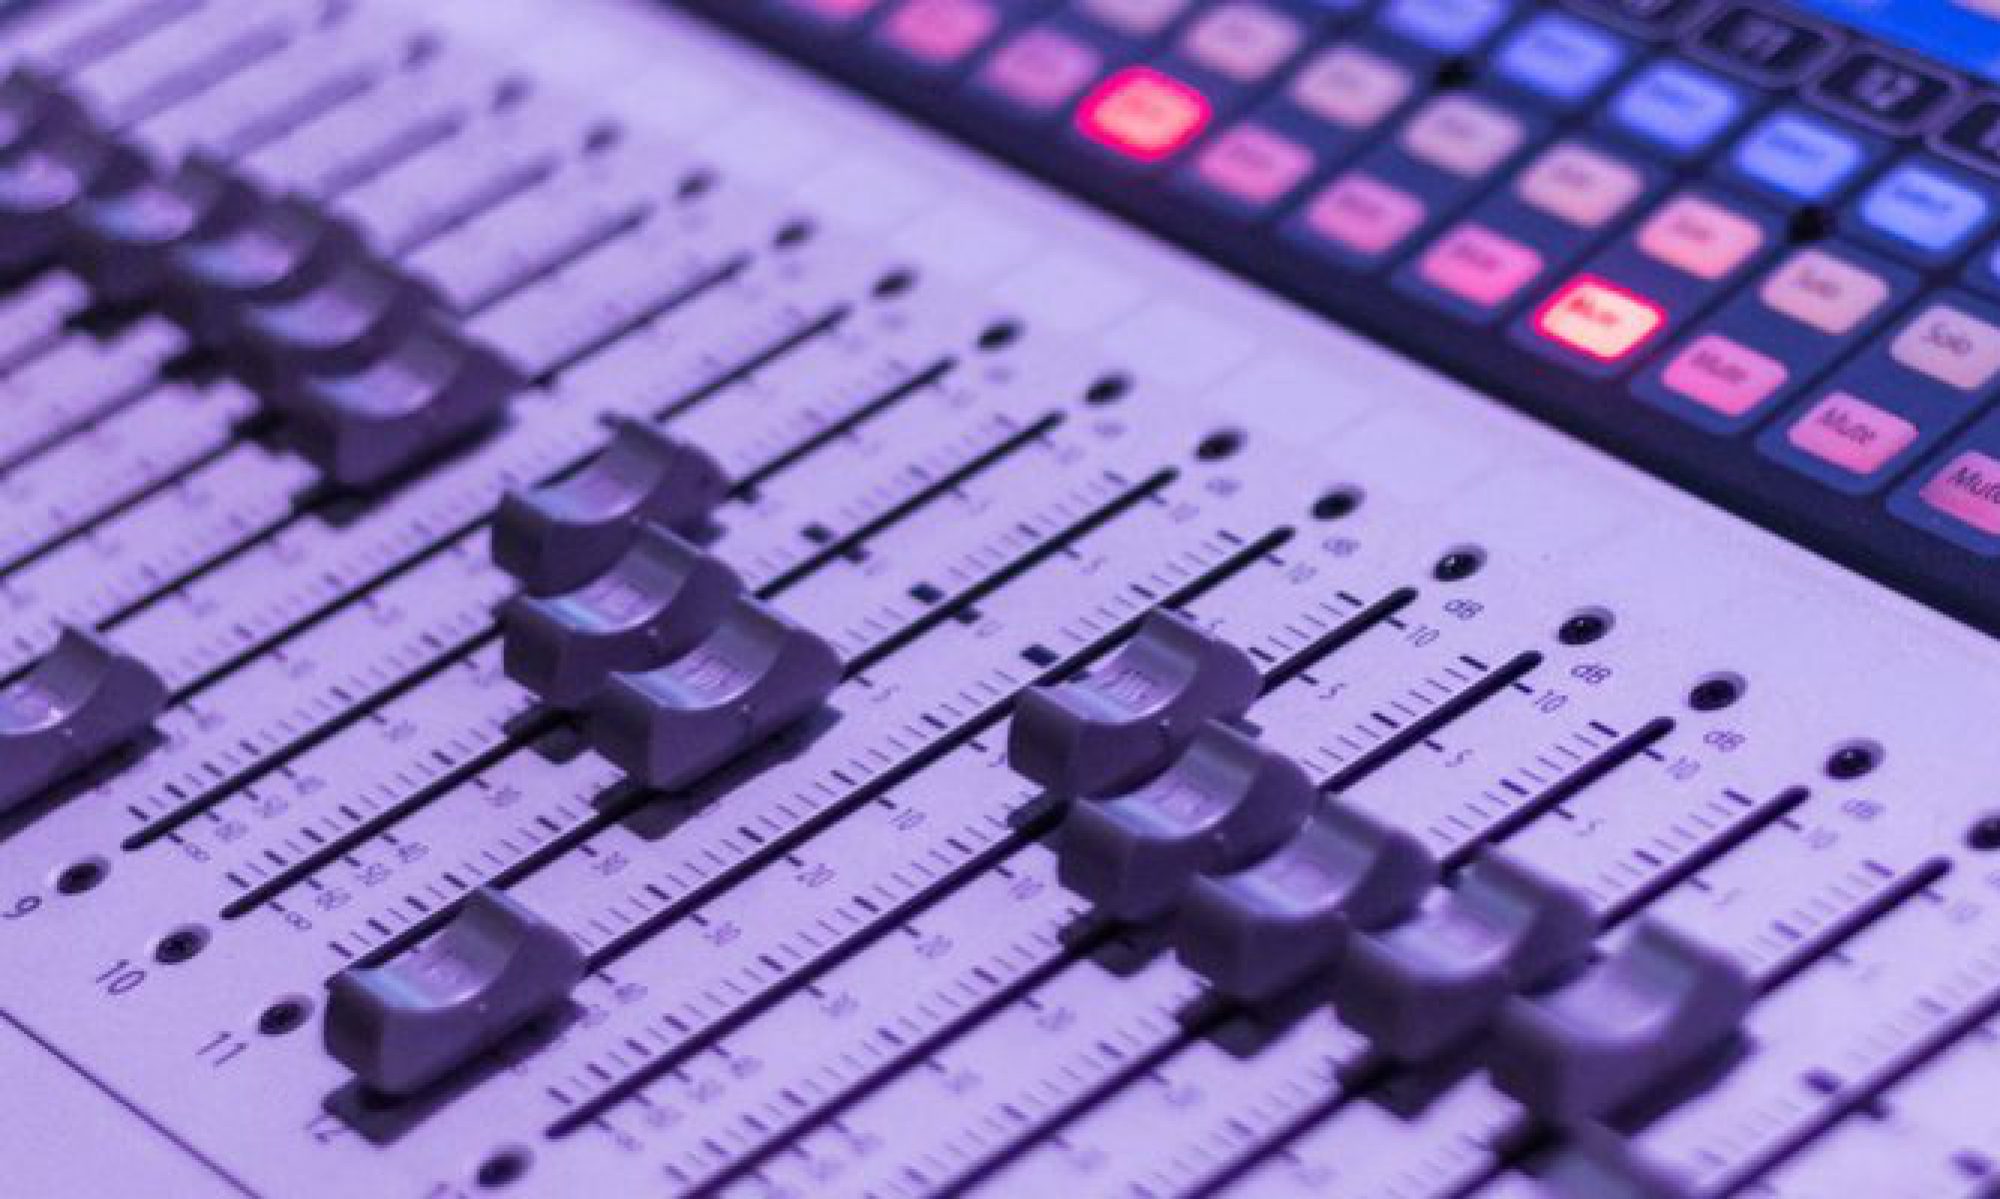
This last week of our expanded From the Booth series is about how I use effects in regards to verb, delay, chorus, etc. If you missed out on the post with the recording I’m discussing, check out this link.  This is from our last Night of Worship here at CCC. This week I’ll be discussing how I use effects to enhance and highlight inputs in our mixes at CCC. We have 10 stereo effects channels. Yes stereo, and I’ll tell you why. The first reason is this, we send stereo inputs to them. While we don’t do much panning in house, on our web-stream they will hear the width that we may not hear as well in the room. Secondly, because of the sheer power of our console, it doesn’t hurt us to run this many stereo effects. Even with all that going on we are only at ~10% DSP processing on the board and have plenty of audio pathways left. Some consoles are a bit more limited and so running stereo effects channels might not be the best choice. I say all of this because I don’t want you to see what I do and say, “I have to do that because he does it.” As with all of my posts, my goal is to explain the meat of what I do and give you the opportunity to translate what I do into your world if you want to try it. I would say the meat of what I’m doing here is just that I’m running them on my board rather than through an outboard device. We do that for a lot of reasons, but most of all so that if we have a failure in our outboard waves rig (has only happened once and it was the first week we had installed it) my mix will only be shy on the compression side of things because that’s about all we do with waves (running plugins like the C6, HComp, F6, CLA-76, NLS, etc).  Here are the 10 effect channels that we run.

  1. Drum Verb
  2. Snare Verb
  3. Instrument Verb
  4. Instrument FX (basically a chorus setup for instruments)
  5. Bass Guitar Drive
  6. Guitar Drive
  7. Vocal Echo (basically a slap delay meant to help the lead stand-out a bit)
  8. Vocal Delay
  9. Vocal FX (chorus)
  10. Vocal Verb

Now we have some busses setup in case there is anything we want to add for a big event as well (the setup on the L500s is a little labor intensive so having a few stems setup and ready to go is necessary). For instance, sometimes we like to use an overdrive pedal on the vocals and occasionally we have a weird verb that works better for a certain song that we load in from waves or the board. But, for 45 out of 52 weekends, we use these almost exclusively. I thought about posting pictures of my plugins for these but like I said before, these settings are what I’m setup to use for my room, the settings for your room and with your console will vary. The last disclaimer before we get into things is that our room is pretty dead. Because of that we have to run verbs pretty thick to help the mixes come alive and provide some sustain to the music. We aren’t running heavy verbs but we do need to help fill the room a bit more than most rooms. Treat the following explanations as to where you could start improving your effects if you feel they are lacking in a certain area.

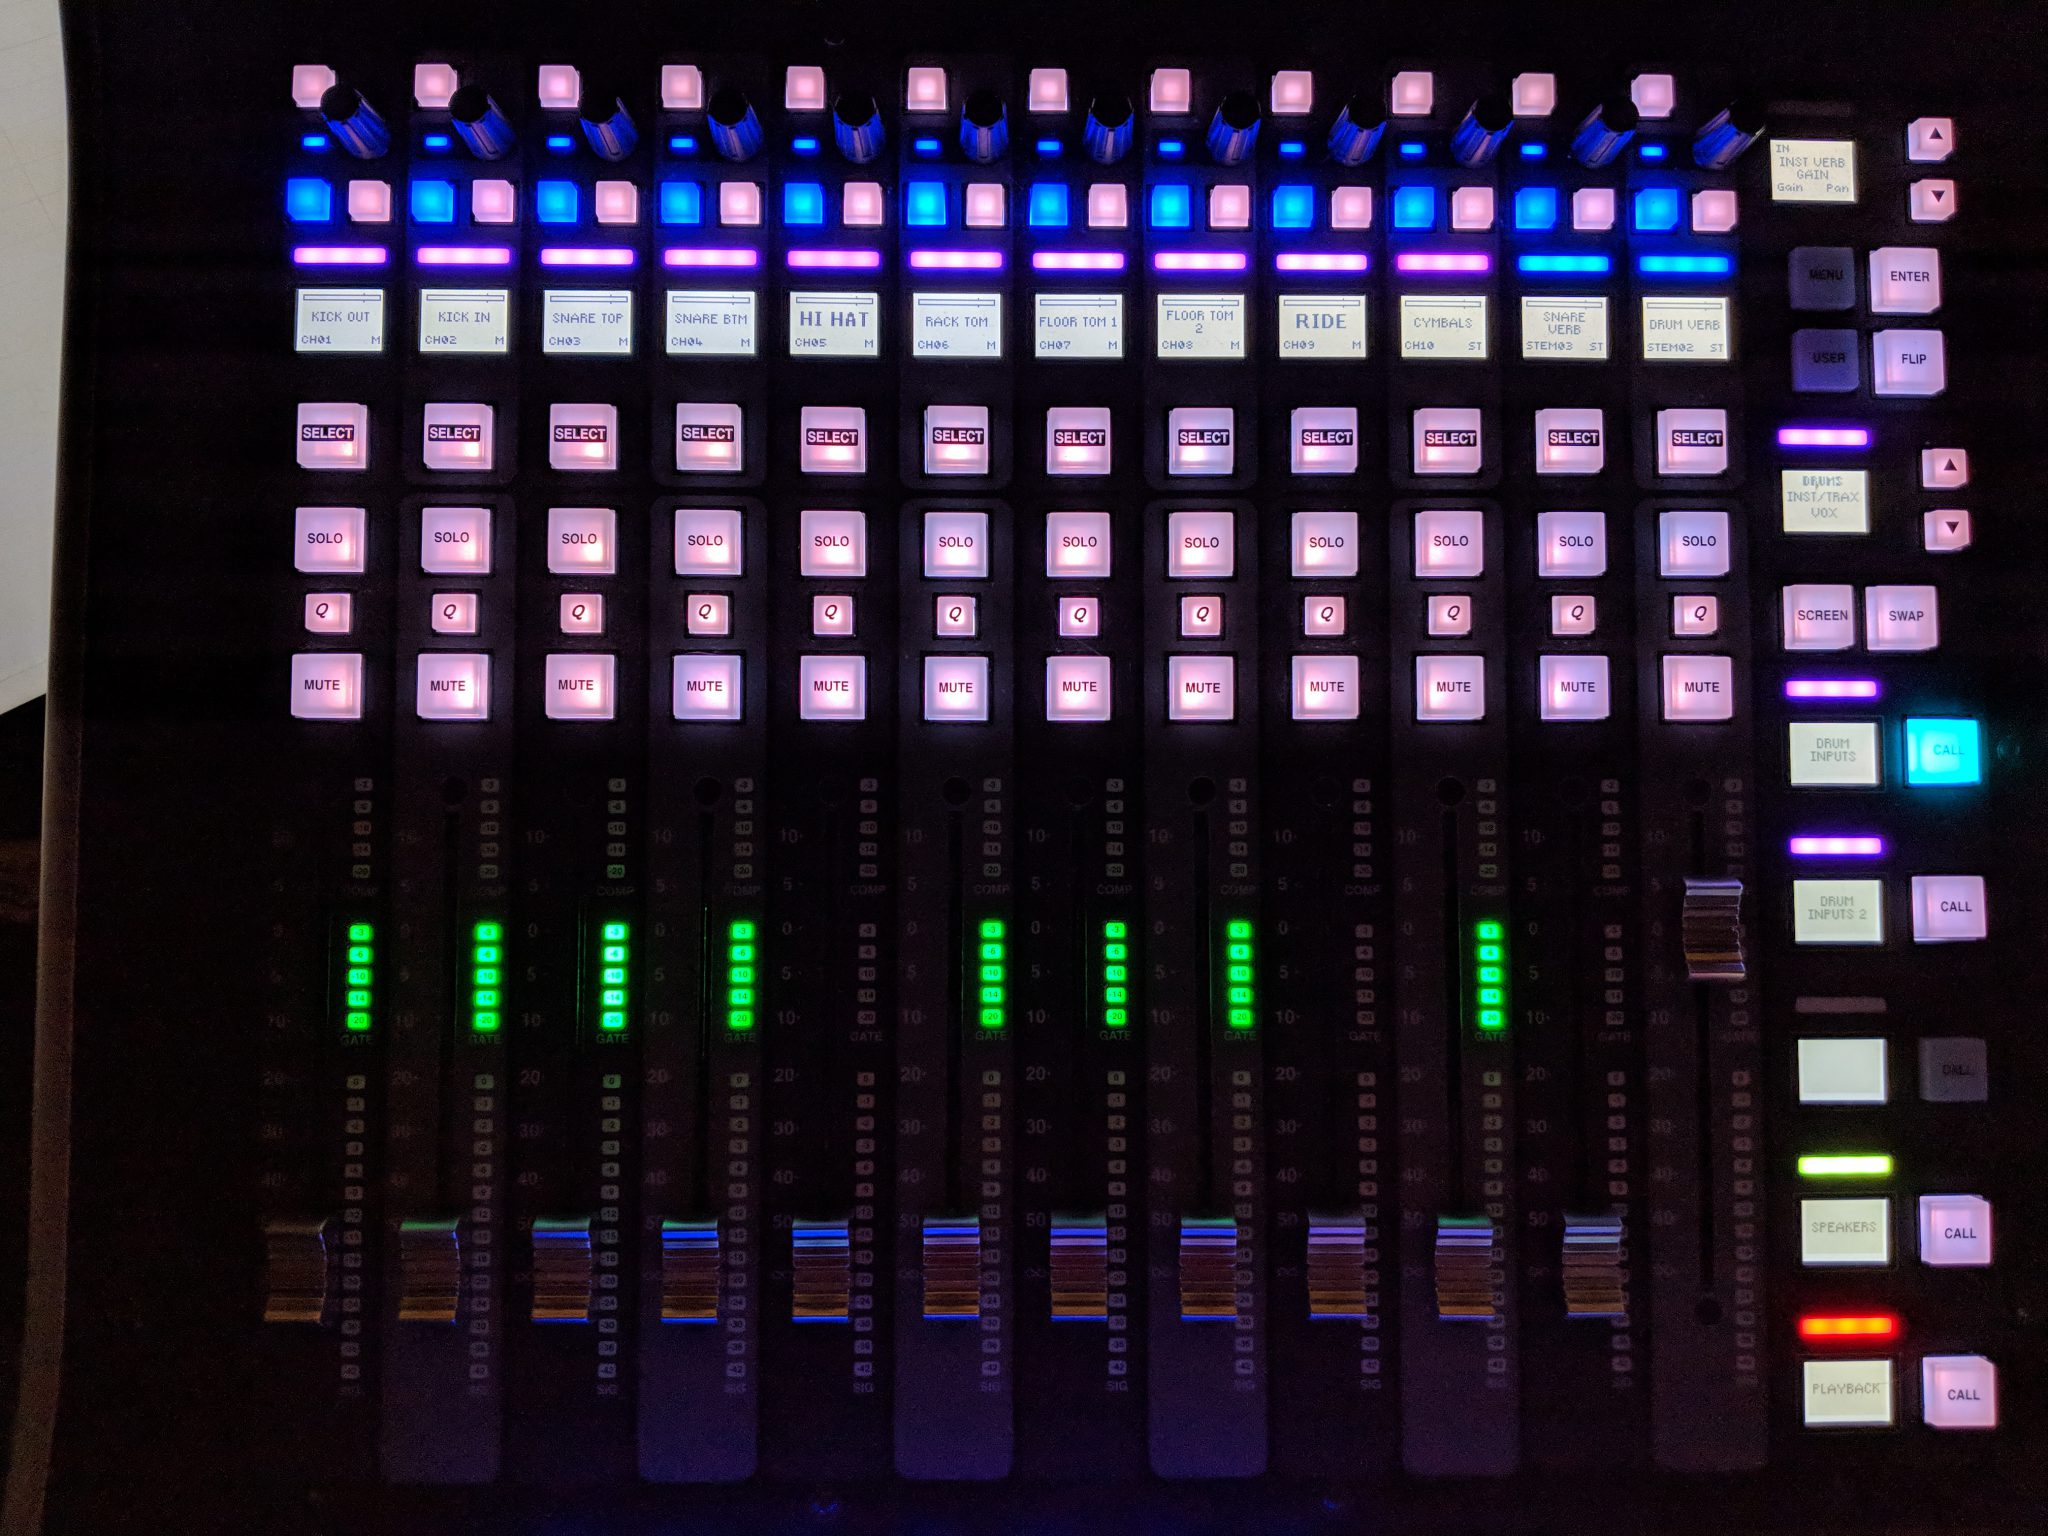
The first group effects I wanted to talk about is the drum verbs. We have two effects that we use with drums and as I said before they are the general drum verb and a snare verb. The regular drum verb is nothing too special but here are the basics of how we have it setup. We run our verbs 100% wet and just send less to them, preferably on faders. This plate verb leans heavily on the early reflections to provide depth of sound with a decay of about 2.5 seconds and it could be gated if we want it too. The decay time is something that you’ll have to setup for each room but between 2 and 3 seconds is often a good place to start. We have a diffusion knob in our plugin as well that we use to help lower presence so we can have more verb without it being able to hear it as much as our actual inputs. Couple all that with some dampening on the low end of things and a little at the top to control the upper end of the spectrum that’s about all we do. Secondly we run a bigger verb that is solely fed by the snare drum (sometimes the toms) so the snare itself can have a more sustained sound. This verb is almost identical to the drum verb with a few small exceptions. The first is that we are doubling the simulated room size and adding another half second or so the decay time so the sound just goes on for days! Combine that with a less dampened high end and we absolutely love our snare verb. We used to just run the snare a bit hotter in the drum verb send but found that we liked the results better when we setup an extra verb tailored for the snare drum. To be clear, the snare is in both verbs.

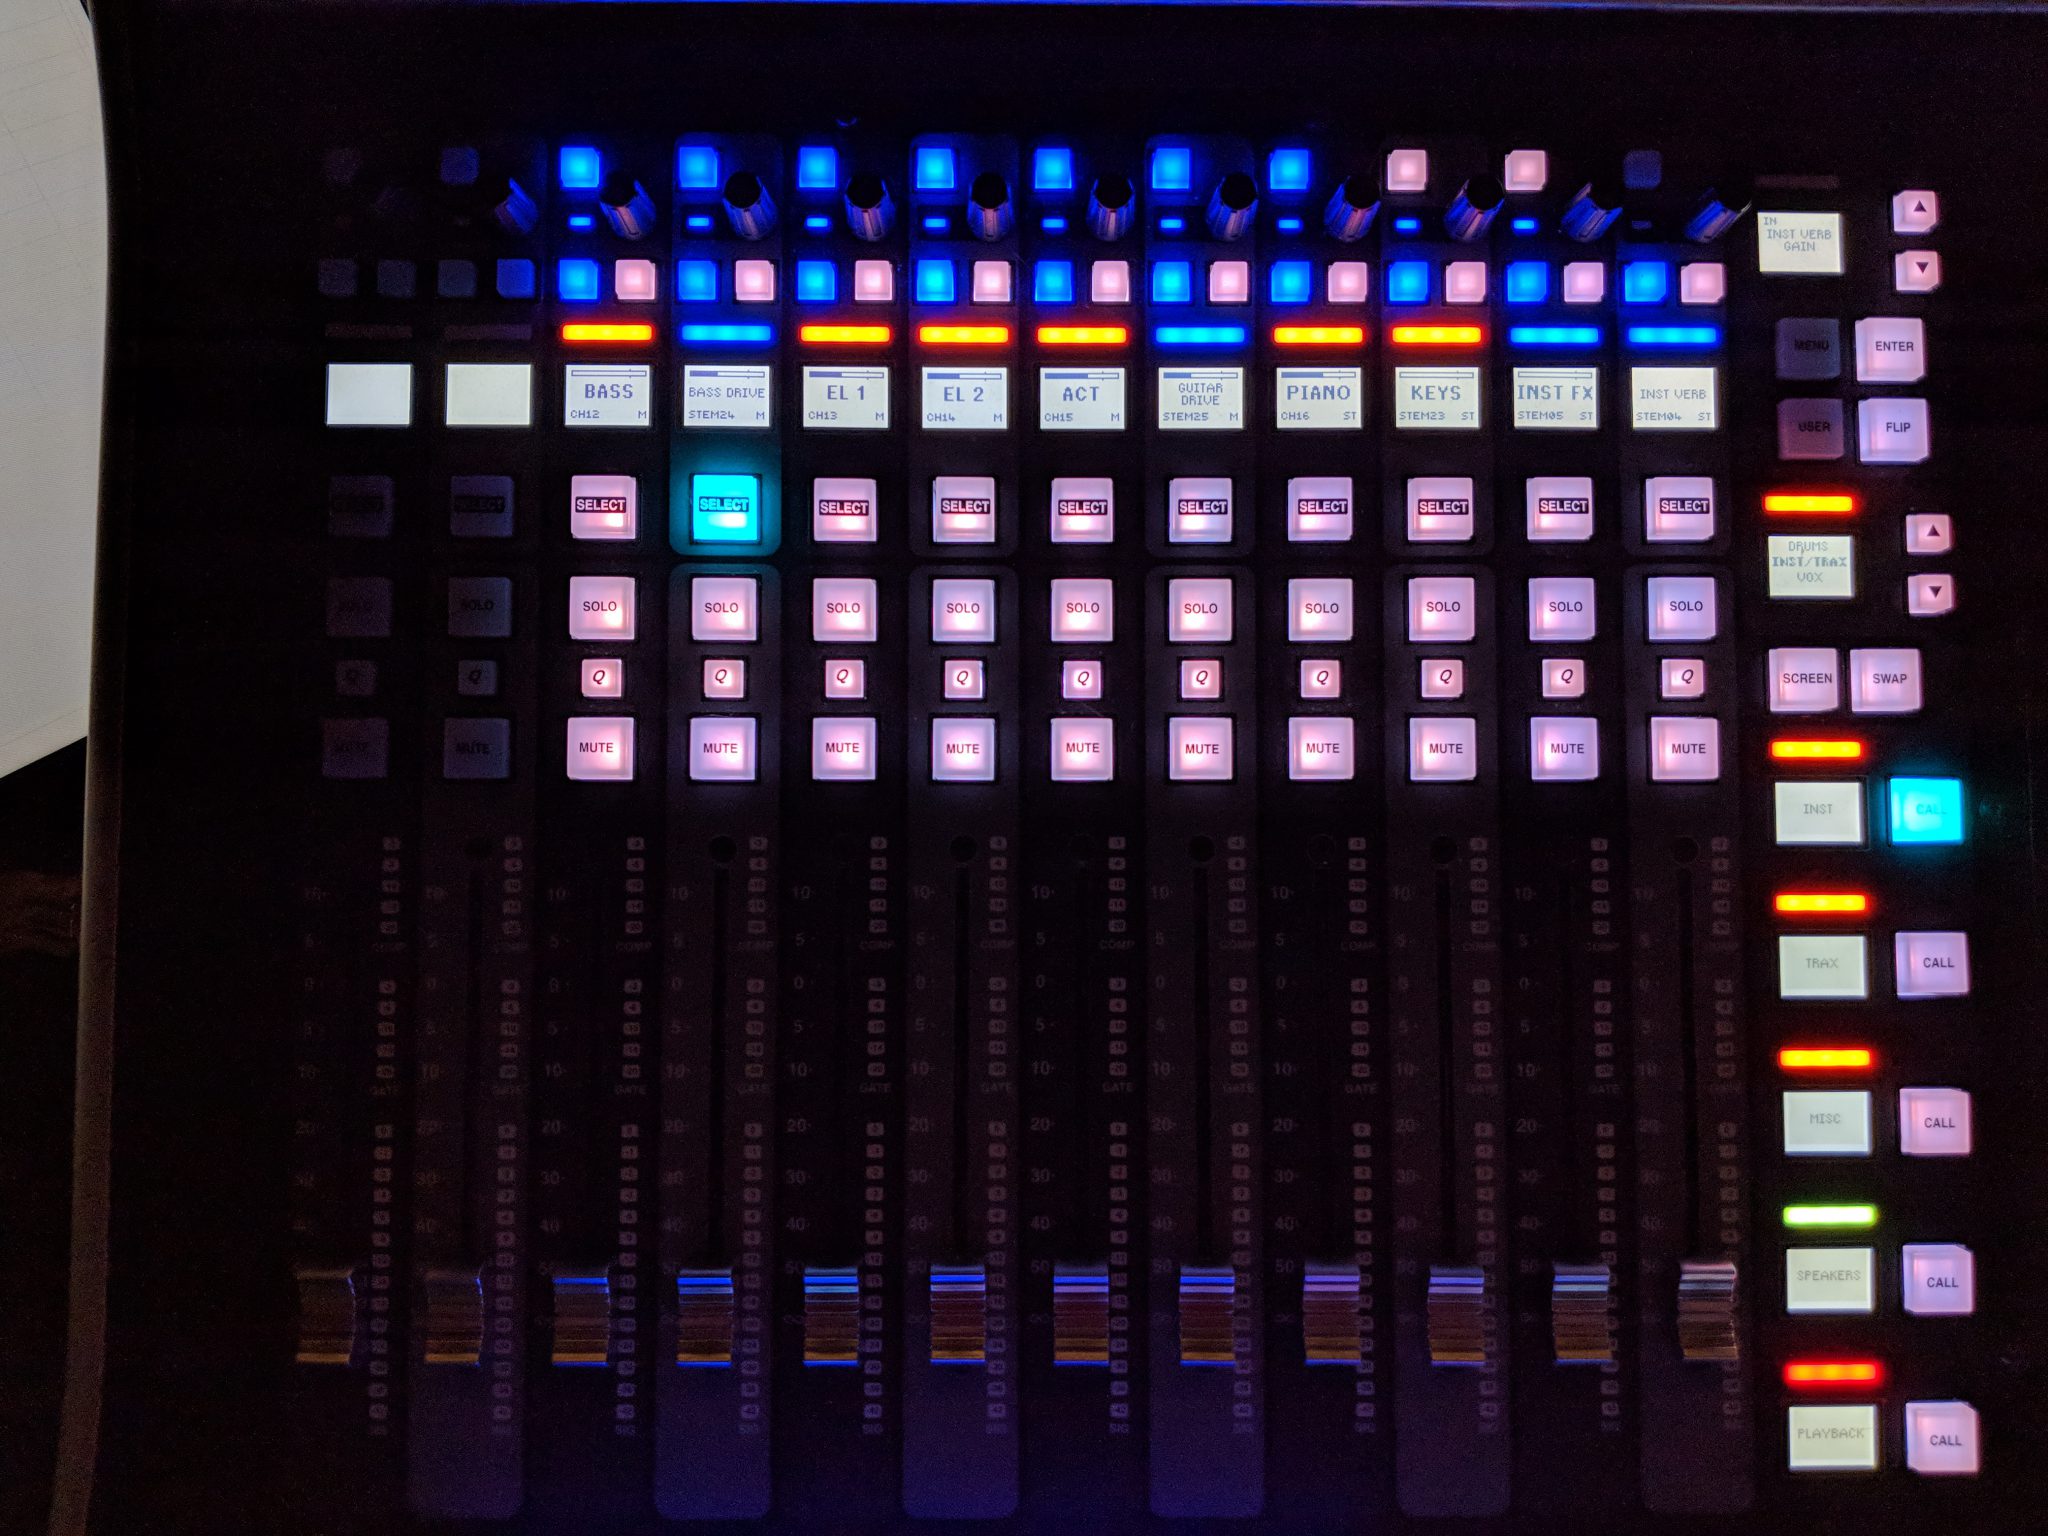
The next group of effects is what we do with our instruments. The general instrument verb is pretty close to the drum verb. We do that so that when you hear the band they all sound like they are getting treated the same. When you do that it keeps your band sounding congruent in the verbs. As you’ll find out the vocals are also about the same as well. Next is the bass drive channel. We just recently added this. This isn’t so much a verb but a double patched bass guitar channel. However, we do not feed this to the subs. We picked up this channel to help us hear the bass guitar primary tones better and help to better balance the to halves of the guitar (this works similar to double micing a kick drum). On this channel we roll up the EQ a bit, insert a bass modeler with the presence and drive settings cranked up to taste and bass turned almost all the way off. We also compress this output quite a bit so stays a pretty consistent level. We also needed to delay the output a little to compensate for waves adding like 23 frames of latency that don’t exist within the board. Having this channel has really helped us to be able to mix quickly the blend of the sub response with the primary notes of the bass guitar and has really enhanced how we use the bass guitar. Secondarily to that is the guitar drive. We use this on the lead guitars for each song to help enhance any instrumental solos that happen. Most of the time instead of mixing the input up during that time we are pushing this bus up to the top of the mix. This one was quite simple as it’s just a mix bus (so we can change which guitar is feeding it as necessary) with a saturation plugin with the drive turned up to taste. Combining that with a compressor that hits pretty hard we get a nice crunchy sound to help make that solo really pop and shine right when we need it to. While pushing the input up does work well, we have found that this gives us a slightly different texture that we really like that perks up your ears when you hear it. Lastly in this group is the instrument FX which is basically a stereo modulated chorus. I primarily use this on acoustics and piano which adds some width and depth that help either of the two inputs be highlighted and easier to hear without being super present. Just try it on an acoustic one time and you’ll be hooked, if you don’t hear it, turn it up a bit more.

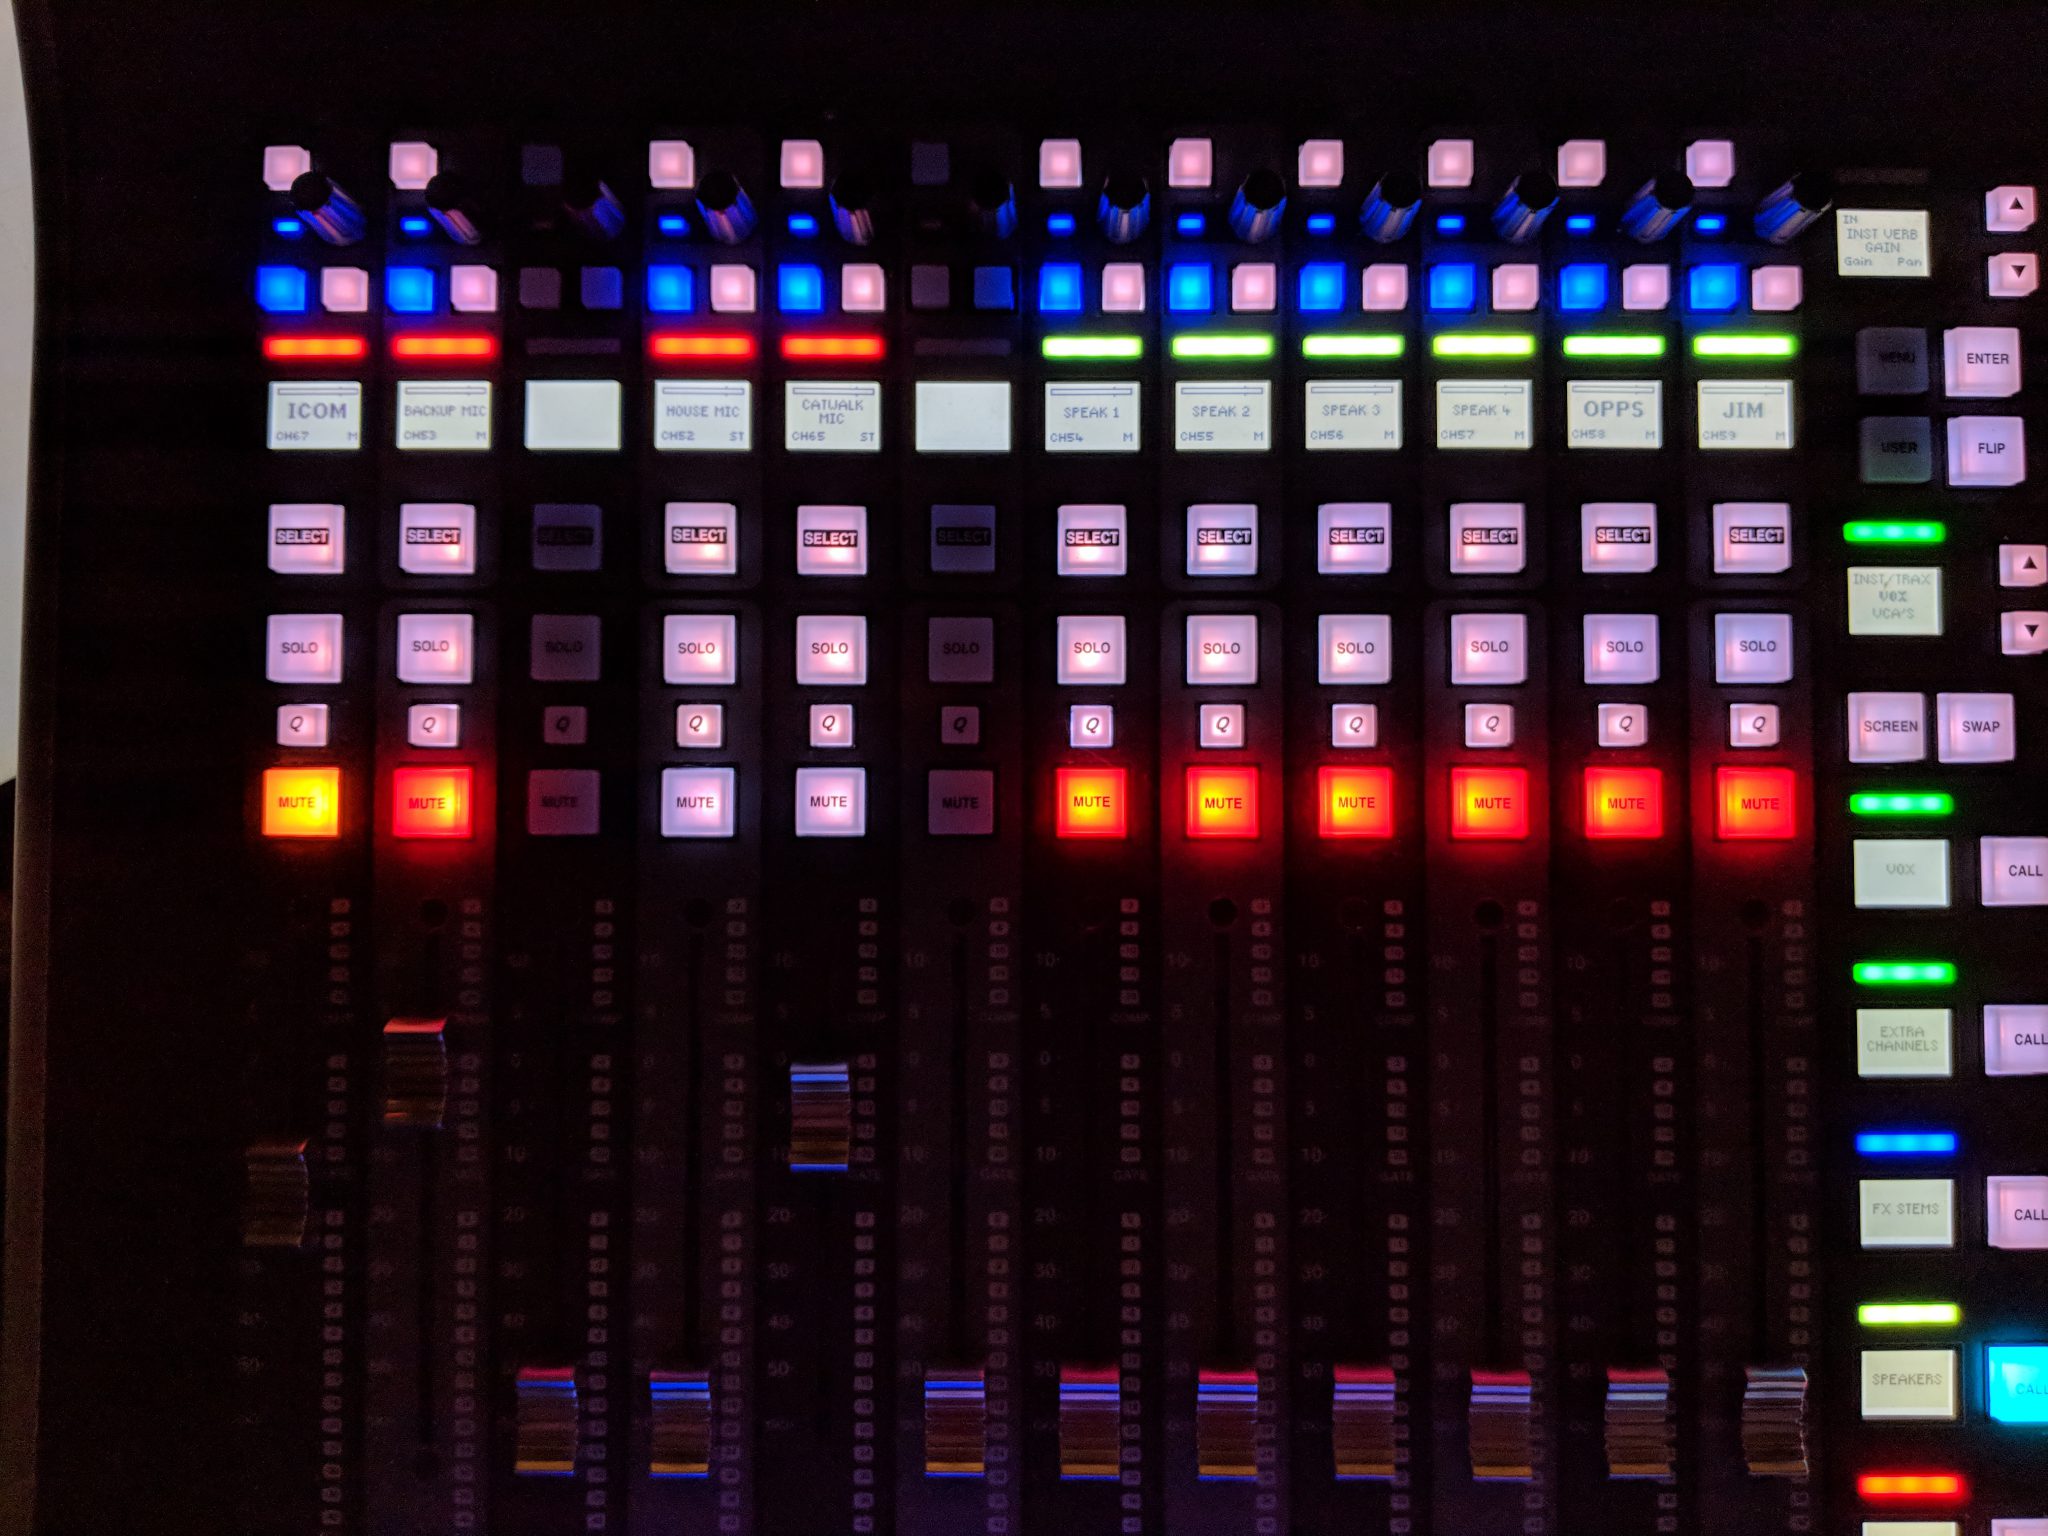
The last group is the vocals. Some people ask me why we run so many effects channels on the vocals. They wonder why it all is necessary. We do all this for a couple of different reasons. The best reason is because our mixes are vocal-centric. If that really is the case, shouldn’t they have the most color added to them? The most presence? The most weighting in our mixes? Because that’s true, we pull out all the stops for our vocals. Even to the case of slight side-chain compressing the vocal range out of our other group busses to create room for them to sit nicely in the mix (I’ll be going over this when I discuss the cool things we do in our waves rig). To that end, as I said before we run 4 effects busses for vocals. Primarily, all vocals are ran through our vocal verb which gives them plenty of body and depth and is setup just like the two other general verbs but with less dampening so that it helps the vocals pop even more. We also use the vocal echo on the lead vocal for each song.  This is a very fast slap delay with anywhere between 10-20 ms of delay so it’s not a straight double. Basically it needs to be fast enough to double the voice and be distinguishable but not separate from it. Having this effect running really helps our lead vocal be at the top or near the top without needing to be pushed hard to get there. Next is the vocal delay that we tap in. This is exactly what you think it is. We all run one like it. What we do differently is set the EQ to automate for every scene so we change the way it sounds using basically filters (hpf and lpf) to give it a very present sound or low-fi sound. Occasionally I find myself putting that saturator I use on the guitar drive to give it some good crunch as well. Lastly is the Vocal FX which is a stereo de-tuned chorus that runs into a chorus. So the left side of the stereo bus is tuned up like 8 cents, the right side down 8 cents, than it goes to a modulated chorus plugin. This sounds like overkill but adds a good bit of width to the mix. We usually just use this on BGVs because putting it on a lead gets pretty rough on vocals at the top of the mix.

So that is the basics of how we handle effects here at CCC. As I said earlier this is just how we do it. Over the years these have been refined, re-designed, re-tooled, etc as things in our room changes but it seems the team has always landed on this layout. I had always done versions of this stuff but have really loved the consistency of the effects we use. One of the biggest things you can do to bring weekly consistency to your mixes beyond templates for digital consoles is deciding on an effect set that everyone agrees to use. If you have any questions about any of these effects or how we use them don’t hesitate to comment below or email me at daniel@studiostagelive.com.

From the Booth: Episode 3 Part 2

Welcome to Part 2 of this special “From the Booth” series. This week we are talking about my desk’s workflow. If you missed the first week, here is a link to follow where you can see the latest recording “From the Booth.” About 3 years ago now we purchased the SSL L500 consoles for both our FOH and monitors positions. It hasn’t been a perfect experience but we are extremely happy with the purchase. What really sold us on these consoles is the ultimate flexibility they can maintain. Not only is the routing completely flexible, but the layout on the board can be customized to whatever degree you can imagine. The board itself has three tiles of 12 faders. Each tile has 5 banks of 5 pages each. If you’re doing the math that’s 75 unique layouts of 12 faders if you want to set it up that way. To balance that flexibility with a need for ease of use, we designed a layout that groups faders up in such a way as to give us the ability to pull up important inputs anywhere and have the band laid out in an efficient way. I’ve also embraced a standardized color scheme to help increase recognition of where you are within the console without the need to even read a label.  I’ve taken some pictures of my layout for you to see, if you click on them they will go full screen and you’ll be able to see the detail a bit better.


On every bank of every tile is always at least two pages. These pages contain speaker inputs and playback inputs. This allows me to be able to quickly and efficiently get to the few inputs we will need to reach quickly no matter what. The first is the speaker page. This page contains our pre-made channels for any mic we might use for speech on any given weekend including our main channel for the speaking pastor. It also is where we land the inputs for our intercom system so our producers can speak into the PA during rehearsals and the crowd mics to be mixed into the broadcast feed. The great thing is that this page is always on the second to last button on any bank in any tile. Muscle memory is key here so we can always respond quickly and get to our pastors mic or to the intercom feed if it needs to be used in an emergency.

Next is our playback page (we use the color red for any local playback input). This is landing spot for the inputs relating to audio that comes from any device that isn’t a track or part of the band. For instance, we have the inputs from our macs in the broadcast booth, split up  left from right and a stereo input for non-split videos (all of our in house videos that have speech are split up with the vocals on one side and the music on the other so that the FOH tech can mix the music in during the event. There is also a feed from our lighting video server broken out the same way. From time to time during our larger events we play videos from this server if they are also being shown on a rented screen or wall so we need the ability to play audio as needed. This page also has a feed from our Spotify machine and a local iPod cable as a backup if needed. Lastly, this page has a feed from the recorded stereo channel we use to feed soundcloud after rehearsal and to be able to easily export a mix for archival purposes.  Lastly, over the years our speaking pastors have gotten sick a couple of times between our Saturday and Sunday services so we have an input from our high quality video servers so that if we need to play a sermon from playback, it’s possible in a pinch and already setup.

Next I’d like to talk about the tile that sits right in front me. During worship, this is where my vocals are sitting as well as the vocal FX stems. I use the color green for vocal inputs and blue for any FX stem. For those not familiar with stems, think of them as a bus that can be routed to and from anything. On the L500 we use them primarily as effects busses. We can set them up to be both the send and return for an effect which makes internal routing easy to understand and don’t tie up an audio pathway with a channel just for the return of an effect patch. For most weekends we don’t run more than 4 vocals so those are sitting right next to our main vocal FX stems which are a slap delay (Vox Echo), a tap delay (Vox Delay), a chorus (Vox FX), and our main vocal verb (Vox Verb). The on-board verbs are amazing on the SSL so we use those to free up resources in our waves soundgrid for other things. There are few things that we regularly want to do that these four effects either by themselves or combined can’t accomplish. Our room is quite large in terms of air volume and acoustically probably a little too dead so these effects help to liven the room a bit. We have also found that limiting ourselves by these four things also helps to bring focus and continuity week to week.  That isn’t to say we don’t change it up for special weekends but continuity between weeks is an important value of our leadership and this is one way we can help contribute to that philosophy. Lastly, on the right side of this page are 4 VCAs that control the 4 main groups of our band inputs (drums, instruments, tracks, vocals). We don’t usually mix with these but every now and then, we use them to help shape the sound after we have each group really locked in.

The tile on my left hand is instruments and tracks in two layers (we use orange to denote instruments or tracks and again the color blue for any FX stem). The instrument page is just about what you’d expect with bass all the way to the left, than guitars and ending with keys and my instrument FX busses. I’ve sprinkled in a few new things even since the recording you saw last week from our earlier Night of Worship that we are starting to play around with. The first is that bass drive channel you see. That is actually a stem (this can be done with a channel but doing it with a stem is easier to be able to add a synth bass input to as well as compatibility with playback). This is basically the clean bass guitar feed that we heavily compress and don’t send to the subs so we can hear the note of the bass guitar better without adding to the bottom of the mix (it is mixed right alongside the bass input that we process). We have an on-board plugin adding some drive to it as well so there is some crunch there for texture. We did the same thing with the guitar drive. This is a stem so we can pick which guitar to highlight per song as the soloist can change quite a bit during a worship set. Our keys rig is driven by Mainstage. The first is our piano input and the second fader is a stem of the rest of the keyboard inputs. We can mix those sends from those inputs per song and getting it down to two faders just makes more sense for how our operators mix. This used to break out into 4 actual faders but we just weren’t utilizing those enough to make the use of faders on a main page worth it. That keys stem has things like pads, synths, organs, etc in it that our players use to color each song a bit differently. Lastly on the page is a Instrument FX stem I use that is basically a chorus that sounds great with keys and acoustic used to give some extra depth and width to one of those two inputs depending on the song and lastly the instrument verb.  This is just a general verb like the vocal reverb.  Why do we have so many verbs and effects? Well check in next week and I’ll be going through why we use this much verb and how it can help you in your room as well.

The second page of this bank is our tracks page. We have 16 inputs from our Ableton rig that composes of 4 stereo tracks and 8 mono tracks (last of which is guide and click) that are brought in from our Dante network. A few years ago we had 6 tracks, than we switched to 8, and now we have 16. This has all come about because as we grow in our musical diversity and gain access even to artist tracks for songs, we found out that we wanted more of an ability to individually treat and mix those tracks. This may not be a good solution for everyone but our volunteers are exceptionally high capacity and we combine that with a document that maps out what tracks are being used for each song (some songs don’t use any tracks, some use only a few of them, and a few use most of the available tracks). We have also designated what would show up in each track to some pretty broad groups that cover everything we would use a track for during a song. These input channels are also setup to completely automate with each scene so that everything about them can change allowing the operator to set different EQs, gains, filters, etc for each song. Like the rest of our band, all of our tracks inputs also go through our waves rig.

On the angled tile to the left hand side of the screen is my drum tile. We have a main page consisting of all the primary drum inputs and a second page where I can find the triggers and any extra drum or percussive inputs we might have for any given weekend. I also have two drum FX stems that are a snare verb which is exactly what it sounds like. A longer more pronounced verb we use exclusively for the snare (sometimes the toms). Secondly is just the general drum verb we run on everything. This is probably the most used location for the speaker page. I love to flip this bank knowing the drums will fade regardless so that I have easy access to the vocals and instruments who might keep vamping through a scene transition. We have also started using drum triggers to open gates instead of the microphones and have loved it so far. There is a bit of work to be done refining thresholds and such but if you have a little extra money, your verbs will thank you later. That was probably the biggest thing was having more active gates really cleaned up the verbs we run and tightened up the whole mix quite a bit. It also rids you of the high hat bleed and I got to start using that mic again! We used this trigger for our kick drum and this trigger for our snare and toms. Make sure you get the kick drum one because the standard triggers won’t mechanically fit or work on the kick. Feel free to ask questions in the comments or email engineers@studiostagelive.com.

Lastly I have some user buttons on each tile for what SSL calls the “swap” page. In my setup, I have two setup already and the third is open so I can pick what I’d like to see at a moments notice for each event (often ends up being a VCA page as my main VOX page fills up with other stuff). My two swap tiles are my output pages (we used blue again because these are mostly FX or mix stems). You may do it differently but because of how we like to output from the console, all of our inputs go to stems first and the get routed from there to the master bus or broadcast mix. The master fader on the surface of the board has been set to our master band vca and isn’t the master bus anymore. This page allows me to get to the physical master bus as well as my sub bus to make adjustments as needed.

The other swap tile that I have preset is my matrix and mixed outputs. This includes front fills, lobby feed, broadcast mix, and lighting send (I have a mix setup for our lighting engineer to use audio cues as necessary to trigger lighting cues that are more musical in nature rather than rhythmic). As you can see my front fill matrix has been muted. We do this during walk-in and walk-out times in our services so that it’s easy for people down front to talk as well.  “TB to MON” is a matrix send to our monitor console that is fed from our speaker group, videos group, etc so that our band can have those items in their ears without adding extra work for our monitor techs. Typically matrixes are yellow in our setup.

With that layout, we have a tremendous amount of flexibility but also a lot of predictability as larger bands or extra inputs still allow this organization scheme to work.  Also, having the playback and speaker pages accessible everywhere makes the board so easy to use. My keys to remember are simple. First, if your board has layers, make sure your highest priority inputs are either locked to user buttons or they are accessible from any screen so that if something happens, you can get to them quickly. Second, if your board can do different color schemes, take advantage of them so that you can more easily recognize what you are looking at. Lastly, make it work for you. Your layout must make sense for how you operate and the people that will use the console. Just keep it simple and intuitive.

Well that is my workflow.  Hopefully this has helped to explain what you are seeing in these videos.  It may change but the buckets described will likely always be some version of the explanation above. Let me know in the comments below what you think or if you see anything I should add that I missed. As always, if you’ve like what you see you can subscribe at this link and get emails whenever new content is released (weekly).  See ya next week with  more on this topic as I explain how we use FX in our setup.


From the Booth: Episode 3 Part 1 – Night of Worship 5/28/2018

Welcome to our special From the Booth series that is in two parts. In addition to the video this time I’m going to be going through board layout and on board FX setups in part 2 next week. My hope for this two part “From the Booth” miniseries is to finally show a bit more of what is going on in the console and how I do what I do for this event. Not going to dig into Waves just yet because I want to be sure to keep this stuff universal to any console. Don’t worry, Waves is coming, just not yet. This post will let you see and watch the event and next week I’ll dig into board layout and operation. I took out our Senior Pastor’s closing segment but left our teaching pastor’s worship focus in there because it shows some speaking to listen to and how we transition in and out of speaking portions. Also, Clayton has some great things to say about worship.

Here are the particulars for this recording:

  1. This recording is from our Night of Worship that occurred just a few weeks ago. This is a mixture of staff and volunteers and an awesome volunteer choir.
    The audio you hear is from the broadcast mix of the FOH console. This mix is built from my master bus with the FX turned down just a bit to help them sit better in a studio environment and that’s it. It’s not a perfect mix for broadcast but it does a good job at translating a mix designed for an auditorium down to a mix suitable for personal viewing.
  2. You will see 4 videos in a matrix. The top left video is my Smaart machine. The green is real-time, the orange is a 10 sec average of the real time, the red (if you even see it) is what is coming out of the console (you’ll typically only see if there is an issue with our gear which I don’t believe there was). The SPL number is 1 minute average which is how we measure the services. The top right is the broadcast video feed. Bottom left is a camera showing what I’m doing. The bottom right is basically what I see, that camera is looking over my shoulder.
  3. This is a Night of Worship so our SPL levels are a bit higher than normal but still fit within our church’s guidelines. While I do monitor this level, I’m not actively looking at it so much as the RTA during this event. Remember, it’s important to mix with your ears first, your eyes second.
  4. Here is the general layout of the SSL L500+ that I’m operating. Top left bank of faders generally sits on my drum inputs and drum FX feeds and can access my mixed outputs if need be. The Left bank at my waist (left hand) is used for instruments and tracks and access my main outputs and groups if I need to check on something or make an adjustment. The bank in front of me (right hand) is almost always on the VOX page of the console which also has my VCAs which allows me to quickly make larger mix changes. Please don’t hesitate to ask questions in the comments if you’d like to know more.
  5. There is a Waves SoundGrid running, look for future posts regarding how we use that.
  6. Song names are listed on the youtube page and all credit goes to the band for the performance, the song authors, and to God for allowing me to work with such a great team.

If you like what you see and would like to receive an email when new content is released please feel free to subscribe at this link! Also, if you have any questions about what you see, please feel free to reach out to me in an email at daniel@studiostagelive.com and I’ll do my best to answer your question.