
Here we are on week three of my series on my step by step process for creating consistent online broadcast mixes. The first week was all about the basics of recording and last week covered my ingest process. This week I’m back and finally getting to the good stuff. The mixing! This all of course presumes that you have at least a little bit of a template (I do plan to share a link to my Logic Pro Template at the end of the series). So what if you don’t have one? Well start this week and create one. When you’re done with your mix, wipe out all the project specific files and clips, all the markers and automation, and lastly, any weird routings you did for something specific, then save. You now have the groundwork for your template! Building a template progressively allows you to get more and more feedback and mix more and more projects right now, which then moves you closer and closer to a really dialed in template. I didn’t really have anything going into this but 10 or so weeks in, I’ve really got some great details sitting and waiting for me in each show thanks to my showfile. I find that EQs still need some tuning along with any multi-band processor but what it saves you is the routing for mixes and summing, built-in FX already setup, and a basic loadout of plugins assigned and loaded with a stock setup you usually end up using. That’s all I’m talking about here, don’t make it too complicated. Just have in the file whatever you find yourself doing for every mix.
When I sit down to mix, I love to use the process I use for FOH work (maybe this hurts me but I’m proficient with it so it works for me). I love to pull up whole groups of inputs and work with them as a group (soloing when needed of course), then move onto the next group, and so on then start pulling them all together. For me, mixing is all about context. I want to hear that source in context with other relevant sources and fix problems as I hear them. Practically for me I start with the drums, listening to the relevant relationships (I’ll dive more into this next week! Click here to subscribe!) and stepping through all the inputs as I can. I do try and move pretty quick because just like in FOH work, ear fatigue is a problem. So I try and get through each group in about 15 minutes. Next is the instruments. This group can take a bit because you’ll often have to make adjustments to the dynamic EQs and harmonics of each guitar to not only suit their role in the song but help to carve out a space for each so they don’t fight for attention. This whole group should be mixed such that if you give any of them just a little boost they jump right to the top. While I include the piano in this group, often the pads and synths I lump in with tracks because of what they are for. Next is the tracks. I love this group of inputs because it’s always such an interesting blend of instruments. For me this time is less about balancing and more about listening. Often these tracks are already fully processed so you shouldn’t need much EQ or compression for their use in broadcast. If I find problems, presets can really be effective to help find solutions quickly. As I’m listening I try to make a mental note about times when these tracks should move from the background to the foreground in the mix and be sure to make that happen as I begin to automate in the next step. The last group is the vocals. I save presets for each vocal I process so that I can always have a starting place for each individual vocal. My vocal always start with a tuner (usually Waves Tune Real-Time) then into a de-esser (usually Sibliance or the Renaissance De-Esser) and it’s off to the races from there. Lately I’ve been experimenting with compression before EQ with a follow up slow and minor compressor at the end but it seems like I mix it up each time. The key is to experiment and keep trying things until things just lock in. I love using Waves Studiorack for this because it’s really easy to just move plugins around until I’m able to find what I want. All in all, I try to get through all that in about an hour or so and take a break right after (P.S. – if you didn’t already know it, they came out with a new version of StudioRack! Be sure to check it out!).
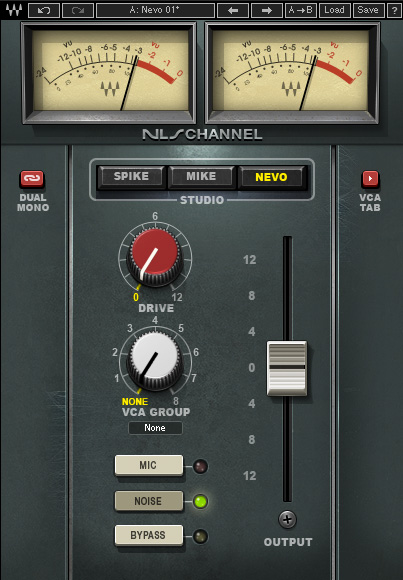
The last thing I wanted to talk about is a few quick tips and tricks I use while I’m working through this stage. First, on all my channels is the NLS channel plugin (NLS is also found at the end of my busses as well). I use this to help glue the inputs together as a whole as the plugin works hard to manage the summing emulation as if they were all running through a console together (adds warmth and I think cohesiveness). There is some magic sauce here when used correctly (make sure not to turn the drive up to much or you’ll start hearing that noise floor). If you don’t believe me, I’d really encourage you to A/B the plug with and without and hear the difference.
Secondly, for speed, I try to keep my bussing as simple as possible. Much like at FOH, simplicity brings consistency and speed. I know guys with more complicated setups and there are times when I need to create a more robust structure to accommodate for special circumstances but I like to try and keep things as simple as possible. I have 4 buss setup for the band (drums, instruments, tracks, and vocals with any FX fed into the one that fits of these four), 3 submaster busses (Music – all the non-vocal inputs, Vocals, Speech) and those three feed into the master. Having things grouped out like this allows for easy changes to large groups of inputs which makes the mastering much quicker (in my experience and opinion)
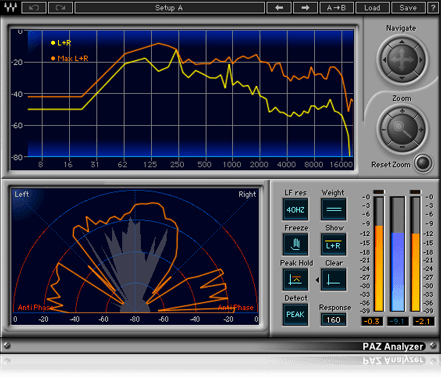
Lastly, if you’re getting stuck and just can’t find the sound you’re looking for, delete the entire plugin chain and start over. Think logically. Start with EQ. Pull your favorite EQ and start trying out some presets to get a new vibe (I love presets for this because they aren’t what you created, someone else did so you’re always on new ground). Once you have something, think about dynamics, don’t do what you always do, pull up something new. Experimenting is the key. Use your ears and hear your way out of the problem (if need be switch to headphones or speakers or your cell phone!). One of two things always happens to me when I do this. Either you find a new and often better way to do things or you learn that your original way actually sounded pretty good. Just don’t give up, keep experimenting, it’ll lock in eventually. One thing you can always experiment with is pan (careful here). If things sound weird, pan off some of the FX or tracks to the side a bit and give your mix some depth. I love using the PAZ-Analyzer to check the width of my mix.
Well that’s about it for this week, I was already a bit longer than I wanted but hopefully it has been a helpful read. As always if you have any questions sound off in the comments below or on Facebook. Next week I’ll be going over some of the ways I dial in a mix for broadcast and how I manage multiple songs that will be played back to back using automation. I’ll also be digging into mix relationships as well and talking about ways I mitigate bleed (especially in the drums). Sign up at this link to subscribe to the blog and you’ll get an email when that goes live! Remember we are all in this together, see you next week!
Do you send your mix to something like a AjaKipro and a LUF METER?
The last plugin in my chain on my master (right before export) is WLM Plus which is a LUFS meter. I shoot for -14 LUFS Long per song.